Use vimdiff Like a Vim Pro
Want to see the difference between two files? Normal users use diff command. Pro Vim users go for vimdiff.


Have you ever wondered of writing a vimscript such that, when you open two files, it highlights the differences between the opened files and shows you how they differ? Why do that when vimdiff exists?
What is vimdiff?
Vimdiff is essentially a mixture of sdiff and Vim under the hood. When you execute the vimdiff command without any arguments, you will be greeted with the default Vim user greeting. ;)
But, when you do open two or more files using vimdiff, the differences between each file are highlighted. If there are any indifferent lines, they will be folded when the number of lines different is larger than the number of lines that can be shown at once.
Using vimdiff
To understand vimdiff, let's start with a simple example.
I have two files, one.rs and two.rs. The only difference between them is that a period missing from the ellipsis from the 3rd line of the two.rs file.
Let's see that difference using the diff or sdiff command first.
$ sdiff one.rs two.rs
fn main() {                        fn main() {
    println!("Hello world!");          println!("Hello world!");
    println!("Exiting...");      |     println!("Exiting..");
}                                  }
As you can see, the sdiff command highlighted which line was different using the vertical bar symbol on that line.
The syntax for the vimdiff command is very simple. Specify two or more filenames.
vimdiff FILE1 FILE2 ... FILENAs I said, specifying no filename is valid but it will only show you the Vim startup user greeting. And, specifying only one filename won't be of much help since there is no second file to compare with.
Let's see the difference with vimdiff now!
vimdiff one.rs two.rs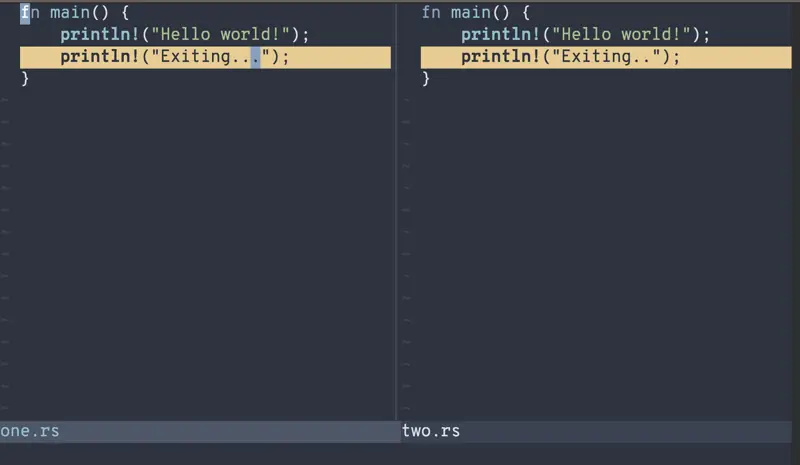
As you can see, the line which is different among both files has been highlighted (the color used to highlight will depend on the Vim color scheme that you use).
Even on the line that is highlighted, you can see that on the left, the last period of the ellipsis is highlighted to show that it is missing from the other file!
You can also see that the first file (one.rs) is to the left and the second file (two.rs) is to the right of the vimdiff window.
Quality of life changes
As I mentioned that vimdiff is just Vim being used in a specialized manner, we can use all the Vim command-line options here too!
Enabling numbers
This is purely cosmetic; meaning the line numbers displayed in Vim aren't "real" line numbers, as you will soon see. But, if you are like me, you want line numbers enabled.
We can enable that using the +{command} option like so:
vimdiff +'set number relativenumber' one.rs two.rs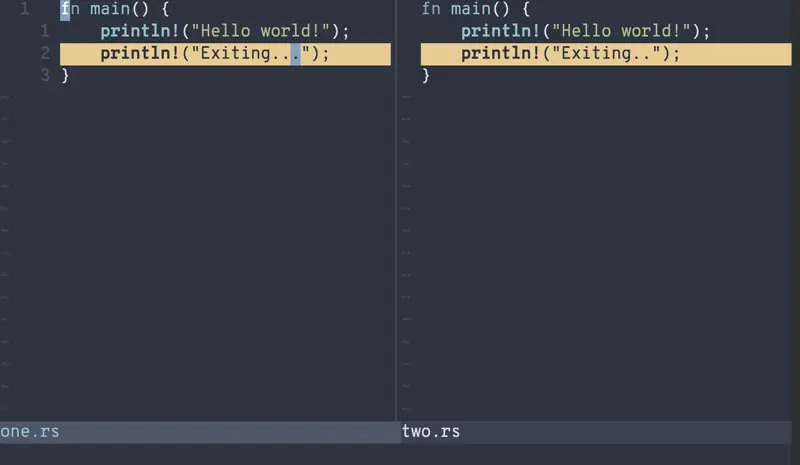
Horizontal splits
We know how useful vertical splits are. They are used very frequently to show how a line changed. But sometimes you can't figure out why a diff exists... "That looks the same to me, why does vimdiff say it's different?" (It turns out the diff had a minor typo.)
To detect such errors, I prefer to use a horizontal split. In such cases, pass in the -o argument so that the split is horizontal.
vimdiff -o one.rs two.rs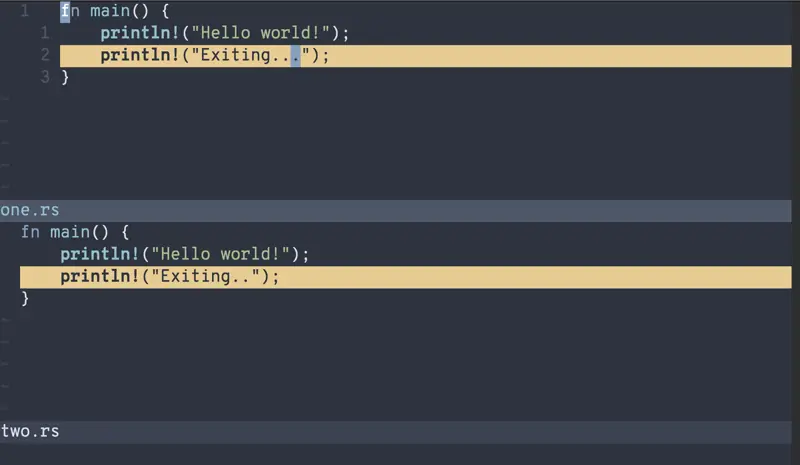
Simultaneous scrolling
This is not a configurable change but I just wanted to mention it since we are talking about improving the quality of life.
When you reach towards the bottom-most or the top-most of the visible buffer, the other buffer(s) will scroll with you when the current buffer scrolls up or down ;)
Here it is in action:
Layout of vimdiff
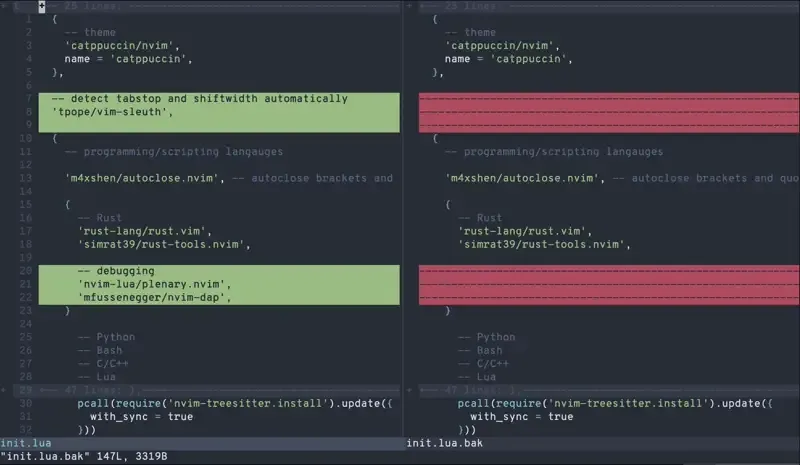
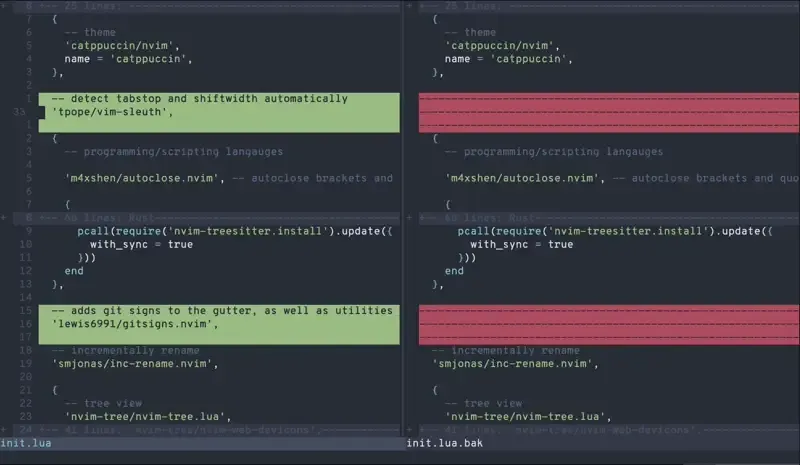
Before we start using vimdiff, it is essential to understand how the information is laid out. Let's understand that by opening my Neovim plugin file and a modified version of it.
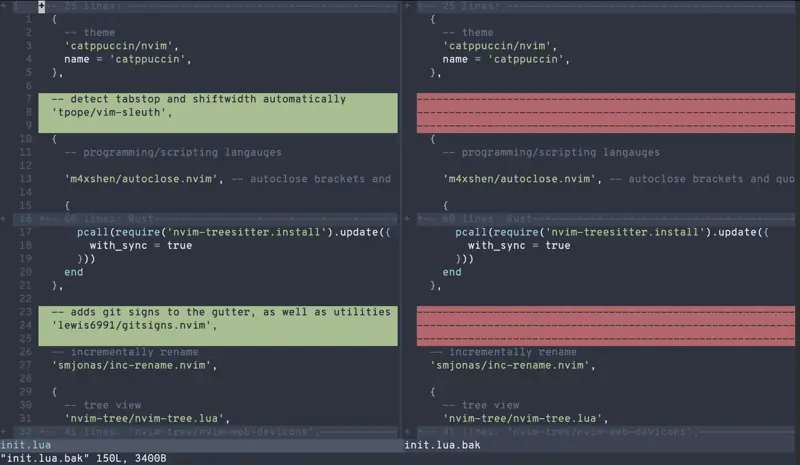
On the first line itself you can see that it says +-- 25 lines:. This means that there are 20 lines that are "folded" (collapsed).
Under that are some lines that are shown so that the user gets the context of where the difference is located.
Then, the difference is highlighted [as per your colorscheme's colors]. An absence of lines is shown as a line full of hyphens, as seen on the right split window.
Then, on the 17th line, there is again that line which says +-- 60 lines:. This again, shows that "60 lines are here, which are collapsed".
Again, there is another diff shown. And then at the bottom, it is again informed that the last 41 lines are folded.
And finally, at the very bottom, you can see the file name in the buffer. As I said, the first file argument is opened in the left-most buffer and the last file argument is opened in the right-most buffer.
Opening and closing folds
Though folded lines mean that they are 1:1 between files, there might be cases when you might want to see those lines regardless. To do so, the folded lines need to be unfolded.
To unfold the lines and later, optionally, fold them again, move the cursor to those lines first. Then, press one of the following key combinations:
z + o: Open the folded lines (unfold)z + c: Close the folds

Navigation
Now that you know the layout of the vimdiff window, let's start with the most basic thing: navigation.
Navigating to changes
Yes, you heard that right. Instead of lurking for changes, you can jump to the next or previous change!
Following are the key combinations to do so:
] + c: Move to the next change[ + c: Move to the previous change
Navigating between split windows
You are not stuck with editing only the current split window. As you can in Vim, you can navigate between split windows in vimdiff. If you have been using Vim, this will be a familiar motion for you.
To enter split navigation mode, press the Ctrl + w key combination first (<C+w>). Then, based on which direction you want your cursor to move, press one of the following key:
h: Move cursor to the split window on the leftl: Move cursor to the split window on the rightj: Move cursor to the split window on the bottomk: Move cursor to the split window on the top
Resizing the split windows
You can also resize the split windows since we are essentially using Vim. I've covered this already so please check out the article linked below if you are interested.

Applying diffs
The vimdiff tool allows you not only to edit the files manually, but even help you apply a particular diff from one file to another.
There are two commands for this based on what you want to do:
diffget: The diff to apply is in another split window and it should be applied in the current split window. Get the diff from another split window and apply that diff in the current split window.diffput: The diff to apply is in current split window and it should be applied in another split window. Send that diff from the current split window and apply that diff to another split window.
Let's take a look at that in action:
Undo-ing changes
We are all humans. Sometimes we need to rollback one change, sometimes we undo by mistake and need to redo it. Thankfully, the interaction with vimdiff is same as Vim. So use the following keys to perform the respective tasks.
u[ndo]: Undo the most recent changeCtrl + r: To redo the last undo (<C-r>)
Exiting Vim[diff]
That's it; we're at the biggest UNIX meme. How do I quit Vim[diff]? Well it is simple, you do either of the following:
:wqa[ll]: If you made changes in more than one split window and want to save all of those changes.:qa[ll]!: If you made changes in more than one split window but don't want to save any of those changes.:wq: If you made changes in current split window and want to save it.:q!: If you made changes in current split window but do not want to save it.
Conclusion
I mean, there is always the diff command but for a dedicated Vim user, the vimdiff works way better. It is an amazing tool that lets you visualize the differences between two files and edit them inside the comfort of Vim. It's a must-know tool for any pro Vim user.

Need more help in becoming a Vim pro user? This course could help you with that.
I hope you like this detailed tutorial on vimdiff. Let me know if you need any questions about it.
About the author
 Pratham Patel
Navigating through the world of Rust, RISC-V, Podman. Learning by doing it and sharing by writing it.