When you need to compare two files containing similar text in Linux, using the diff command can make your task much easier. The command compares two files to suggest changes that would make the files identical. Great for finding that extra curly brace that broke your newly updated code.
Using the diff command is very simple. Here’s the syntax:
diff [options] file1 file2But understanding its output is a different thing. Don’t worry, I’ll explain the output so that you can compare two files and understand the difference between them.
Understanding the diff command in Linux
You need a couple of files to get started with. I’ve generated a list using a random word generator.
I added the list to two different files and then I modified the list by:
- Changing list order
- Adding Letters
- Switching case
I saved these similar files as 1.txt and 2.txt. Here’s what they look like before you do anything.
I suggest that you follow the tutorial while reading so please create new files and add the following content to them.
Contents of 1.txt:
cobweb
locket
acoustics
expansion
record
Contents of 2.txt:
cobweb
LOCKET
acoustics
records
expansion
Example 1: Diff without options
Let’s see what happens when you run the diff command without any options.
christopher:~$ diff 1.txt 2.txt
2c2
< locket
---
> LOCKET
3a4
> records
5d5
< record
Confused? You’re not alone. The output is not exactly human-friendly. In order to understand what’s going on, you need to know more about how diff works.
It may be helpful to know that when the analysis is done, file2 [in the syntax] is treated as the reference document that you are trying to match with. So, you may say that diff works in this way:
diff <file_to_edit> <file_as_reference>This also means you will get different output based on the order you place the file names in.
The order matters
An example of how the output differs depending on the file order:
christopher:~$ diff 1.txt 2.txt
2c2
< locket
---
> LOCKET
3a4
> records
5d5
< record

christopher:~$ diff 2.txt 1.txt
2c2
< LOCKET
---
> locket
4d3
< records
5a5
> record
Important Symbols in the diff command output
Using the table below as a reference, you can better understand what is happening in your terminal.
| Symbol | Meaning |
|---|---|
| A | Add |
| C | Change |
| D | Delete |
| # | Line numbers |
| – – – | Separates Files in Output |
| < | File 1 |
| > | File 2 |
Let’s take another look at the diff command output:
christopher:~$ diff 1.txt 2.txt
2c2
< locket
---
> LOCKET
3a4
> records
5d5
< record
Explanation of the diff command output
Let’s see the first difference in the output:
| Output Line | Explanation |
|---|---|
| 2c2 | The line 2 of file 1, CHANGE with line 2 of file 2. |
| < locket — > LOCKET | Change “locket” to “LOCKET” to match file 2.txt |
Let’s take a look at the next part of the output:
| Output Line | Explanation |
|---|---|
| 3a4 | After line 3 of file 1, add line 4 of the file 2. |
| > records | That is to add “records” to create the 4th line in file 1. So that file 1.txt will match file 2.txt |
Similarly:
| Output Line | Explanation |
|---|---|
| 5d5 < record | Delete the text “record” from the 5th line of file 1. So that file 1.txt will match file 2.txt |
There is no spellchecking or dictionary function built into the command. It doesn’t recognize “record” and “records” as being related. Its only goal is to perfectly match the two files.
Looking at the output, it is still pretty tough to translate. It is unlikely that you would save a lot of time.
Fortunately, there are options that can be added to make things more human-readable. Let’s look at a couple of different examples using the same list.
Example 2: Diff in “Copied” context with -c
The context option gives a more visual representation over the more programmatic information displayed by default. Let’s continue with our example text.
More important symbols in the diff command output
| Symbol | Meaning |
|---|---|
| + | Add |
| ! | Change |
| – | Delete |
| *** | File 1 |
| – – – | File 2 |
christopher:~$ diff -c 1.txt 2.txt
*** 1.txt    2019-10-20 12:05:09.244673327 -0400
--- 2.txt    2019-10-20 12:11More:31.382547316 -0400
***************
*** 1,5 ****
  cobweb
! locket
  acoustics
  expansion
- record
--- 1,5 ----
  cobweb
! LOCKET
  acoustics
+ records
  expansion
It is much easier to understand when you see the information in this way. Instead of the alphanumeric output, the new set of symbols helps you to quickly identify the differences between the two files.
The output first displays the first file i.e. 1.txt and its line from 1 to 5. It says that there is a slight change in (part of) line 2 of the file 1.txt and (part of) line 2 of file 2.txt.
It also indicates that line number 5 of file 1 has been deleted (-) in the second file.
— 1,5 —- indicates the start of the second file and it says that line 2 is slightly changed from line 2 of file 1. It also indicates that line 4 has been added (+) in the second file and there is no corresponding line in file 1.
Example 3: Diff in “Unified” context with -u
This option provides output similar to the copied context format. Instead of displaying the two files separately, it merges them together.
christopher:~$ diff 1.txt 2.txt -u
--- 1.txt    2019-10-20 12:05:09.244673327 -0400
+++ 2.txt    2019-10-20 12:11:31.382547316 -0400
@@ -1,5 +1,5 @@
 cobweb
-locket
+LOCKET
 acoustics
+records
 expansion
-record
As you can see, it uses the same symbols as before, but instead of the change symbol, it suggests changes to be made using easy to read + or - symbols. Here, it recommends that you remove line 2 from 1.txt and replace it with line 2 from 2.txt.
Going forward, it also suggests that you add records after line containing acoustics and delete line record after the line containing expansion.
All these changes are suggested for the first file in the diff command. This is another scenario where it helps to remember that the diff program uses the second file listed as the ‘original’ or basis for corrections.
For comparing a list like this, I personally find this method easiest to use. It gives you a clear visualization of the text that needs to be changed in order to make the files identical.
Example 4: Compare but ignore cases with -i
Case-sensitive searches are the default for diff but you can turn this off. Let’s look at what happens when you do that.
christopher:~$ diff 1.txt 2.txt -i
3a4
> records
5d5
< record
As you can see “locket” and “LOCKET” are no longer listed as suggested changes.
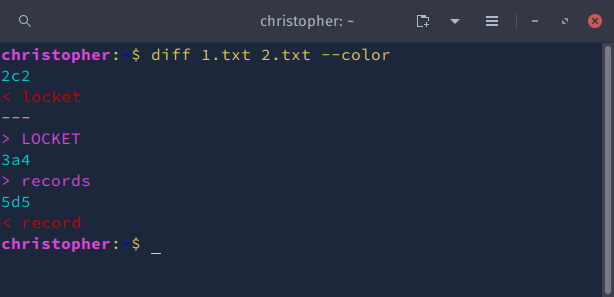
Example 5: Diff with –color
You can use --color to highlight changes in the diff command output. When the command is run, sections of output will be printed in different colors from the terminal palette.
Example 6: Quick analyze files with diff command options -s and -q
There are a couple of simple ways to check whether or not files are identical. If you use -s it will tell you the files are identical or it will run diff as normal.
Using -q will only tell you that the files “differ”. If they do not, you will get no output.
christopher:~$ diff 1.txt 1.txt -s
Files 1.txt and 1.txt are identical
christopher:~$ diff 1.txt 2.txt -q
Files 1.txt and 2.txt differ
Bonus Tip: Using diff command in Linux with large text files
You might not always be comparing such simple information. You may have large text files to scan and find differences in. I’ll detail a few methods for handling this type of problem.
For this example, I created two files with big chunks of text (lorem ipsum). Each line has hundreds of columns. This obviously made comparing lines difficult.
When diff is run on a file like this, the output generates huge chunks of text and the symbols are difficult to see even with tools like the contextual output.
To conserve space, I took a screenshot of the output for you to look at.

Not very helpful, is it?
You can use some of the same concepts to analyze these kinds of files. They will not work well unless the file is properly formatted. Some large blocks of text do not have line breaks. You have probably encountered a file like this where you needed to enable “Word Wrap” in order to get all the text to display within the allotted space without using a scrollbar. The reason this happens is some text formats don’t create line breaks automatically. This is how you end up with the large chunks of text on only 2-3 lines. There is a pretty easy fix for this.
Use fold to wrap text into lines
This is Linux Handbook so, naturally, we have a solution for you and we can cram a mini tutorial in. There is a great write-up on fold (Unix) and fmt (GNU) here. I’ll give a quick example that should be pretty self-explanatory though to move us forward.
The fold command is used to break lines using the number of columns. It can be customized to give you options on how these new line breaks are implemented.
In the example here, you are going to separate the file into a standardized width and use the -s option. This tells the program to break ONLY where there is whitespace, not in the middle of text.
Use fold to quickly insert line breaks
fold -w 80 -s lorem.txt > lorem.txt
fold -w 80 -s lorem2.txt > lorem2.txt
With both files broken up into 31 lines instead of 3, you can compare them much more effectively. Here’s an example of your output with the unified context filter.
christopher:~$ diff lorem.txt 2lorem.txt -u
--- lorem.txt    2019-10-27 09:39:07.298691695 -0400
+++ 2lorem.txt    2019-10-27 09:39:08.370704501 -0400
@@ -1,10 +1,10 @@
 Lorem ipsum dolor sit amet, consectetur adipiscing elit. Vivamus in tincidunt
 sapien. Maecenas sagittis ex risus, in vehicula turpis imperdiet sed. Phasellus
 placerat posuere maximus. In hac habitasse platea dictumst. Ut vel tristique
-eros, sit amet sodales nibh. Maecenas non nibh a nisi porttitor porta.
+eros, sit amet sodales nibh. Maecenas non nibh a nisi porttitor PORTA.
 Suspendisse at mauris vitae sapien euismod tincidunt. Sed placerat finibus
 blandit. Duis ornare ante at ipsum accumsan, nec bibendum nibh tincidunt.
-Nullam ut rhoncus risus. Phasellus est ex, tristique et semper eu,
+Nullam ut rhoncus risus. Phasellus est ex, tristique et semper eu, facilisis
 vitae enim. Nam condimentum, purus nec semper efficitur, nisi quam vehicula
 sem, eget finibus diam ipsum suscipit velit.

@@ -21,7 +21,7 @@

 Maecenas lacinia cursus tristique. Nulla a hendrerit orci. Donec lobortis nisi
 sed ante euismod lobortis. Nullam sit amet est nec nunc porttitor sollicitudin
-a ut orci. Ut euismod, ex at venenatis mattis, neque massa dignissim QUAM, at
+a ut orci. Ut euismod, ex at venenatis mattis, neque massa dignissim quam, at
 interdum mi metus vel tellus. Fusce nec dui a risus posuere mattis at eu orci.
 Proin purus sem, finibus eget viverra vel, porta pulvinar ex. In hac habitasse
 platea dictumst. Nunc faucibus leo nec tristique porta. Phasellus luctus ipsum
Use diff with –minimal output
You can make this a little easier to read with the --minimal tag. This makes larger text files a little easier to read. Let’s have a look at the output.
christopher:~$ diff lorem.txt 2lorem.txt --minimal
4c4
< eros, sit amet sodales nibh. Maecenas non nibh a nisi porttitor porta.
---
> eros, sit amet sodales nibh. Maecenas non nibh a nisi porttitor PORTA.
7c7
< Nullam ut rhoncus risus. Phasellus est ex, tristique et semper eu,
---
> Nullam ut rhoncus risus. Phasellus est ex, tristique et semper eu, facilisis
24c24
< a ut orci. Ut euismod, ex at venenatis mattis, neque massa dignissim QUAM, at
---
> a ut orci. Ut euismod, ex at venenatis mattis, neque massa dignissim quam, at
You can combine any of these tips or use some of the other options listed in the diff man pages. This is a powerful and easy to use software utility.
Conclusion
The use of diff is not limited to files. You can also use diff to compare directories.

I hope you found this article useful. If you have a tip, don’t forget to leave us a comment and tell us about it.