No matter if you are a sysadmin or a software developer, if you work in the Linux terminal, you would face the situation where you need to edit text files in the terminal.
When you are restricted to the terminal, you must use one of the command line editors like Vim. Most of us are accustomed to the GUI editors and this causes a problem because using a command line editor is not the same as using a graphical text editor like Atom.
There are several command lines text editors available and you are free to use any of them. Vim is one of the most popular command line text editors and you’ll find it installed on any standard Linux distribution. This is why learning the basics of Vim will help you a lot.
Now, this is not a comprehensive guide to make you a Vim expert. It’s a comprehensive Vim guide intended to provide you with enough to survive Vim in the Linux terminal.
I hope you did install Vim on Ubuntu or whichever Linux distribution you are using.
Basic Vim Commands Cheat Sheet
If you have worked with Vim previously, maybe you just want to refresh your memories by looking at this Vim cheat sheet:
| Vim Command | Description |
|---|---|
| i | Enter insert mode |
| Esc | Enter command mode |
| x or Del | Delete a character |
| X | Delete character is backspace mode |
| u | Undo changes |
| Ctrl + r | Redo changes |
| yy | Copy a line |
| dd | Delete a line |
| p | Paste the content of the buffer |
| /<search_term> | Search and then cycle through matches with n and N |
| [[ or gg | Move to the beginning of a file |
| ]] or G | Move to the end of a file |
| :%s/foo/bar/gci | Search and replace all occurrences with confirmation |
| Esc + :w | Save changes |
| Esc + :wq or Esc + ZZ | Save and quit Vim |
| Esc + :q! | Force quit Vim discarding all changes |
You can download the above commands as PDF as well. Download it, print it and keep it on your desk for quick reference.
Don’t worry, I am going to explain these basic Vim commands in detail as well.
Understand the Vim modes
Before we start, let’s know about the Vim modes. Vim has three modes:
- Command Mode: When you start Vim, you are placed in Command mode. In this mode, you can move across the screen, delete text and copy text.
- Insert Mode: You cannot write text in command mode. To write text (or let’s say insert text) into a file, there is a dedicated insert mode. When you want to write something on a file, you must enter the insert mode.
- Visual mode: Somewhat like command mode but here, you can use the arrow keys to select text across lines (instead of directly working on words and lines based on cursor position).
Once you know the Vim modes, let’s see some basic Vim commands for various purposes.
Entering insert mode in Vim
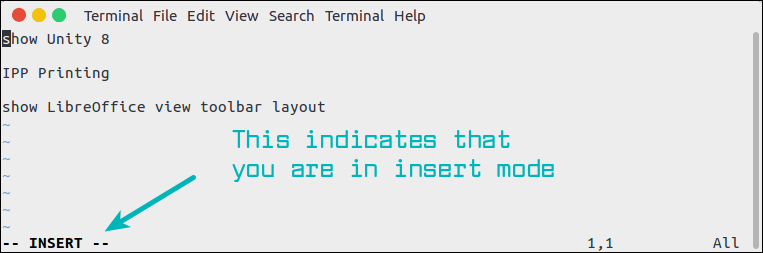
Always remember, i stands for insert mode. You press the ‘i’ key to enter the insert mode.
When you enter the insert mode, you’ll see — INSERT — at the bottom of the editor/terminal screen. This indicates that you are in insert mode.
But i is not the only way to enter the insert mode. There are several other commands to enter the insert mode in Vim. The cursor position is important while entering the insert mode.
- i – New text will appear before the cursor
- a – New text will appear after the cursor
- I – New text will appear at the beginning of the current line
- A – Next text will appear at the end of the current line
- o – A new line is created after the current line
- O – A new line is created before the current line
Going back to command mode in Vim
You start in command mode, you go in to insert mode. If you want to move back to the command mode, press Esc (escape) key.
When you have entered your text, I advise hitting Esc key to enter command mode. This way, you won’t enter any new text unknowingly, involuntarily.
Moving around in Vim
When you are in Vim, you cannot use your mouse to click at in point in the screen like normal text or code editors. This is why you need to know the movement commands to a certain line or word or position in Vim.
Vi/Vim purists will suggest using h, j, k and l keys for moving up, left, right and down respectively when you are in the command mode. While this is applicable to both Vi and Vim editors, I don’t prefer using these weird key-combinations.
I use arrow keys for moving around in Vim. It works well even when you are in insert mode in Vim. That’s the standard way of moving around that most of the newer generation is accustomed to.
If you are new to Linux or to Vim, you may opt for the arrow keys. No harm done.
However, if you want to be a bit more proficient with Vim, you may want to memorize a few Vim shortcuts for easily moving around the screen. Some of my favorite Vim movement commands are:
- H – Move to the top of the screen. Note that it doesn’t always mean moving to the first line in the file. It’s just for moving to the top of the visible screen.
- L – Move to the bottom of the screen. Note that it doesn’t always mean moving to the last line in the file. It’s just for moving to the bottom of the visible screen.
- M – Move to the middle of the screen.
- [[ – Move to the first line of the file. You can also ue gg here.
- ]] – Move to the last line of the file. You can also use G here.
- nG – Move to line number n. Note that you won’t see anything on the screen while typing the line numbers.
As you can see, with these additional movement commands, it will be easier for you to move around in a big text file. You can learn more movement commands like { and } for moving back and forth paragraph, w for moving word by word etc.
You can also use ‘repeater modifiers’ like nG you just saw with most commands in Vim. For example, if you use 5w, it will move 5 words. If you use 6H, it will move to the 6th line from the top of the screen.
Repeater modifiers also work with ‘i’ and this is where many people make mistakes. If you have accidentally pressed a number like 7 before pressing ‘i’ to go into insert mode, whatever text you type will be added 7 times. You won’t see it on the screen immediately until you start saving the document.
So what to do when you make a silly mistake like this? Undo it.
Undo your changes in Vim
If you made a mistake in Vim, you don’t have to live with it forever. I have also seen people quitting the editor without saving in such cases which is sort of ridiculous.
Vim allows you to undo and redo your changes. You can also redo your changes. It’s all applicable in the same session, of course. Once you have saved your changes, you cannot undo it.
To undo a change, go to command mode and press ‘u’ key. You can press it several times for multiple undo actions.
If you want to redo a change, press Ctrl+r key combination in the command mode. You can press it several times for multiple redo actions.
Deleting in Vim
Apart from undoing your changes, you might also want to delete some text from the file. In Vim, you can always use the Delete key for deleting a character but there are a few key combinations for better handling the deletion in Vim.
- x – Delete the character at the current cursor position just like a delete key
- X – Delete the character before the current cursor position like a backspace key. Note that the backspace key itself doesn’t work in Vim.
- dw – Delete word. Actually, it deletes from the current cursor position till the end of the current word plus the white space after it.
- dd – Delete the current line.
- d$ – Delete from the current cursor position till the end of the line.
- dG – Delete from the current cursor position till the end of the file.

Copy-Pasting in Vim
You might wonder how to copy paste in Vim. This is a legitimate concern because you won’t always type in the texts.
There are two kinds of copy and paste in Vim. One that deals with the buffer and one that deals with the ‘external’ text.
When you are in command mode, you can either use your Linux terminal shortcuts for copying the text or the following key combinations for copying text:
- yw – Copy word. Actually, it copies from the current cursor position till the end of the current word plus the white space after it.
- yy – Copy current line.
- y$ – Copy from the current cursor position till the end of the line.
- yG – Copy from the current cursor position till the end of the file.
Suppose you used one of the delete commands discussed above. The deleted text is placed into the buffer. You can paste this text from the buffer using these two paste commands:
- p – Paste the contents of the buffer before the cursor position
- P – Paste the contents of the buffer after the cursor position
Note that if you have deleted an entire line, the contents will be placed before or after the current line with the above-mentioned paste commands.
The paste commands only work with the Vim buffer. What about the text you copied from some other file? In those cases, you can use the standard copy and paste key combinations of your Linux Terminal.
In Ubuntu and many other Linux distribution’s default terminal, Ctrl+Shift+C is used for copying and Ctrl+Shift+V is used for pasting. In some other terminals, selecting a text copies it and you can paste it using the right click.
Whatever may be the way to copy paste in your Linux terminal, you can also use it in Vim. Just make sure that you are in the insert mode for this type of copy pasting.
Searching for text in Vim
Finding a particular text is an important function of a text editor. You can search for text in the file in Vim using ‘/’.
In the command mode, use / and then type your search text and press enter. You’ll see whatever you are typing in the bottom left of the screen.
It will do a forward searching for the searched term from your cursor position. You can also use ‘?’ and then type your search term and press enter to perform a backward search. Note that the search is case sensitive.
If there is more than one match for your search text, you can jump to the next position by pressing n key. If you want to go back to the previous match, press N. Basically, with n and N you can cycle through all the matches. Tip: You can use \c option to run a case-insensitive search in Vim. Example: /\cMy_Search
Search and Replace in Vim
Vim provides a substitute command (:s) for searching and replacing text. It relies heavily on regular expressions (regex) for search and replace.
You can use it in the following fashion:
:%s/foo/bar/gThe above command will replace all the ‘foo’ with ‘bar’ in the entire file. The ‘g’ at the end is responsible for extending the search and replace function on all the matches. Otherwise, only the first match is replaced.
:s/foo/bar/gThe ‘:s’ command will do the exact same function as above but only in the current line instead of the entire file.
By default, the search is case sensitive. To make it case insensitive, you can use the flag ‘i’ along with g.
:%s/foo/bar/gciI added an additional ‘c’ flag here. Actually, you might not feel comfortable with the idea of your entire matching text getting replaced in the entire document within seconds. This is where ‘c’ flag helps a lot. With this confirm flag, Vim will ask you to confirm if you want to perform a replacement on each match.
In confirmation mode, you’ll be presented with the following option: replace with UU (y/n/a/q/l/^E/^Y)?
Let me explain the choices here:
- y – YES, replace this match
- n – NO, don’t replace this match and move to the next one
- a – Replace ALL matches
- q – QUIT without replacing any match
- l – Replace this match and quit as if it was the LAST match
- ^E – Scroll the screen up
- ^Y – Scroll the screen down
Saving and quitting Vim
You have just learned the basics of Vim commands. It’s time to save your work and exit Vim. To save or exit Vim, you must enter the command mode first by press Esc key. And then you can use the following options:
- :w – Save the changes but don’t exit
- :wq – Save and quit
- :q – Just Quit (if you have unsaved changes, you’ll see this warning: E37: No write since last change (add ! to override))
- :q! – Force quit (it will discard any unsaved changes)
Download Vim Command Cheat Sheet in PDF format
I can understand that if you are new to Vim, remembering what you just learned could be difficult. This is why I created a list of basic vim commands and their quick explanation.
You can download this Vim cheat sheet in PDF format, print it and keep at your desk for a quick reference.
Going further with Vim
Well, you just learned all the Vim basics you need to survive this dreadfully awesome text editor. With this much knowledge, you can read text, search text and do some basic editing in Vim. This will be enough to save you a panic as soon as the idea of using a terminal text editor like Vim strikes you.
You should bookmark this page to refresh what you learned on Vim here. You can also use the vimtutor command. Most Linux distributions have the vimtutor command installed. If you feel like brushing your Vim knowledge or practicing Vim commands, just run vimtutor in a terminal.
If you want to take your Vim skills to next level, I highly recommend the Mastering Vim Quickly resource. It's worth the investment.
I hope this guide helped you to get started with Vim. If you have questions or suggestions, please leave a comment.