Clustering and High Availability With proxmox
Utilize the versatility of Proxmox by creating a cluster of nodes and setting up high availability.

One of my favorite features of Proxmox is its ability to form clusters from multiple nodes (servers).
For example, if you have 3 physical servers with Proxmox installed on each of them, you can cluster them together. This way, if you need to take a node down for maintenance, you can simply move the VMs on that node to another server while not incurring any downtime.
The other thing you can do is, if you have at least 3 physical servers in a cluster, you can set up high availability between the three servers.
Proxmox requires at least 3 nodes for this function because it uses quorum to determine which node that the VMs will be automatically transferred to if a node goes down unexpectedly. You will also need a NAS or some type of shared storage for this to work correctly.
In this tutorial, I will be showing you how to create a cluster out of three nodes, set up high availability, and remove nodes from a cluster, which doesn't seem to be well-documented officially, and can be kind of messy if you do it the wrong way.
Creating a 3 node cluster in Proxmox
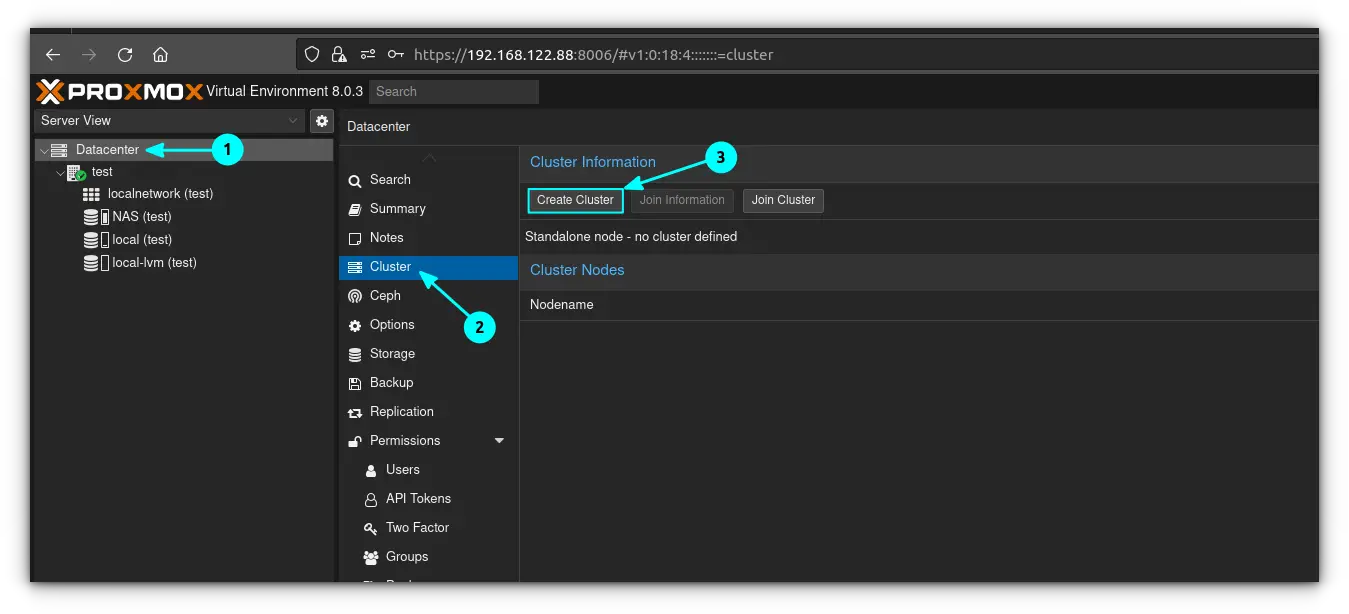
This will require at least 3 physical Proxmox servers. You can create a cluster with two, but HA will not function if there are less than 3 nodes in a cluster. Go ahead and log into the first server, click on the "Datacenter" tab, click on "Cluster" and "Create Cluster":
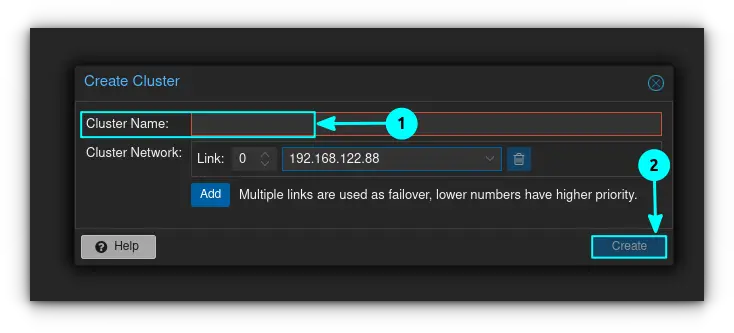
Go ahead and give the cluster a name and then click on "Create"
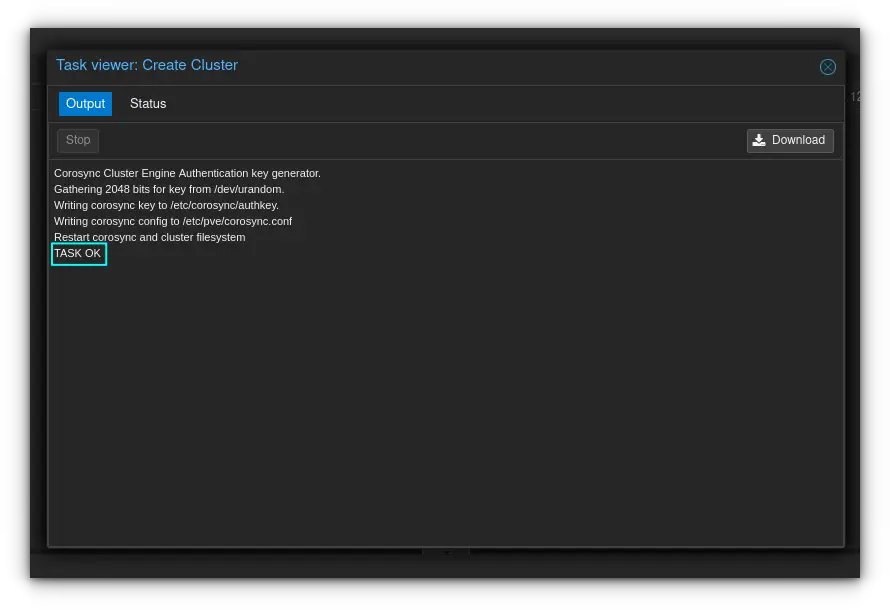
As usual with proxmox, the cluster creates itself and returns "TASK OK" when complete. Close the activity window:
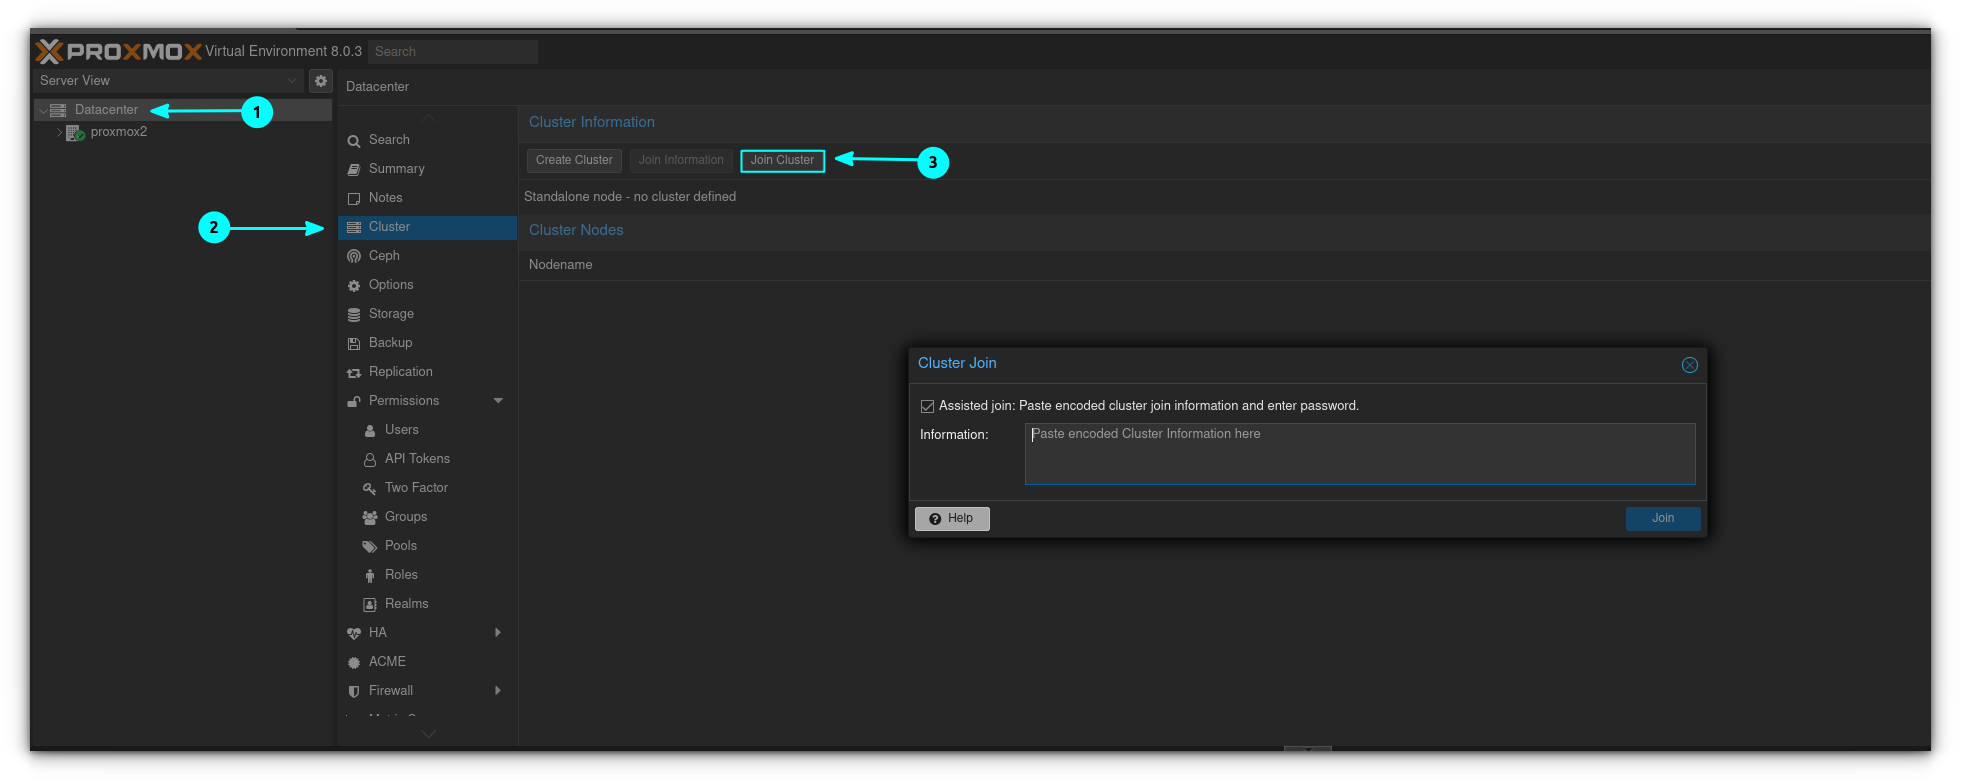
Go to your second server, click the "Datacenter" tab once again, and click "Join Cluster"
Go back to your first server and click on "Join Information" followed by "Copy Information":
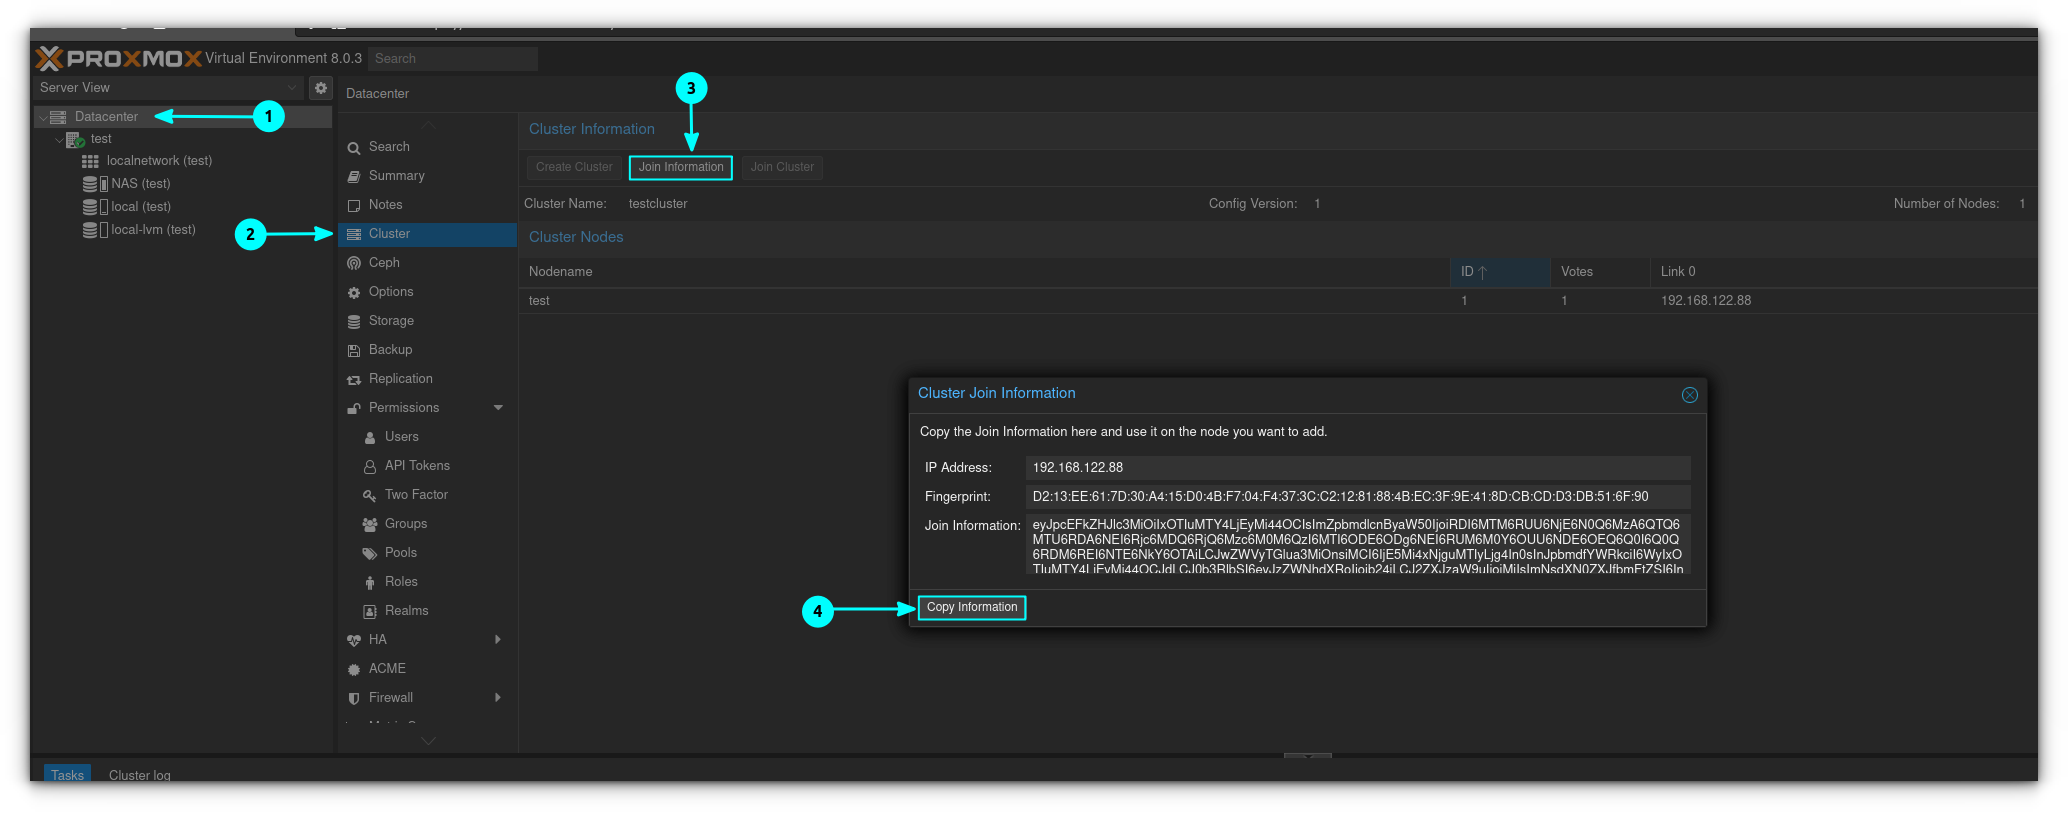
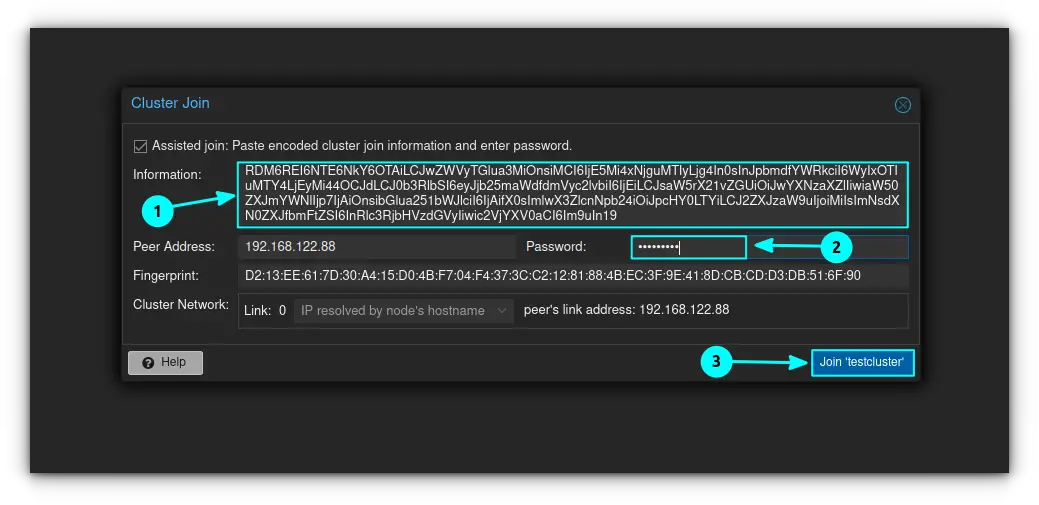
On the second server, hit "Control V" in the information window to populate the fields. Make sure you enter the root password of the first server in the field below it. If everything looks good hit "join testcluster (depending on the name you gave your cluster this will vary):
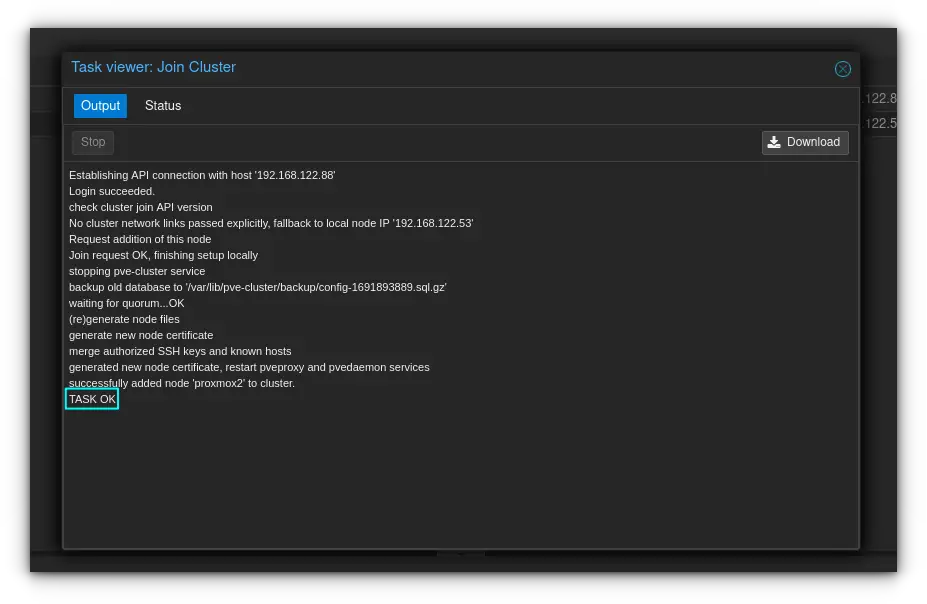
The join operation will commence. If it hangs, just refresh the entire page and re-login. You'll end up with a screen like this :
And you will have 2 nodes in your cluster as so:

In order to add the third node, you log into the node and hit "Cluster" again in the Datacenter tab. You then go back to our first node, copy the "Join Information" and paste it into the appropriate area on the Join Information box, along with the root password. You can basically repeat from step 4 at this point. You'll end up with all three nodes being shown on all proxmox installations like this :

High Availability with a 3 node cluster
The nice thing about having HA is that if a node (server) goes down for whatever reason, the virtual machines on that server will automatically move themselves to a different node. They do this using quorum (a vote is taken, and the winner gets the VMs from the failed node). It is possible to set up a "quorum node" - which is a node that doesn't host any virtual machines, but just votes. That is out of the scope of this article however. To set up HA, I have my "test" VM set up, stored on my first server on my NAS here like this:
To start, log into one of your nodes, and click on the "Datacenter" tab, followed by the HA option to the right of it and below.
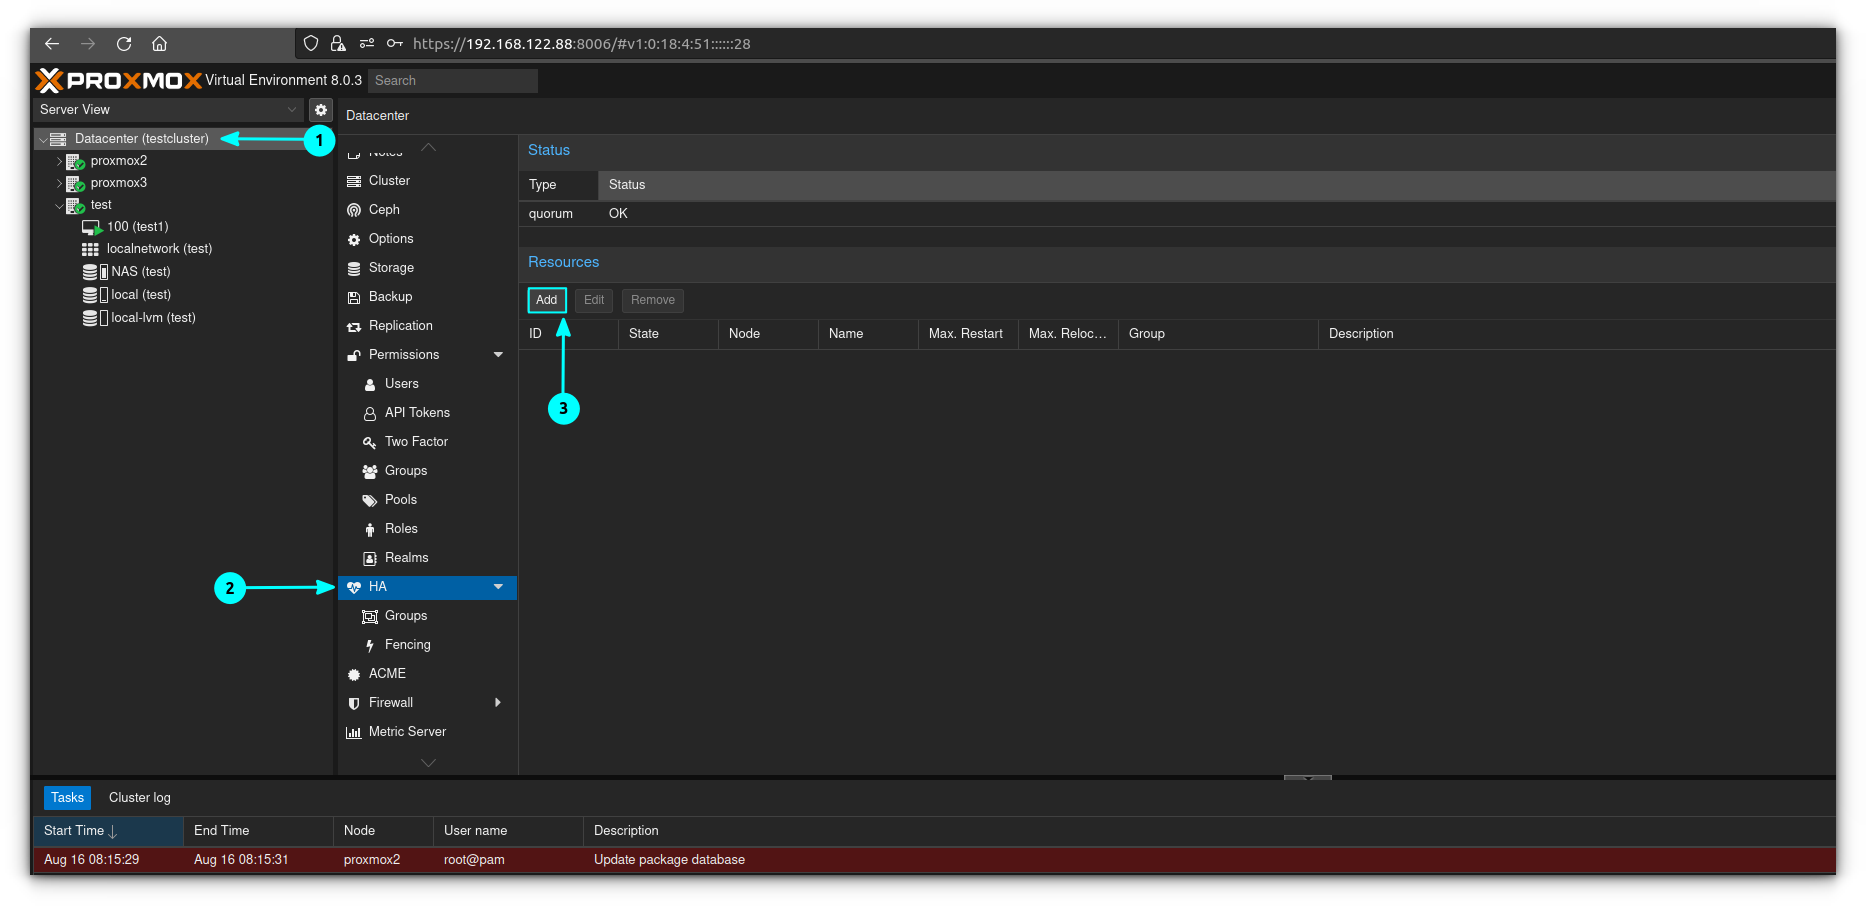
Click on "Add" and select the desired VM. I only have one VM, so that's the one I'm using.
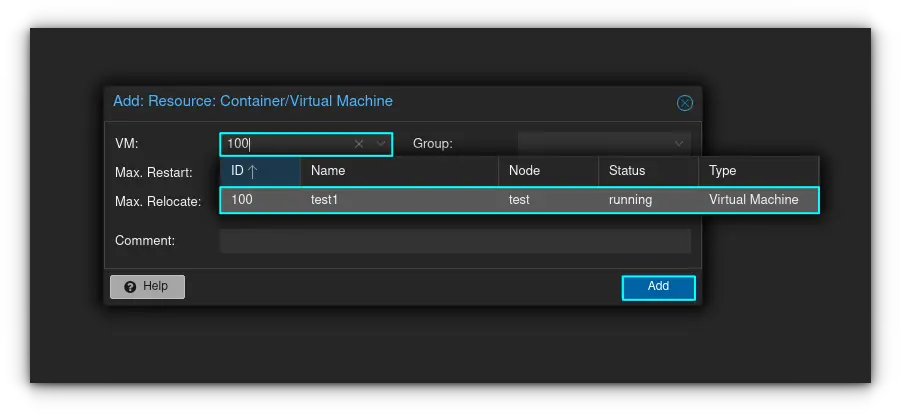
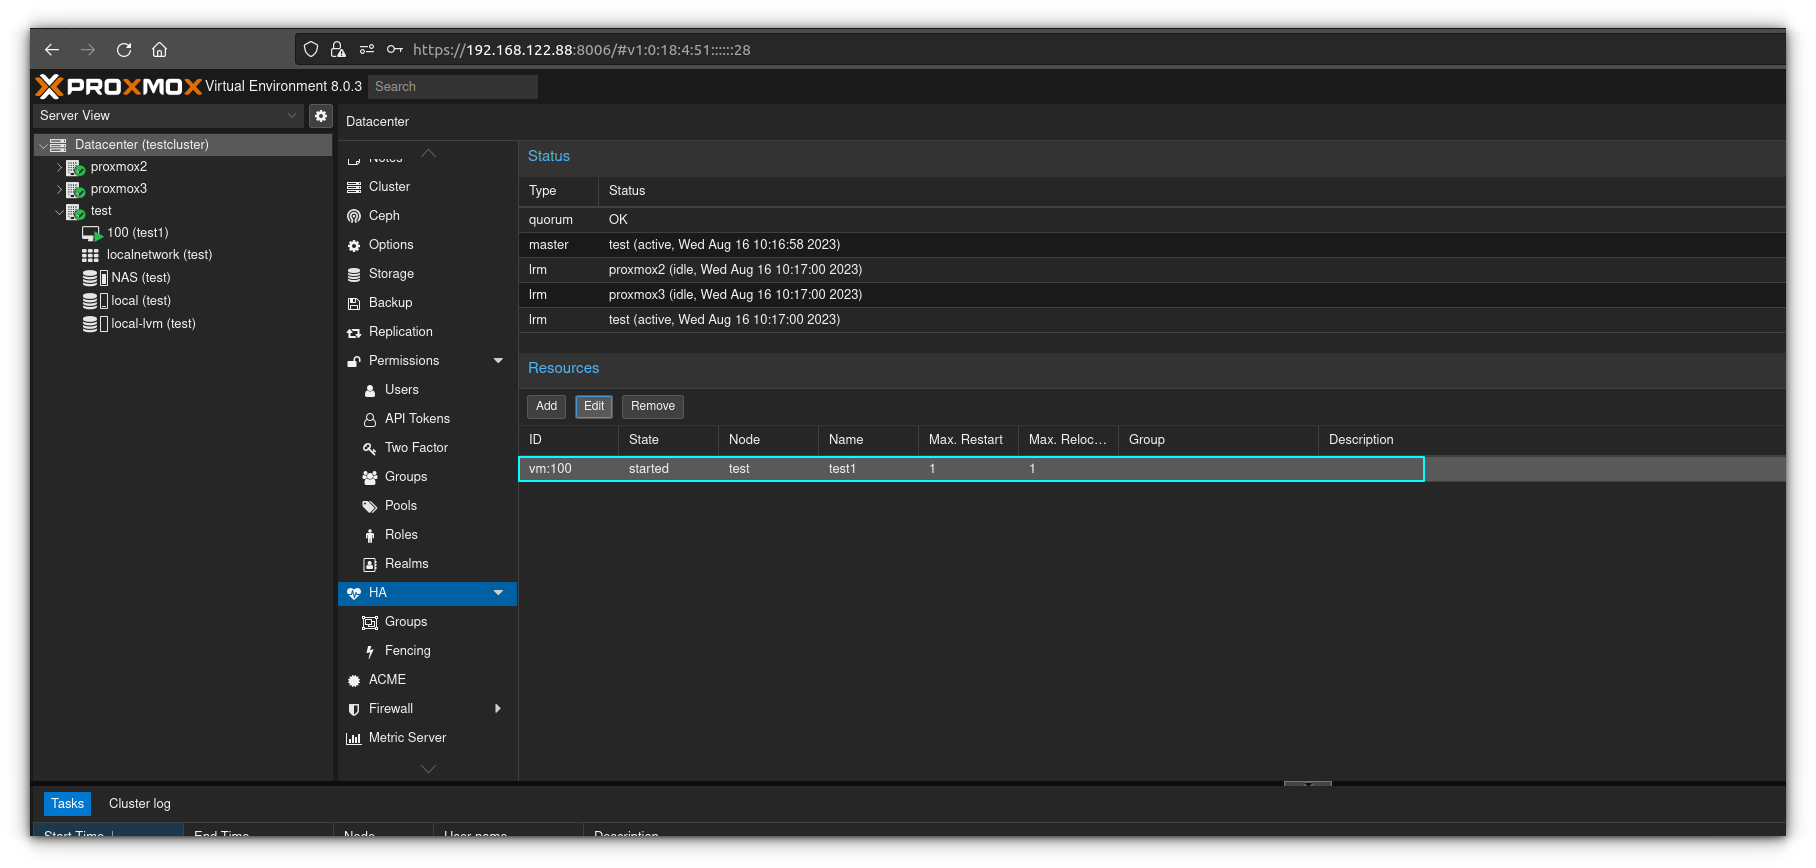
You'll now see the VM in the list of machines that are being monitored for HA. You'll notice that if you shut down the node that the virtual machine is being hosted on, the VM will automatically move itself to a node that's powered on.
Removing a node from a Cluster
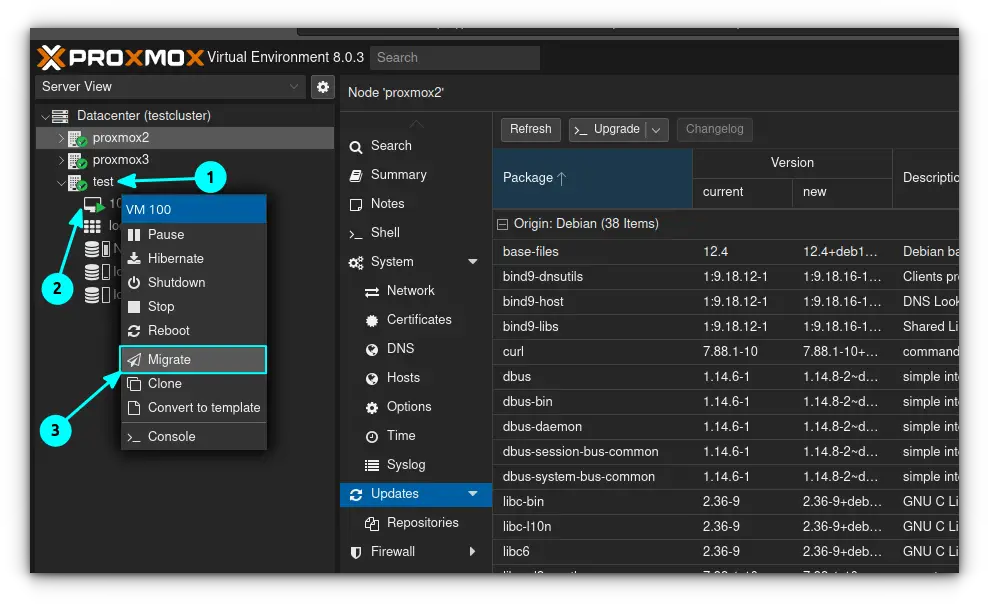
The first thing you want to do is move all the VMs off of the node you're going to remove. Also make sure you have backups of everything, just in case something goes wrong. To migrate a node you'll want to right click on it, and click "migrate"
In the window that pops up, you'll want to select the node you want to move the VM storage to and click "Migrate". Make sure your virtual CD/DVD drive is empty when you do this, or it will complain and refuse to migrate.
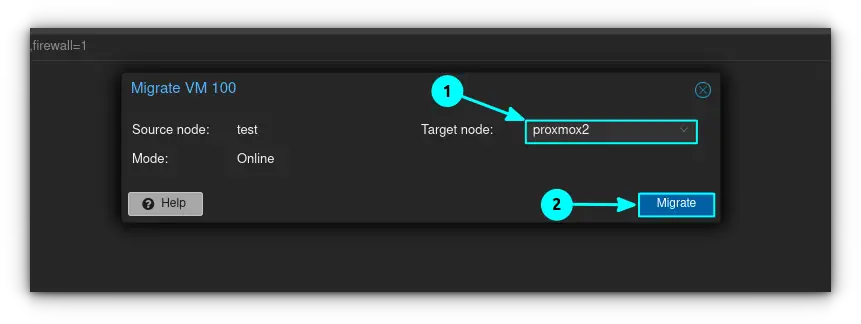
The virtual machine will take a couple of moments to migrate, but it should give you a TASK OK if everything went well.
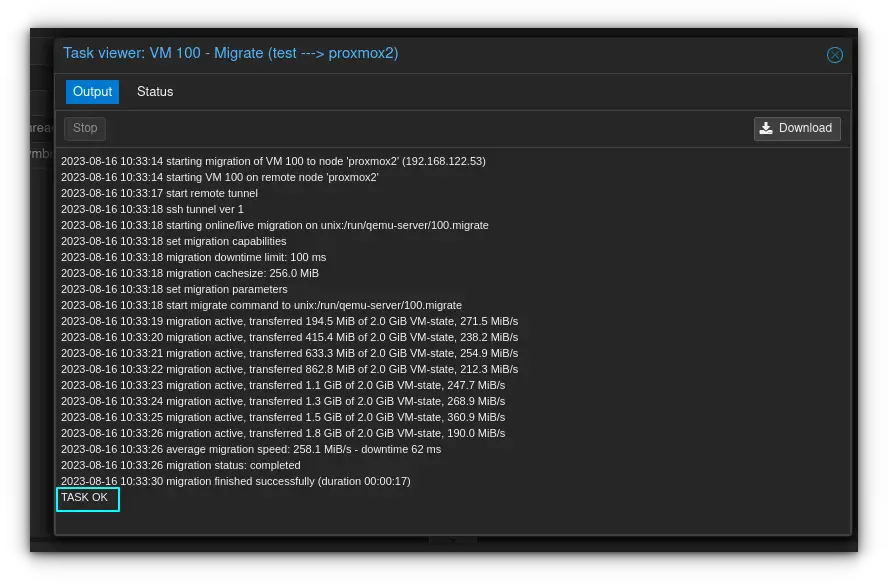
At this point you should make sure you're not logged into the node you want to remove. If you are, go ahead and log out of Proxmox.
SSH into a different node using the terminal as shown below:
ssh [email protected]In my case, I'm going to be removing the "test vm". You can see I'm logged into the proxmox2 VM because it says "local".
root@proxmox2:~# pvecm nodes

Membership information
----------------------
    Nodeid      Votes Name
         1          1 test
         2          1 proxmox2 (local)
         3          1 proxmox3
root@proxmox2:~#
Go ahead and power down the node by clicking on it, and then clicking "Shutdown" on the right hand side:
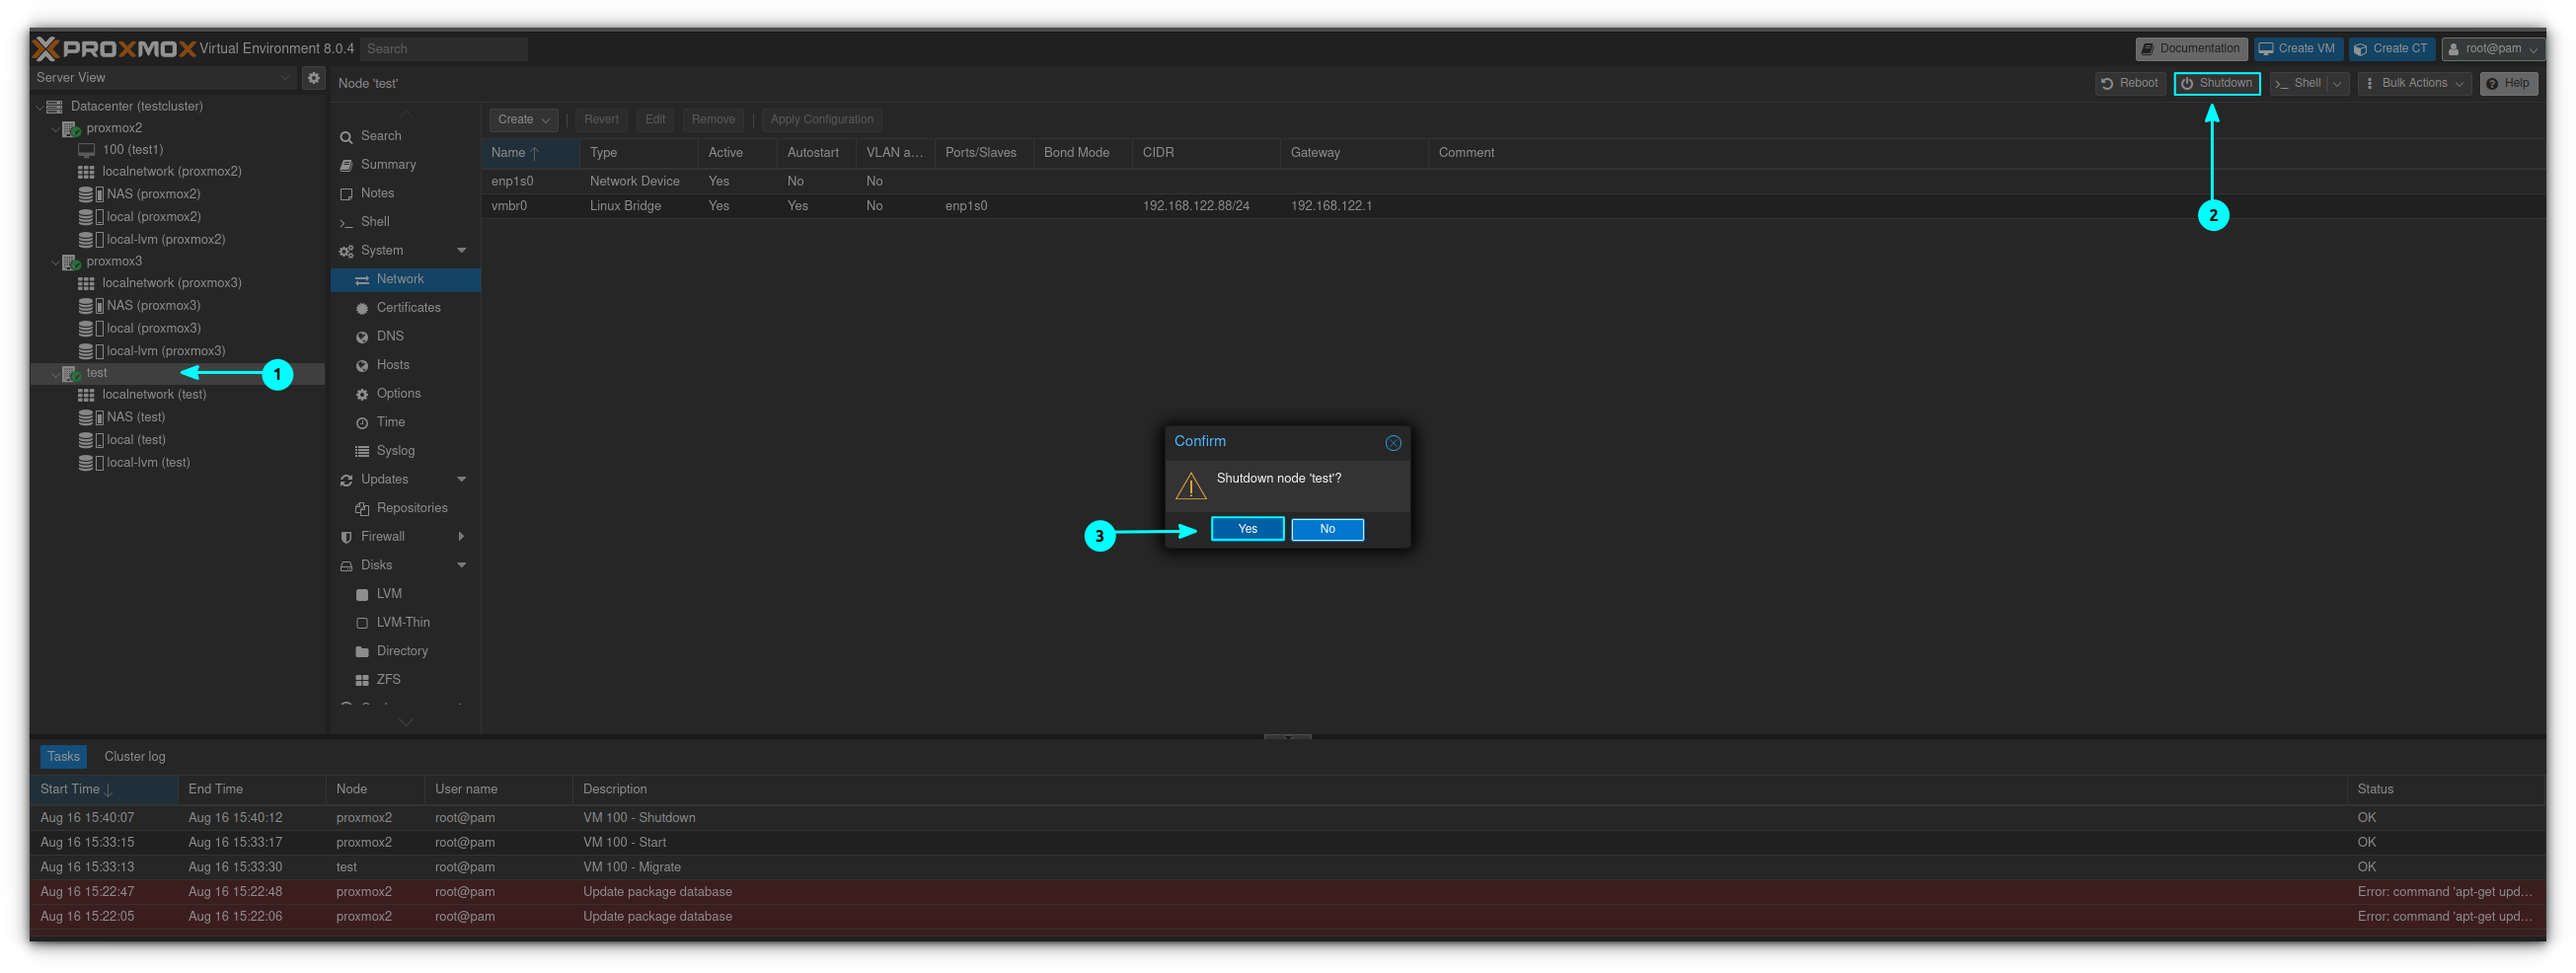
Go ahead and confirm the shutdown, and wait for the node to power down.
You can now remove the node from the cluster using the following command in your SSH session:
root@proxmox2:~# pvecm delnode test
Could not kill node (error = CS_ERR_NOT_EXIST)
Killing node 1
root@proxmox2:~# pvecm nodes

Membership information
----------------------
    Nodeid      Votes Name
         2          1 proxmox2 (local)
         3          1 proxmox3
root@proxmox2:~#
If you get an error like above, it can be safely ignored.
You can now verify that the node has been removed using the following command:
root@proxmox2:~# pvecm statusDate: Wed Aug 16 10:47:23 2023
Quorum provider: corosync_votequorum
Nodes: 2
Node ID: 0x00000002
Ring ID: 2.11
Quorate: YesYou can see that the node is removed from the cluster by looking at the "Nodes" section under "quorum information".
Note that if you want to readd the node to the cluster, you'll have to reinstall Proxmox on the node, and add again using the instructions above.