

Ghost is an open source CMS platform which is lightweight, fast and has focus on building a membership website.
You can always opt for managed hosting from Ghost itself. But since it is an open source software, you are also free to host it on your own server and manage it yourself.
Thanks to cloud services like Linode and DigitalOcean, deploying a new Linux server with Ghost installed becomes a matter of a few clicks.
While deploying Ghost on cloud servers is a relatively easier task, managing Ghost may not always be that easy.
We have been managing our Ghost instance to host Linux Handbook for several months now. And this experience has taught us several things that you probably won't find in the official Ghost documentation.
In this article, I'm going to talk about some crucial factors to consider before deploying your Ghost-powered blog on production servers.
In the DevOps Community, what we always strive for, is to get as close as possible towards a state called NoOps. But in the practical sense, it will always remain a paradox.
Here we are trying to achieve the same goal as NoOps but with a hybrid outlook with human intervention whenever necessary.
So without further delay, let me enlist and describe the essentials to ensure a stable and minimum maintenance Ghost instance.
1. Set your mail configuration correctly
You'll be following kinds of emails to your members and subscribers through your Ghost instance:
- Transactional emails: for member logins, sign up confirmation etc.
- Bulk emails: for sending email newsletter through Ghost
You may use any SMTP service if you don't want to deliver newsletters through Ghost. Otherwise, you must use Mailgun.
SMTP settings for transactional emails
In theory, your Ghost instance should be able to use the direct mail service thanks to Nodemailer.
However, this may result in some sign ups failing with "Please Enter a Valid Email Address" error message.
This is why you must setup SMTP settings with Mailgun or Amazon SES. You could also try other Email relay services like SendGrid or Mailchimp.
A typical SMTP setting, configured via Mailgun looks as follows (set through a bind-mounted file config.production.json):
  "mail": {
    "transport": "SMTP",
    "options": {
        "service": "Mailgun",
        "host": "smtp.eu.mailgun.org",
        "port": 465,
        "secureConnection": true,
        "auth": {
            "user": "replace-me-with-a-mailgun-configured-email-address",
            "pass": "replace-me-with-the-relevant-mailgun-apikey"
        }
    }
  },
Keep an eye on the SMTP port number. Some time emails fail because of the port number. In our case, some emails were failing with port 587 and started working with port 465.
Please check this documentation from Mailgun here for complete information about verifying your domain and updating the necessary DNS records that are also required for sending email.
In general, you have to update the MX, CNAME and TXT records obtained from Mailgun inside the DNS record settings on your domain name panel. On Linode, they look like:


Bulk emails for sending newsletters
For sending newsletters in bulk to your members, Mailgun is the only available service that is available for implementing it within your Ghost configuration. Bulk email services are quite different from conventional SMTP services.
To correctly configure bulk email on Ghost for your members, first you would have to ensure that memberships are enabled. That is an obvious requirement.

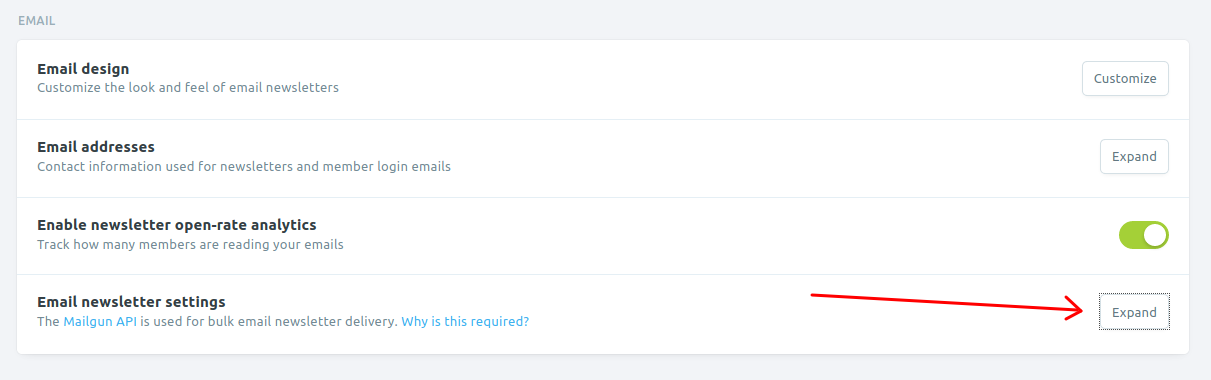
Now scroll down to the email section and expand "Email newsletter settings".
Enter the Mailgun configured domain name and API key. Mailgun region would be either "EU" or "US". Please choose the appropriate one.
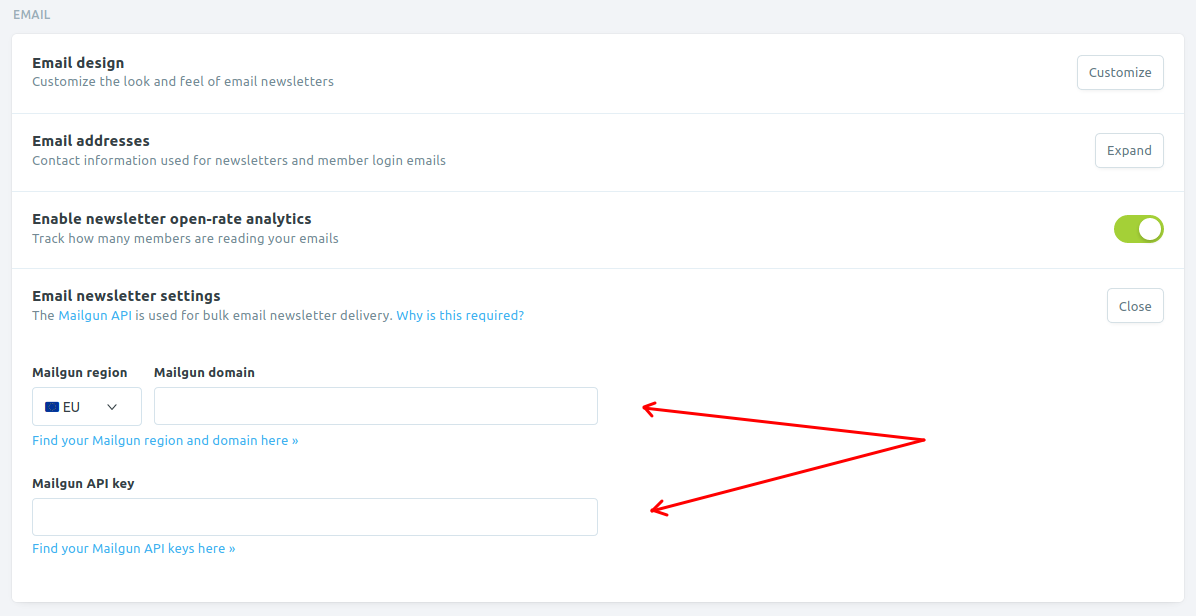
If you recall from above in the SMTP settings example, the region name, "EU" can be perceived with the name of host, which is smtp.eu.mailgun.org.
Read here for more information on the Mailgun configured domain name and API key. For picking domain names, check here.
2. Choose MySQL or MariaDB for the database instead of SQLite
If your Ghost blog is planned for production usage, I recommend not to use the SQLite Database that is provided by default within the Ghost Container.
The reason for using the recommended Database as MySQL or MariaDB is extremely crucial when you have substantial numbers of members and you want to send them email newsletter from Ghost itself.
We learned it the hard way. Initially, we were using MailerLite for creating and sending the newsletter. Then we decided to take advantage of Ghost's built-in newsletter feature.
By this time we have around 1,100 members. And this created a problem as SQLite could not handle these many queries at a time. The newly created post was failed to send. Logs showed this error:
Processed job threw an unhandled error
"The email service was unable to send an email batch."

Error ID:
    24bf8000-4f50-11eb-adf5-73dcc562a630

Error Code:
    SQLITE_ERROR
That was not it. It even refused to export 1100 members. The download would just won't start. We downloaded the entire backup in JSON format and extracted the member information from there.
To fix this, migrate from SQLite to MySQL or MariaDB which would become an unnecessary overhead and result in potentially unwanted downtime during the migration that could even be for an indefinite amount of time. So, it is always better to initially deploy Ghost with MySQL or MariaDB as a preventive practice.
Following is an example of a typical MariaDB database service configuration for Ghost on Docker Compose:
    db:
        image: mariadb:10.5.3
        volumes:
            - ghostdb:/var/lib/mysql
        restart: on-failure
        environment:
            MYSQL_RANDOM_ROOT_PASSWORD: 1
            MYSQL_USER: rename-me
            MYSQL_PASSWORD: replace-me
            MYSQL_DATABASE: rename-me
3. Enable log rotation
Log rotation is the process of automatically resetting your log files after a desired time period. This helps in avoiding the creation of huge log files piling up and unnecessarily invading your server disk space. In general practice, if you do not include the following snippet within your Ghost configuration, it would result in log files accumulating to enormous sizes between 15-20 GB!:
  "logging": {
    "path": "content/logs/",
    "level": "info",
    "rotation": {
      "enabled": true,
      "count": 15,
      "period": "1d"
  },
For a detailed overview on logging in Ghost, you can visit its relevant documentation page.
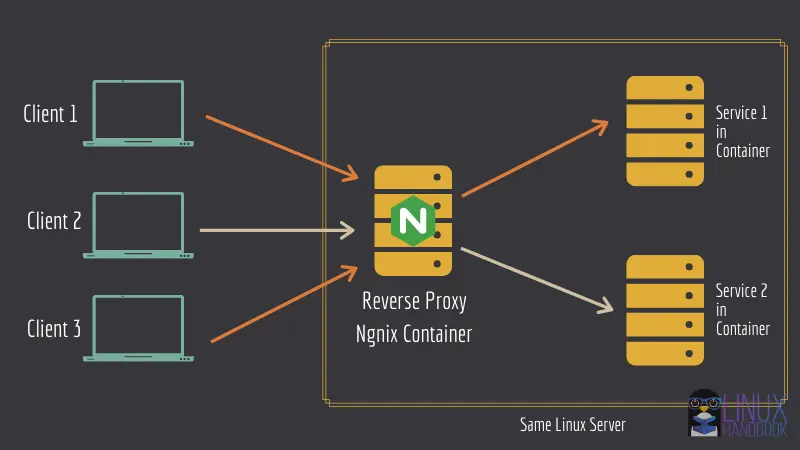
3. Use reverse proxy
It is always an added advantage to use a reverse proxy from the very beginning, before deploying Ghost. It makes it much easier to manage your web applications both in the short term and the long run.
4. Update Ghost without downtime
If you use revers proxy, updating your Ghost instance without downtime will be an easy job.
Here's what I recommend. Set up Docker Notify so that you get notified of a new Docker image of the Ghost instance (with the latest version of Ghost).
Then you may follow this tutorial to update your Docker container.
Fortunately, there is absolutely no downtime at all when you perform the update. If you are already logged in to the admin panel (say while composing an article), you wouldn't notice any anomalies.
However, if you are not logged in, until you remove the older container after the update, the admin panel would keep attempting to load itself if you try a fresh login.
But in a production sense, the Ghost blog itself would continue to be available at the front-end even while you perform the upgrade.
6. Always set a restart policy
Since you are using a Ghost Docker container, a restart policy is always very important and necessary to specify within your configuration. This ensures your Ghost container always restarts itself whenever your physical server has been rebooted because of any maintenance event.
If your generic Docker configuration has live restore enabled, it is recommended to use the on-failure restart policy. To have a better understanding on restart policies, please check the official documentation for a complete reference on such policies.
Typically, you set such a restart policy within your Docker Compose file's service as:
restart: on-failure
7. Use External Docker Volumes
If you use volumes that have been manually created before deploying Ghost, it makes it easier to migrate your content (within the same server or another) if required in the future. It gives you more control over your data since it is you who is creating and specifying the volume for use by the Ghost container. Otherwise, you would need to leave it to Docker Compose to create it locally.
To create an external Docker volume for the Ghost container, use the following command:
docker volume create ghost
Where ghost is the name of your external Docker Ghost volume.
Since I've already mentioned opting for a MySQL or MariaDB database to ensure better performance with thousands of users, its volume must also be created in the same manner:
docker volume create ghostdb
Where ghostdb is the name of your external Docker Ghost Database volume.
To instruct Docker Compose to make use of these specific volumes that you just created above, our volumes section in the Docker Compose file must look like:
volumes:
  ghost:
    external: true
  ghostdb:
    external: true
Note how I've specified that these Docker volumes are external in nature.
Bonus Tip: Schedule regular backups

If you are using Linode, Digital Ocean or any other similar cloud server provider, it is highly recommended to always enable backups when you are creating your server to deploy Ghost.
For example, when you create a server with 1 GB of RAM (called a nanode) on Linode, you will find a checkbox that asks for enabling backups. Whenever you deploy a production server, I would always recommend you to enable it before proceeding to actually initiating the server for first boot.
Also, you can deploy a script on the server based on a crontab to manually take a snapshot of your external Docker volumes for Ghost.
Technically, the volume data as discussed in the previous pointer 7, particularly ghost and ghostdb, locally reside at /var/lib/docker/volumes/ghost/_data and /var/lib/docker/volumes/ghostdb/_data respectively. To archive them effectively, you can use tar to backup those two directories on a periodic basis.
Since you would now know when these tar archives would be readily available after archival, you can also deploy another script on your local system(assumed to be running live at a specific time on a daily basis at your home/office) to ssh into the Ghost server and fetch those archives. This way, you would always have a locally updated copy of your Ghost blog available with you regardless of any access to the Internet.
Alternatively, you can also use the logical backup approach for backing up the MySQL database with the database command mysqldump. On MariaDB, the command is called mariadb-dump which is nothing but a symlink to the same mysqldump command.
An excellent comparison between physical and logical backups can be found here.
Tame the Ghost
That was a compilation of some diverse approaches to minimize and prevent any potential maintenance issues from happening after you've deployed your Ghost instance. Hope it is useful for you whenever you launch or use your own blog on Ghost.
We will continue our journey with Ghost and if we encounter any other issue that could have been avoided with different configuration at deployment, we'll update this article.
If you have any suggestions regarding the above discussed pointers or have any new ones, please share them with us in the conversation section below. We'd be glad to read and know more from you.
