

Suppose you are running a service in a container and there is a new version of the service available through their docker image. In such a case you would like to update the Docker container.
Updating a docker container is not an issue but updating docker container without downtime is challenging.
Confused? Let me show you both ways one by one.
Method 1: Updating docker container to the latest image (results in downtime)
This method basically consists of these steps:
- Pull the latest docker image
- Stop and remove the container running the old docker image
- Create a new container with the newly pulled docker image
Want the commands? Here you go.
List the docker images and get the docker image that has an update. Get the latest changes to this image using docker pull command:
docker pull image_nameNow get the container ID or name of the container that is running the older docker image. Use the docker ps command for this purpose.
Once you have the details, stop this container:
docker stop container_IDAnd remove the container:
docker rm container_idThe next step is to run a new container with the same parameters you used for running the previous container. I believe you know what those parameters are because you had created them in the first place.
docker run --name=container_name [options] docker_imageDo you see the problem with this approach? You have to stop the running container and then create a new one. This will result in a downtime for the running service.
The downtime, even if for a minute, could leave big impact if it's a mission-critical project or high-traffic web service.
Want to know a safer and better approach for this problem? Read the next section.
Method 2: Updating docker container in a reverse proxy setup (with zero or minimal downtime)
If you were looking for a straightforward solution, sorry to disappoint you but it's not going to be one because here you'll have to deploy your containers in a reverse-proxy architecture with Docker Compose.
If you are looking to manage critical services using docker containers, the reverse proxy method will help you a great deal in the long run.
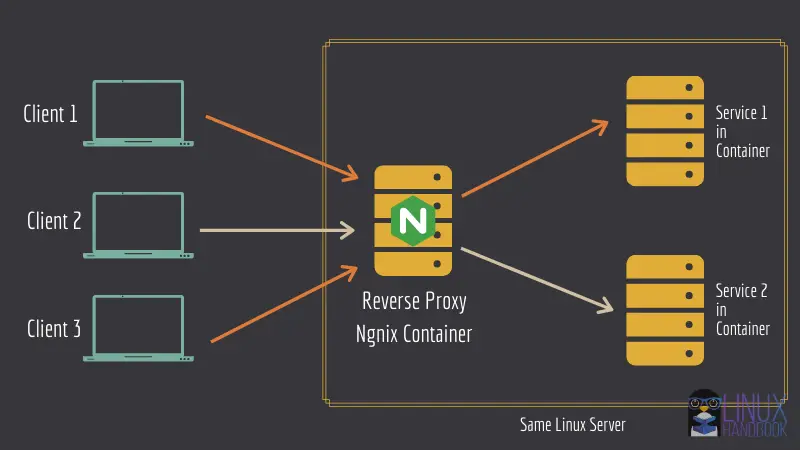
Let me list three main advantages of the reverse proxy setup:
- You can deploy multiple public facing services on the same server. No port blocking here.
- Let's Encrypt server takes care of SSL deployment for all services, all containers.
- You can update the containers without impacting the running services (for most web services).
If you're curious to learn more, you can check out the official Nginx glossary that highlights the common uses of a reverse proxy and how it compares with a load balancer.
We have a great in-depth tutorial on setting up Nginx reverse proxy to host more than one instances of web services running in containers on the same server. So, I am not going to discuss it here again. You should go and set up your containers using this architecture first. Trust me, this is worth the trouble.

In this tutorial, I have designed a step by step methodology that can be very helpful in your day to day DevOps activities. This requirement can not only be very necessary when you update your containers but also when you want to make a very necessary change in any of your running apps without sacrificing invaluable uptime.
From here onwards, we assume that you are running your web applications under a reverse proxy setup that would ensure that rerouting works for the new up-to-date container as expected after the configuration changes that we are going to do.
I'll show the steps of this method first, followed by a real life example.
Step 1: Update the docker compose file
First of all, you need to edit the existing docker compose file with the version number of the latest image. It can be viewed at Docker Hub, specifically under the "tags" section of the application.
Move into the application directory and edit the docker-compose file with a command line text editor. I used Nano here.
avimanyu@localhost:~/web-app$ nano docker-compose.ymlWithin services:, update image: web-app:x.x.x with the most recent version number and save the file.
You might wonder why not use the latest tag anyway instead of specifying the version number manually? I did it on purpose since I've noticed that while updating containers, there can be an intermittent delay of the latest tag in actually picking up the latest version of the dockerized application.When you use the version number directly, you can always be absolutely sure.
Step 2: Scale up a new container
When you use the following command, a new container is created based on the new changes made in the docker compose file.
avimanyu@localhost:~/web-app$ docker-compose up -d --scale web-app=2 --no-recreateNote that the previous container is still up and running. The --scale flag is used to create additional containers as specified. Here, web-app has been set as the service name for the web application.
Even though you specify scaling up to 2 containers, --no-recreate ensures that only one is added since you already have your old container running.
To learn more about the --scale and --no-recreate flag, check the official docker-compose up documentation page.
Step 3: Remove the old container
After step 2, give it around 15-20 seconds for the new changes to take into effect and then remove the old container:
avimanyu@localhost:~/web-app$ docker rm -f old-web-appOn different web apps, the reflected changes are behaviorally different after you run the above command(discussed as a bonus tip at the very bottom of this tutorial).
Step 4: Scale down to the single container setup as before
For the final step, you scale down to the single container setup once again:
avimanyu@localhost:~/web-app$ docker-compose up -d --scale web-app=1 --no-recreate
I have tested this method with Ghost, WordPress, Rocket.Chat and Nextcloud instances. Except Nextcloud switching to maintenance mode for a few seconds, the procedure works extremely well for the other three.
Discourse however, is another story and can be a very tricky exception in this case due to its hybrid model.
The bottom line is: the more the web app uses standard docker practice when dockerizing it, the more convenient it becomes to manage all web app containers on a day to day basis.
Real life example: Updating a live Ghost instance without downtime
As promised, I am going to show you a real life example. I am going to show you how to update Ghost running in docker container to a newer version without any downtime.
Ghost is a CMS and we use it for Linux Handbook. The example shown here is what we use to update our Ghost instance running this website.
Say, I have an existing configuration based on an older version located at /home/avimanyu/ghost:
version: '3.5'
services:
  ghost:
    image: ghost:3.36
    volumes:
      - ghost:/var/lib/ghost/content
    environment:
      - VIRTUAL_HOST=blog.domain.com
      - LETSENCRYPT_HOST=blog.domain.com
      - url=https://blog.domain.com
      - NODE_ENV=production
    restart: always
    networks:
      - net

volumes:
  ghost:
    external: true

networks:
  net:
    external: true
Note that the above docker compose configuration is based on a pre-existing Nginx docker configuration described here, running on a network named net. Its docker volume had also been created manually with docker volume create ghost-blog.
When I check it with docker ps:
CONTAINER ID        IMAGE                                    COMMAND                  CREATED             STATUS              PORTS                                      NAMES
2df6c27c1fe3        ghost:3.36                             "docker-entrypoint.s…"   9 days ago          Up 7 days           2368/tcp                                   ghost_ghost-blog_1
89a5a7fdcfa4        jrcs/letsencrypt-nginx-proxy-companion   "/bin/bash /app/entr…"   9 days ago          Up 7 days                                                      letsencrypt-helper
90b72e217516        jwilder/nginx-proxy                      "/app/docker-entrypo…"   9 days ago          Up 7 days           0.0.0.0:80->80/tcp, 0.0.0.0:443->443/tcp   reverse-proxy
At this time of writing, this is an older version of Ghost. Time to update it to the latest version 3.37.1! So, I revise it in the image section as:
version: '3.5'
services:
  ghost-blog:
    image: ghost:3.37.1
    volumes:
      - ghost-blog:/var/lib/ghost/content
    environment:
      - VIRTUAL_HOST=blog.domain.com
      - LETSENCRYPT_HOST=blog.domain.com
      - url=https://blog.domain.com
      - NODE_ENV=production
    restart: always
    networks:
      - net

volumes:
  ghost-blog:
    external: true

networks:
  net:
    external: true
Now to put the scaling method to good use:
avimanyu@localhost:~/ghost$ docker-compose up -d --scale ghost-blog=2 --no-recreateWith the above command, the older container remains unaffected but a new one joins in with the same configuration but based on the latest version of Ghost:
avimanyu@localhost:~/ghost$ docker-compose up -d --scale ghost-blog=2 --no-recreate
Pulling ghost (ghost:3.37.1)...
3.37.1: Pulling from library/ghost
bb79b6b2107f: Already exists
99ce436c3449: Already exists
f7bdc31da5f5: Already exists
7a1300b9ff59: Already exists
a495c68fa838: Already exists
6e362a39ec35: Already exists
b68b4f3c36f7: Already exists
41f8b02d4a71: Pull complete
3ecc736ea4e5: Pull complete
Digest: sha256:595c759980cd22e99037811397012908d89efb799776db222a4be6d4d892917c
Status: Downloaded newer image for ghost:3.37.1
Starting ghost_ghost-blog_1 ... done
Creating ghost_ghost-blog_2 ... done
Had I used the conventional approach with docker-compose up -d instead, I would not have been able to avoid the recreation of the existing container to be based on the latest image of Ghost.
Recreation involves removal of the older container and creating a new one in its place with the same settings. This is when downtime occurs and the site becomes inaccessible.
This is why you should use the --no-recreate flag while scaling up.
So now I have two containers running based on the same ghost configuration. This is the crucial part where we avoid downtime:
avimanyu@localhost:~/ghost$ docker ps
CONTAINER ID        IMAGE                                    COMMAND                  CREATED             STATUS              PORTS                                      NAMES
f239f677de54        ghost:3.37.1                               "docker-entrypoint.s…"   2 minutes ago       Up 2 minutes        2368/tcp                                   ghost_ghost-blog_2
2df6c27c1fe3        ghost:3.36                             "docker-entrypoint.s…"   9 days ago          Up 7 days           2368/tcp                                   ghost_ghost-blog_1
89a5a7fdcfa4        jrcs/letsencrypt-nginx-proxy-companion   "/bin/bash /app/entr…"   9 days ago          Up 7 days                                                      letsencrypt-helper
90b72e217516        jwilder/nginx-proxy                      "/app/docker-entrypo…"   9 days ago          Up 7 days           0.0.0.0:80->80/tcp, 0.0.0.0:443->443/tcp   reverse-proxy
Note that the older container's name is ghost_ghost-blog_1. Check your domain name and you will find it still accessible at blog.domain.com. If you refresh the Ghost admin panel, which is at blog.domain.com/ghost after scaling up, it would keep trying to load itself until you remove the old container:
avimanyu@localhost:~/ghost$ docker rm -f ghost_ghost-blog_1But for the Ghost blog itself, there is no downtime at all! So, in this manner you can ensure zero downtime when updating Ghost blogs.
Finally, scale down the configuration to its original setting:
avimanyu@localhost:~/ghost$ docker-compose up -d --scale ghost-blog=1 --no-recreate
Starting ghost_ghost-blog_2 ... done
As mentioned earlier, after removing old containers, the changes are reflected in the respective web apps, but they obviously behave differently due to diverse app designs.
Here are a few observations:
On WordPress: Ensure that you add define( 'AUTOMATIC_UPDATER_DISABLED', true ); as a bottom line on the file wp-config.php located at /var/www/html and mount /var/www/html/wp-content instead of /var/www/html as volume. Check here for details. After step 3, the WordPress admin panel would show that your WordPress is up-to-date and will ask you to proceed and update your database. The update happens quickly without any downtime on the WordPress site and that's it!
On Rocket.Chat: It can take around 15-20 seconds for the Admin>Info page to show that you are running the latest version even before you do step 3. No downtime again!
On Nextcloud: After step 2, Nextcloud would switch to maintenance mode for a few seconds and then load your files again. Under Administration > Overview > Security & setup warnings, you might get a warning like, "Your web server is not properly set up to resolve "./well-known/carddav". This is because your old container is still running. Once you remove it with step 3, this warning would no longer exist. Make sure you give it some time before accessing your Nextcloud URL as it could show a 502 bad gateway error until your Nginx container sees the newly scaled Nextcloud container based on the latest version.
Bonus tips
Here are a few tips and things to keep in mind while following this method.
Tip 1
To keep downtime at a minimum to a zero across different applications, make sure you provide sufficient time to the newly scaled and up-to-date containers so that the Nginx containers can finally acknowledge them before you remove the old ones in step 2.
Before you move to step 2 described above, it is advisable to observe your application's behavior on your browser (both as a page refresh after login or as a fresh page access on a private, cache-free browser window) after doing step 1.
Since each application is designed differently, this measure would prove very helpful before you bring down your old containers.
Tip 2
While this can be a very resourceful method to update your containers to the latest versions of the apps they run, do note that you can use the same method to also make any configuration changes or modify environmental settings without facing downtime issues.
This can be crucial if you must troubleshoot an issue or perform a change that you may deem necessary in a live container, but do not want to bring it down while doing so. After you make your changes and are sure that the issue is fixed, you can bring down the older one with ease.
We have ourselves faced this when we found that log rotation wasn't enabled in one of our live containers. We did the necessary changes to enable it and at the same time avoided any downtime while doing so with this method.
Tip 3
If you have specifically named your container in the YML file by using container_name, the method will not work as expected because it involves the creation of a new container name.
You can avoid this conflict by leaving that task of container naming to Docker Compose (done automatically as per its naming convention). Docker Compose names its containers as directory-name_service-name_1. The number in the end would increment every time the container is updated (until you use docker-compose down for some reason).
In case you are already using a service by using custom named containers in your docker compose file, to use this method, simply comment out the line (with a # prefix) that includescontainer_name inside the service definition.
After creating the new container for the above using step 1 as described in this tutorial, for step 2, the old container(that wasn't stopped to avoid downtime) name would be as it was specified earlier using container_name(also can be checked with `docker ps` before removing the old container).
Did you learn something new?
I know this article is a bit lengthy but I do hope it helps our DevOps community in managing downtime issues with production servers running dockerized web applications. Downtime does have a huge impact at both individual and commercial level and this is why covering this topic was an absolute necessity.
Please join the discussion and share your thoughts, feedbacks or suggestions in the comments section below.
