cat Command Examples
cat is one of the most used commands in Linux but do you really know the cat command? Learn the basics as well as advanced examples of cat command in Linux.

Continuing the tour of those not-that-well known commands started last week with the ls command, let’s examine today the cat command.
The cat name stands for catenate as the primary job of that command is to join several input files by sequentially sending their content on standard output:
# Let's obtain first some sample data files:
curl -so - dict://dict.org/'d:felidae:gcide' | unexpand -a -t 3 |
  sed -Ee '/^151/,/^[.]/!d;/^[.0-9]/s/.*//' > felidae.txt
curl -so - dict://dict.org/'d:felis:gcide' | unexpand -a -t 3 |
  sed -Ee '/^151/,/^[.]/!d;/^[.0-9]/s/.*//' > felis.txt

# Catenate files
cat felidae.txt felis.txt
If you want to store the result of that concatenation in a file, you have to use a shell redirection:
cat felidae.txt felis.txt > result.txt
cat result.txt
Even if its primary design goal is to catenate files, the cat utility is also often employed with only one argument to display the content of that file onto the screen, exactly like I did it on the last line of the example above.
A. Using cat command with standard input
When used without any argument, the cat command will read data from its standard input and write them to its standard output— which is mostly useless … unless you are using some option to transform the data. We will talk about a couple of interesting options later.
In addition to file paths, the cat command also understands the - special file name as an alias for the standard input. That way, you can insert the data read from the standard input between the files given on the command line:
# Insert a separator between the two concatenated files
echo '----' | cat felis.txt - felidae.txt
B. Using cat command with binary files
1. Joining split files
The cat command does not make any assumption about the file content, so it will happily work with binary data. Something that may be useful to rejoin files broken by the split or csplit command. Or to join partial downloads like we will do it now:
#
# A picture by Von.grzanka (CC-SA 3.0)
# Optimize bandwidth usage by breaking the download in two parts
# (on my system, I observe a 10% gain that way compared to a "full" download)
curl -s -r 0-50000 \
    https://upload.wikimedia.org/wikipedia/commons/thumb/b/b6/Felis_catus-cat_on_snow.jpg/1024px-Felis_catus-cat_on_snow.jpg \
    -o first-half &
curl -s -r 50001- \
    https://upload.wikimedia.org/wikipedia/commons/thumb/b/b6/Felis_catus-cat_on_snow.jpg/1024px-Felis_catus-cat_on_snow.jpg \
    -o second-half &
wait
We have now two halves of an image. You can open the first half and see it is “broken” using ImageMagick’s display, or gimp, or any other software able to read image files:
display first-half
# -or-
gimp first-half
# -or-
firefox first-half
If you study the curl command I used, you see the two parts are perfectly complementary. The first half is from byte 0 to 50000 and the second half, from the byte 50001 to the end of the file. There should be no missing data between them. So we only have to catenate the two parts together (in the right order) to get back the full file:
cat first-half second-half > image.jpg
display image.jpg
2. Working with streamable file formats
Not only you can use the cat command to “rejoin” binary files that were split into several parts, but in some cases, you can also create new files that way. That works particularly well with “headerless” or “streamable” file formats like MPEG transport stream video files (.TS files):
# Let's make a still video file from our picture
ffmpeg -y -loop 1 -i cat.jpg -t 3  \
    -c:v libx264 -vf scale=w=800:h=-1 \
    still.ts

# Let's make a fade-in from the same picture
ffmpeg -y -loop 1 -i cat.jpg -t 3  \
    -c:v libx264 -vf scale=w=800:h=-1,fade=in:0:75 \
    fadein.ts

# Let's make a fade-out from the same picture
ffmpeg -y -loop 1 -i cat.jpg -t 3  \
    -c:v libx264 -vf scale=w=800:h=-1,fade=out:0:75 \
    fadeout.ts
We can now combine all those transport stream video files using the cat command, obtaining a perfectly valid TS file in the output:
cat fadein.ts still.ts fadeout.ts > video.ts
mplayer video.ts
Thanks to the TS file format, you can combine those files in the order you want, and you can even use the same file several times in the argument list to create loops or repetition in the output video. Obviously, this would be more fun if we were using animated images, but will I let you do that by yourself: many consumer-grade devices record TS files, and if they don’t, you can still use ffmpeg to convert almost any video file to a transport stream file. Don’t hesitate to share your creations using the comment section!
3. Hacking cpio archives
As the last example, let see how we can use the cat command to combine several cpio archives. But this time, it will not be as straightforward since it will require a little bit of knowledge about the cpio archive file format.
A cpio archive stores file’s metadata and content sequentially which makes it suitable for file-level concatenation with the cat utility. Unfortunately, the cpio archive also contains a trailer used to mark the end of the archive:
# Create two genuine CPIO `bin` archive:
$ find felis.txt felidae.txt | cpio -o > part1.cpio
2 blocks
$ echo cat.jpg | cpio -o > part2.cpio
238 blocks

$ hexdump -C part1.cpio | tail -7
000002d0  2e 0d 0a 09 09 20 20 5b  57 6f 72 64 4e 65 74 20  |.....  [WordNet |
000002e0  31 2e 35 5d 0d 0a 0a 00  c7 71 00 00 00 00 00 00  |1.5].....q......|
000002f0  00 00 00 00 01 00 00 00  00 00 00 00 0b 00 00 00  |................|
00000300  00 00 54 52 41 49 4c 45  52 21 21 21 00 00 00 00  |..TRAILER!!!....|
00000310  00 00 00 00 00 00 00 00  00 00 00 00 00 00 00 00  |................|
*
00000400
$ hexdump -C part2.cpio | tail -7
0001da40  46 96 ab f8 ad 11 23 90  32 79 ac 1f 8f ff d9 00  |F.....#.2y......|
0001da50  c7 71 00 00 00 00 00 00  00 00 00 00 01 00 00 00  |.q..............|
0001da60  00 00 00 00 0b 00 00 00  00 00 54 52 41 49 4c 45  |..........TRAILE|
0001da70  52 21 21 21 00 00 00 00  00 00 00 00 00 00 00 00  |R!!!............|
0001da80  00 00 00 00 00 00 00 00  00 00 00 00 00 00 00 00  |................|
*
0001dc00
The good new is, with cpio binary archives, that trailer has a fixed length of 280 bytes. So, using the head standard command, we have an easy way to remove it:
# Each archive end with the 280-byte trailer.
# To catenate both archives, just remove the trailer
# at the end of the first part:
$ head -c-280 part1.cpio | cat - part2.cpio > cat.cpio
$ cpio -it < cat.cpio
felis.txt
felidae.txt
cat.jpg
239 blocks
C. Essential cat command options
After having played with various binary file formats, let’s go back to plain old text files now by studying a couple of option specifically tailored to deal with those files. While not part of the POSIX standard, those options are portable across the BSD and GNU cat implementations. Please note I do not pretend to be exhaustive here, so check the man to see the full list of options supported by cat on your system!
-n: number lines
With the n option, the cat command will prefix each output line by its line number:
cat -n felidae.txt
     1
     2    Felidae \Felidae\ n.
     3       a natural family of lithe-bodied round-headed fissiped
     4       mammals, including the cats; wildcats; lions; leopards;
     5       cheetahs; and saber-toothed tigers.
     6
     7       Syn: family {Felidae}.
     8            [WordNet 1.5]
     9
The -n option numbers output lines. That means the counter is not reset when switching from one input file to the next, as you will see it if you try the following command by yourself:
cat -n feli*.txt-s: suppress repeated empty output lines
With the -s option, the cat command will collapse multiple consecutive empty lines in only one:
 cat -n felis.txt felidae.txt | sed -n 8,13p
     8       lynx ({Felis lynx}) is also called {Lynx lynx}.
     9       [1913 Webster +PJC]
    10
    11
    12    Felidae \Felidae\ n.
    13       a natural family of lithe-bodied round-headed fissiped
sylvain@bulbizarre:~$ cat -ns felis.txt felidae.txt | sed -n 8,13p
     8       lynx ({Felis lynx}) is also called {Lynx lynx}.
     9       [1913 Webster +PJC]
    10
    11    Felidae \Felidae\ n.
    12       a natural family of lithe-bodied round-headed fissiped
    13       mammals, including the cats; wildcats; lions; leopards;
In the example above, you can see, in the default output, the lines 10 and 11 were empty. When adding the -s option, the second empty line was discarded.
-b: number only non-empty lines
Somewhat related with the two preceding options, the -b option will number lines, but ignoring empty ones:
$ cat -b felidae.txt | cat -n
     1
     2         1    Felidae \Felidae\ n.
     3         2        a natural family of lithe-bodied round-headed fissiped
     4         3        mammals, including the cats; wildcats; lions; leopards;
     5         4        cheetahs; and saber-toothed tigers.
     6         5
     7         6        Syn: family {Felidae}.
     8         7              [WordNet 1.5]
     9
The example above uses two instances of the cat command with different options in a pipeline. The inner numbering comes from the -b option used with the first cat command. The outer numbering comes from the -n option used with the second cat.
As you can see, the first and last line were not numbered by the -b option because they are empty. But what about the 6th line? Why does it still be numbered with the -b option? Well, because it is a blank line— but not an empty one, as we will see in the next section.
-v, -e, -t: display non-printing characters
The three options -v, -e `, and `-t are used to display different sets of invisible characters. Even if the sets overlap, there is no “catch-all” option, so you will have to combine them if you want to display all invisible characters.
-v: view invisible characters
The -v option display all non-printing characters with caret and meta notation, except the line feed and tabulation.
With that option, control characters will appear as a caret (^) followed by the appropriate ASCII character (e.g., the carriage return, byte 13, is displayed as ^M because M in ASCII is 64 + 13), and characters with the high-order bit set will appear in “meta” notation M- followed by the representation corresponding to the 7 lower bits (e.g., the byte 141 will be displayed as M-^M because 141 is 128 + 13).
While seemingly esoteric, that feature may be useful when working with binary files, like, for example, if you want to examine the raw information embedded in a JPEG file:
$ cat -v cat.jpg | fold -75 | head -10
M-^?M-XM-^?M-`^@^PJFIF^@^A^A^A^@H^@H^@^@M-^?M-~^@QFile source: http://commo
ns.wikimedia.org/wiki/File:Felis_catus-cat_on_snow.jpgM-^?M-b^LXICC_PROFILE
^@^A^A^@^@^LHLino^B^P^@^@mntrRGB XYZ ^GM-N^@^B^@    ^@^F^@1^@^@acspMSFT
^@^@^@^@IEC sRGB^@^@^@^@^@^@^@^@^@^@^@^@^@^@M-vM-V^@^A^@^@^@^@M-S-HP  ^@^@^
@^@^@^@^@^@^@^@^@^@^@^@^@^@^@^@^@^@^@^@^@^@^@^@^@^@^@^@^@^@^@^@^@^@^@^@^@^@
^@^@^@^@^@^@^@^Qcprt^@^@^AP^@^@^@3desc^@^@^AM-^D^@^@^@lwtpt^@^@^AM-p^@^@^@^
Tbkpt^@^@^B^D^@^@^@^TrXYZ^@^@^B^X^@^@^@^TgXYZ^@^@^B,^@^@^@^TbXYZ^@^@^B@^@^@
^@^Tdmnd^@^@^BT^@^@^@pdmdd^@^@^BM-D^@^@^@M-^Hvued^@^@^CL^@^@^@M-^Fview^@^@^
CM-T^@^@^@$lumi^@^@^CM-x^@^@^@^Tmeas^@^@^D^L^@^@^@$tech^@^@^D0^@^@^@^LrTRC^
@^@^D<^@^@^H^LgTRC^@^@^D<^@^@^H^LbTRC^@^@^D<^@^@^H^Ltext^@^@^@^@Copyright (
Another use case for the -v option is finding control characters that might have leaked into a text file. If you remember it, we have that strange issue above with the -b option numbering the 6th input line, whereas it looked like it was empty. So let’s investigate that:
$ cat -v felidae.txt
Felidae \Felidae\ n.^M
    a natural family of lithe-bodied round-headed fissiped^M
    mammals, including the cats; wildcats; lions; leopards;^M
    cheetahs; and saber-toothed tigers.^M
^M
    Syn: family {Felidae}.^M
          [WordNet 1.5]^M
Ah ah! Do you see those ^M marks? They are used to replace the otherwise invisible carriage return character. Where did it come from? Well, the dict protocol, like any other Internet protocol, is using CRLF as the line terminator. So we downloaded them as part of our sample files. You can learn more about line feed and carriage returns in the fold and fmt article. But for now, it explains why cat considered the 6th line as not being empty.
-e: display invisible characters, including end-of-line
The -e option works like the -v option, except it will also add a dollar sign ($) before each line-feed character, thus explicitly showing the end of lines:
$ cat -e felidae.txt
$
Felidae \Felidae\ n.^M$
    a natural family of lithe-bodied round-headed fissiped^M$
    mammals, including the cats; wildcats; lions; leopards;^M$
    cheetahs; and saber-toothed tigers.^M$
^M$
    Syn: family {Felidae}.^M$
          [WordNet 1.5]^M$
$-t: display invisible characters, including tabs
The -t option works like the -v option, except it will also display tabulations using the ^I caret notation (tab is stored as a byte holding the value 9, and I in ASCII is 64+9=73):
$ cat -t felidae.txt

Felidae \Felidae\ n.^M
^Ia natural family of lithe-bodied round-headed fissiped^M
^Imammals, including the cats; wildcats; lions; leopards;^M
^Icheetahs; and saber-toothed tigers.^M
^M
^ISyn: family {Felidae}.^M
^I^I [WordNet 1.5]^M-et: show all hidden characters
As I already mentioned it briefly, if you want to display all non-printing characters, including both tabulations and end-of-line markers, you will need to use both the -e and -t options:
$ cat -et felidae.txt
$
Felidae \Felidae\ n.^M$
^Ia natural family of lithe-bodied round-headed fissiped^M$
^Imammals, including the cats; wildcats; lions; leopards;^M$
^Icheetahs; and saber-toothed tigers.^M$
^M$
^ISyn: family {Felidae}.^M$
^I^I  [WordNet 1.5]^M$
$
Bonus: The useless use of cat command in Linux
No article about the cat command would be complete without a mention of the “Useless Use of Cat” anti-pattern.
It occurs when you use cat for the only purpose of sending the content of a file to the standard input of another command. That use of the cat command is said “useless” since a simple redirection or filename parameter would have done the job, and would have done it better. But an example worth a thousand words:
$ curl -so - dict://dict.org/'d:uuoc:jargon' |    sed -Ee '/^151/,/^[.]/!d;/^[.0-9]/s/.*//'  > uuoc.txt
$ cat uuoc.txt | less

UUOC


    [from the comp.unix.shell group on Usenet] Stands for Useless Use of {cat};
    the reference is to the Unix command cat(1), not the feline animal. As
    received wisdom on comp.unix.shell observes, ?The purpose of cat is to
    concatenate (or ?catenate?) files. If it's only one file, concatenating it
    with nothing at all is a waste of time, and costs you a process.?
    Nevertheless one sees people doing


    cat file | some_command and its args ...

    instead of the equivalent and cheaper


    <file some_command and its args ...

    or (equivalently and more classically)


    some_command and its args ... <file
[...]
In the example above, I used a pipeline to display the content of the uuoc.txt file with the less pager:
cat uuoc.txt | lessSo, the only purpose of the cat command was to feed the standard input of the less command with the content of the uuoc.txt file. I would have obtained the same behavior using a shell redirection:
less < uuoc.txtAs a matter of fact, the less command, like many commands, also accept a filename as an argument. So I could have simply written that instead:
less uuoc.txtAs you can see, no need for cat here. If I mention the “Useless Use of Cat” anti-pattern, this is because, if you use it publicly on a forum or elsewhere, undoubtedly someone will point that out at you with the argument you will create an “extra process for nothing.”
I must admit for a long time I was quite dismissive with such comments. After all, on our modern hardware, spawning one extra process for a one-shot operation couldn’t cause that much overhead.
But while writing this article, I did a quick experiment, comparing the time required with and without UUOC by a test awk script to process 500MB of data coming from a slow media.
To my surprise, the difference was far from negligible:
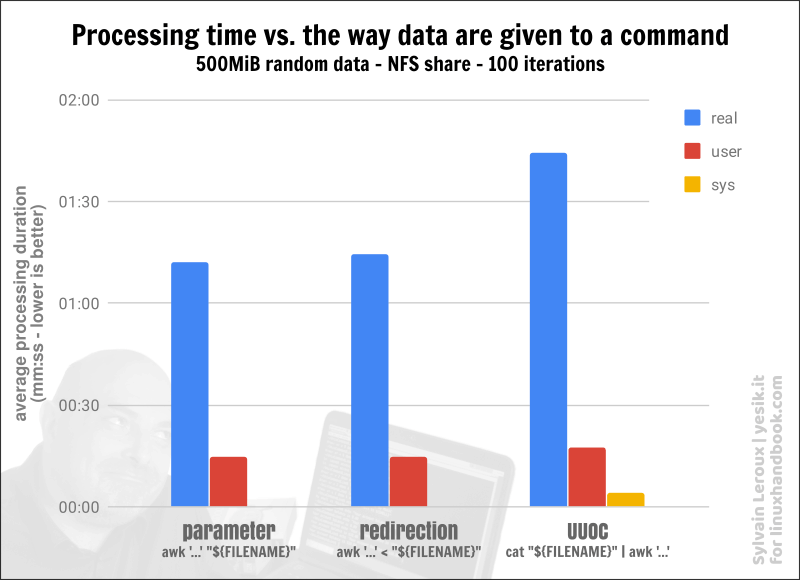
However, the reason is not about an extra process being created. But because of the extra read/write and context switching the UUOC incurs (as you can infer it from the time spend executing system code). So indeed, when you work on large datasets that extra cat command has a nonnegligible cost. As for myself, I will try to be more vigilant with that now! And you? If you have examples of the Useless Use of Cat don’t hesitate to share them with us!

Engineer by Passion, Teacher by Vocation. My goal is to share my enthusiasm for what I teach and prepare my students to develop their skills by themselves.