

Installing Discourse is really easy when its just one Discourse instance on the server. Things get complicated when you want to install multiple Discourse instances on the same server to reduce cost.
The official Discourse installation doesn’t follow the regular Docker practices. The Discourse installer first does something called bootstrapping, which will appear to you as a host installation procedure. After the bootstrap process is over, the launcher starts a container named “app” based on the feedback it took from you during the first time installation.
Such a hybrid installation procedure is different when it comes to setting it up with other web services and applications like WordPress.
In this tutorial, I’ll show you how to install multiple Discourse installation along with other docker based apps on a single Linux server. It’s not difficult at all if you are familiar with basics of Docker and Linux command line.
Installing multiple Discourse forums on the same server
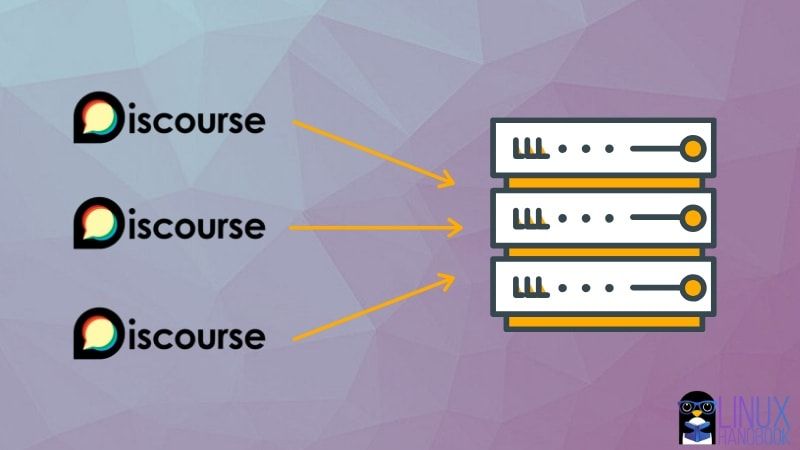
In general, a multiple discourse configuration is understood as a multisite configuration and the process has been illustrated here.
Officially, Discourse provides no documentation for multiple Discourse install on a single server. But fret not. I’ll show you installation process for 3-5 standalone individual containers running under Nginx with each standalone container corresponding to its own respective domain.
I am using Ubuntu 18.04 in this tutorial. Please make sure that you have Docker installed on Ubuntu or whichever Linux distribution you are using.
I suggest using a cloud server provider like Linode for quickly deploying a Linux server in cloud.
I have used domain.com as an example domain name in the tutorial. Please make sure you change it according to your own domains or subdomains.
1. Change your domain’s DNS records
In your domain name provider’s DNS record panel, make sure that both the domain and subdomains (including www) point to your server’s IP address.
For example, for root domain, keep the hostname field blank (or @) and for subdomains, use a ‘*’ wildcard while setting the server IP.
2. Swap space
To make sure all your container apps are at ease and never run out of memory after you deploy them, it is essential that you have the necessary swap space on your system.
You can always adjust swap according to the available RAM on your system. You can decide the swap space based on the bundle of app containers on the single server and estimating their cumulative RAM usage. Discourse also checks and configures swap for you.
3. Create a Docker network
This docker network will enable containers to communicate with each other as required. Let’s call it chain for easier understanding.
You’ll use this network when configuring all your containers.
docker network create chain4. Setup Nginx Reverse Proxy
Now proceed with setting up Nginx Reverse Proxy. Note that this acts as an interface that will map all different container ports on itself so that you can access them through URLs. You can also refer to it as the ‘mother container’.
docker run --name nginx-proxy --net chain -p 80:80 -p 443:443 -v ~/certs:/etc/nginx/certs -v /etc/nginx/vhost.d -v /usr/share/nginx/html -v /var/run/docker.sock:/tmp/docker.sock:ro --label com.github.jrcs.letsencrypt_nginx_proxy_companion.nginx_proxy -d --restart always jwilder/nginx-proxy5. Setup Let’s Encrypt Nginx Proxy Companion
Note that we tell docker to use volumes that is already declared on the first nginx-proxy container. It’s using the same “chain” network you created in step 3.
docker run --name letsencrypt-nginx-proxy-companion --net chain -v ~/certs:/etc/nginx/certs:rw -v /var/run/docker.sock:/var/run/docker.sock:ro --volumes-from nginx-proxy -d --restart always jrcs/letsencrypt-nginx-proxy-companionThis companion container for nginx-proxy takes care of setting up SSL certificates with Let’s Encrypt. You will see that while finally setting up your Discourse containers.
6. WWW Redirection through Nginx (CNAME not required, optional step for using subdomains)
To ensure redirection of domain.com requests to www.domain.com like any other site, you need to perform one additional step.
Enter the nginx-proxy container:
docker exec -ti nginx-proxy /bin/bashYou would now see a root prompt like this:
root@8d04249cc62c:/app#Remember the /etc/nginx/vhost.d location I mentioned in step 4? Create a new file here that’ll be the same as your root domain name. You don’t have vim or nano here. Instead of installing Vim or Nano, use the cat command.
cat >> /etc/nginx/vhost.d/domain.comAt the next prompt, whatever you write will be editing the file. So make sure that you replace www.domain.com with your own domain in the next line:
rewrite ^/(.*)$ https://www.domain.com/$1 permanent;Press enter and then Ctrl+D to save it. Enter exit to get out of the container.
root@8d04249cc62c:/app# exitLet’s stop all the above containers (in the given order) you have created until now. You won’t use restart, just start them again as you don’t want other containers listening when restarting each of them.
docker stop nginx-proxy
docker stop letsencrypt-nginx-proxy-companion
docker start nginx-proxy
docker start letsencrypt-nginx-proxy-companion
7. Clone the official Discourse Docker image
As per the official guide, clone the official discourse docker image into /var/discourse directory. This is where Discourse can store all its Docker volumes belonging to its respective containers after setup.
sudo -s
git clone https://github.com/discourse/discourse_docker.git /var/discourse
cd /var/discourse
8. Copy the Standalone configuration
Now the next step is to ensure you copy the file /var/discourse/standalone.yml to /var/discourse/containers/ as app.yml before editing it according to your requirements.
cp /var/discourse/samples/standalone.yml /var/discourse/containers/app.ymlA typical standalone.yml looks like this.
9. Prepare the Standalone configuration
You now need to edit this file because your configuration is going to based on nginx.
The ports 80 and 443 are already in use by the same. You also have our letsencrypt container already and you have to show Discourse your existing Docker network you want to put it in.
While setting your domain here, you’ll also need a mail server to configure your forum notification emails (I’ve used Sendgrid here).
Note that LETSENCRYPT_EMAIL (for notifying SSL updates)and DISCOURSE_DEVELOPER_EMAILS (for admin) can be different if required.
nano /var/discourse/containers/app.yml10. Customize the Standalone Configuration
Following is my edited file renamed as app.yml for demonstration purpose. It is recommended to edit your own yml file to avoid alignment issues.
this is the all-in-one, standalone Discourse Docker container template
 #
 After making changes to this file, you MUST rebuild
 /var/discourse/launcher rebuild app
 #
 BE VERY CAREFUL WHEN EDITING!
 YAML FILES ARE SUPER SUPER SENSITIVE TO MISTAKES IN WHITESPACE OR ALIGNMENT!
 visit http://www.yamllint.com/ to validate this file as needed
 templates:
 "templates/postgres.template.yml"
 "templates/redis.template.yml"
 "templates/web.template.yml"
 "templates/web.ratelimited.template.yml"
 Uncomment these two lines if you wish to add Lets Encrypt (https)
 #- "templates/web.ssl.template.yml"
 #- "templates/web.letsencrypt.ssl.template.yml"
 which TCP/IP ports should this container expose?
 If you want Discourse to share a port with another webserver like Apache or nginx,
 see https://meta.discourse.org/t/17247 for details
 expose:
   - "80"
 #- "80:80"   # http
 #- "443:443" # https
 docker_args:
   - "--net chain"
 params:
   db_default_text_search_config: "pg_catalog.english"
 ## Set db_shared_buffers to a max of 25% of the total memory.
   ## will be set automatically by bootstrap based on detected RAM, or you can override
   #db_shared_buffers: "256MB"
 ## can improve sorting performance, but adds memory usage per-connection
   #db_work_mem: "40MB"
 ## Which Git revision should this container use? (default: tests-passed)
   #version: tests-passed
 env:
   LANG: en_US.UTF-8
   # DISCOURSE_DEFAULT_LOCALE: en
 ## How many concurrent web requests are supported? Depends on memory and CPU cores.
   ## will be set automatically by bootstrap based on detected CPUs, or you can override
   #UNICORN_WORKERS: 3
 ## TODO: The domain name this Discourse instance will respond to
   ## Required. Discourse will not work with a bare IP number.
   DISCOURSE_HOSTNAME: 'domain.com'
   VIRTUAL_HOST: 'domain.com,www.domain.com'
   LETSENCRYPT_HOST: 'domain.com,www.domain.com'
   LETSENCRYPT_EMAIL: '[email protected]'
 ## Uncomment if you want the container to be started with the same
   ## hostname (-h option) as specified above (default "$hostname-$config")
   #DOCKER_USE_HOSTNAME: true
 ## TODO: List of comma delimited emails that will be made admin and developer
   ## on initial signup example '[email protected],[email protected]'
   DISCOURSE_DEVELOPER_EMAILS: '[email protected]'
 ## TODO: The SMTP mail server used to validate new accounts and send notifications
   # SMTP ADDRESS, username, and password are required
   # WARNING the char '#' in SMTP password can cause problems!
   DISCOURSE_SMTP_ADDRESS: smtp.sendgrid.net
   DISCOURSE_SMTP_PORT: 587
   DISCOURSE_SMTP_USER_NAME: apikey
   DISCOURSE_SMTP_PASSWORD: yourpassword
   DISCOURSE_SMTP_ENABLE_START_TLS: true           # (optional, default true)
 ## If you added the Lets Encrypt template, uncomment below to get a free SSL certificate
   #LETSENCRYPT_ACCOUNT_EMAIL: [email protected]
 ## The http or https CDN address for this Discourse instance (configured to pull)
   ## see https://meta.discourse.org/t/14857 for details
   #DISCOURSE_CDN_URL: https://discourse-cdn.example.com
 The Docker container is stateless; all data is stored in /shared
 volumes:
 volume:
   host: /var/discourse/shared/standalone
   guest: /shared
 volume:
   host: /var/discourse/shared/standalone/log/var-log
   guest: /var/log
 Plugins go here
 see https://meta.discourse.org/t/19157 for details
 hooks:
   after_code:
     - exec:
         cd: $home/plugins
         cmd:
           - git clone https://github.com/discourse/docker_manager.git
 Any custom commands to run after building
 run:
 exec: echo "Beginning of custom commands"
 ## If you want to set the 'From' email address for your first registration, uncomment and change:
 ## After getting the first signup email, re-comment the line. It only needs to run once.
 #- exec: rails r "SiteSetting.notification_email='[email protected]'"
 exec: echo "End of custom commands"
Double checks the following details:
Port configuration should be:
expose:
  - "80"
#  - "80:80"   # http
#  - "443:443" # https
Existing network name properly configured in the file as shown above.
docker_args:
  - "--net chain"
Otherwise, you’ll see a blank page when you check your domain after installation.
12. Bootstrap and Launch
After saving the above file, run the following commands:
cd /var/discourse
./launcher bootstrap app
This will take a considerable amount of time. In the end of the bootstrap process, you’ll be asked to:
./launcher start appNote that if you had named the file as xyz.yml, the command would have been changed accordingly (./launcher start xyz).
It’s the name of the container running that you can check with the docker ps command. Now when you visit the domain in your browser, you will see the following page:

13. SSL Settings
From this point on, the registration process is quite easy. Once you have completed the registration, in the Docker admin dashbaird, go to settings>security and enable “force https”.
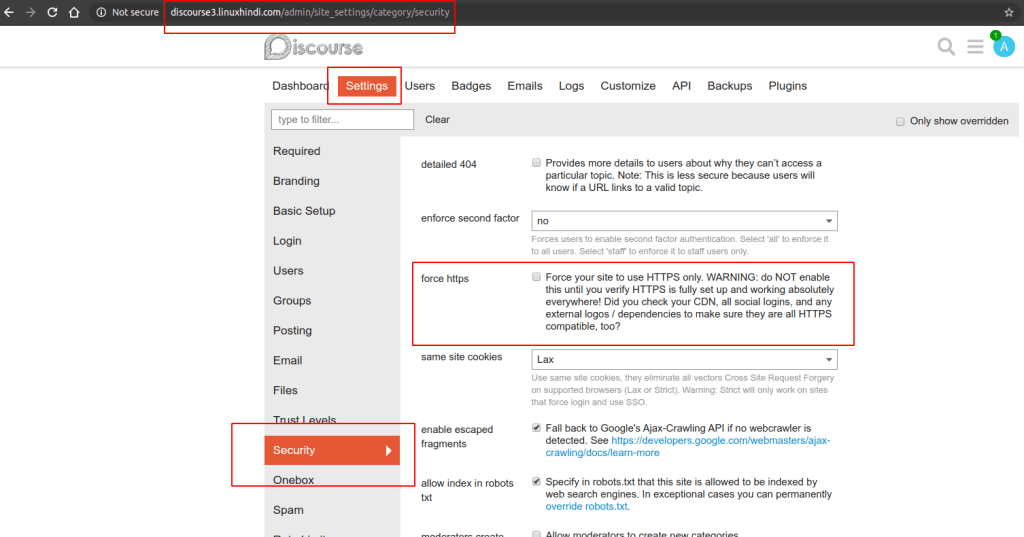
After saving it, stop the container and start it again:
./launcher stop app
./launcher start app
After a few moments SSL will start working on your forum. Make sure you also take care of the dependencies for https.
14. Install more Discourse instances in more standalone containers
For more Discourse containers, you have to repeat the same process again from Step 8.
Initially, you used app. Now you should use other names like app2, app3 etc.
cp /var/discourse/samples/standalone.yml /var/discourse/containers/app2.ymlAn extra step would also be required for each of them to specify a new location (say standalone2, standalone3 and so on) in their respective yml files for the Docker volumes (check step 10). Of course, you’ll have to change the domain name as well.
## The Docker container is stateless; all data is stored in /shared
 volumes:
 volume:
   host: /var/discourse/shared/standalone2
   guest: /shared
 volume:
   host: /var/discourse/shared/standalone2/log/var-log
   guest: /var/log
With this, follow the rest of the steps and you’ll have more Discourse installed on the same server.
Hope you find this article useful in setting up more than one Discourse forums with their respective Docker containers.
If you have questions or suggestions, please feel free to leave a comment below.
