How to Expose or Publish Docker Port
There are two ways to deal with ports in a Docker setup: exposing ports and publishing ports. Both serve different purpose. Learn more about them.


In a multi-container setup, the services running in the containers communicate with each other over a common network. In the same setup, some containers also interact with the outside world.
This internal and external communication is handled with exposed and published ports in Docker respectively.
In this tutorial, I'll discuss dealing with ports in Docker. I'll go on to the difference between exposing and publishing ports, why they are used and how to use them.
Exposing vs publishing a port in Docker
There are two ways to handle ports in Docker: exposing the ports and publishing the ports.
Exposing a port simply means letting others know on which port the containerized application is going to be listening on, or accepting connections on. This is for communicating with other containers, not with the outside world.
Publishing a port is more like You can achieve the same with docker container port command.. This way, the container is able to communicate with external systems, the real world, the internet.
This graphics will help you understand.
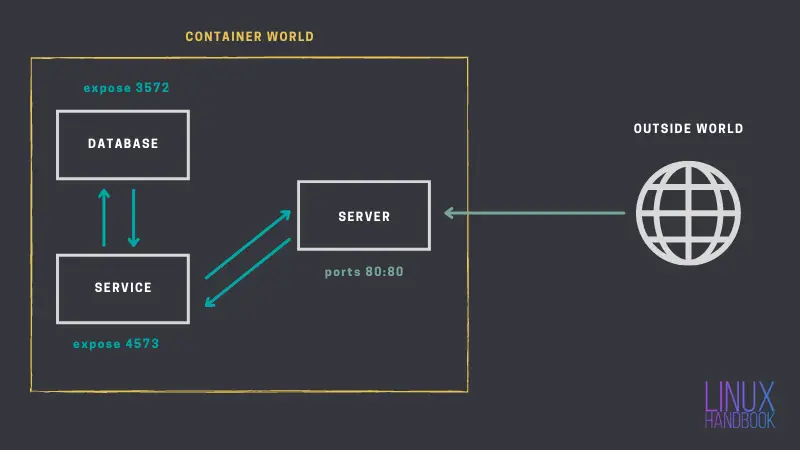
You see, how the SERVER container's port 80 is mapped to the port 80 of the host system? This way, the container is able to communicate to the outside world using the public IP address of the host system.
The exposed ports, on the other hand, cannot be accessed directly from outside the container world.
To remember:
- Exposed ports are used for internal container communication, within the container world.
- Published ports are used for communicated with systems outside the container world.

Exposing ports in Docker
First of all, exposing a port is not strictly necessary. Why? Because most of the docker images you use in your set up already have a default port exposed in their configuration.
For example, a containerized frontend application can communicate with a MariaDB database by simply specifying the container's IP and whichever port MariaDB is accepting connections on (default 3306).
Exposing helps in a situation where the defaults are not being used, like in this case if MariaDB were to not accept connections on port 3306, an alternative port should be mentioned by exposing it.
There are two ways you can expose a port:
- Using the
EXPOSEDockerfile instruction. - Using
--exposewith docker CLI orexposekey in docker-compose.
Time to dive deeper into both.
Method 1: Expose ports via Dockerfile
You can add a simple instruction in your Dockerfile to let others know at which port your application will be accepting connections on.
About this instruction, what you must know is the following:-
EXPOSEdoes not add additional layers to the resulting docker image. It just adds metadata.EXPOSEis a way of documenting your application port. The only effect it has is in terms of readability or understanding the application.
You can see how expose works with a simple container image I've built just for this purpose. This image doesn't do anything.
Pull the image.
docker pull debdutdeb/expose-demo:v1This image exposes a total of four ports, list the image using the following command.
docker image ls --filter=reference=debdutdeb/expose-demo:v1Take a look at the SIZE column, it will say 0 bytes.
➟ docker image ls --filter=reference=debdutdeb/expose-demo:v1
REPOSITORY              TAG       IMAGE ID       CREATED   SIZE
debdutdeb/expose-demo   v1        ad3d8ffa9bfe   N/A       0B
The reason is simple, there are no layers in this image, all the expose instructions added were metadata, no real layers.
You can also get the number of available layers using the following command:-
docker image inspect -f '{{len .RootFS.Layers}}' debdutdeb/expose-demo:v1You should see an output like this:-
➟ docker image inspect -f '{{len .RootFS.Layers}}' debdutdeb/expose-demo:v1
0
As I previously said, the exposed ports are added as image metadata, to let us know which ports the application is using.
How do you see that information without looking at a Dockerfile? You need to inspect the image. To be more specific, see the command below, you can use a similar command on any image to list the exposed ports.
I'm using my sample image for demonstration.
docker image inspect -f \
	'{{range $exposed, $_ := .Config.ExposedPorts}}{{printf "%s\n" $exposed}}{{end}}' \
    debdutdeb/expose-demo:v1
Sample output:
➟ docker image inspect -f '{{range $exposed, $_ := .Config.ExposedPorts}}{{printf "%s\n" $exposed}}{{end}}' debdutdeb/expose-demo:v1
443/tcp
80/tcp
8080/tcp
9090/tcp
You can also compare this image, which is exposing a couple of ports, with the debdutdeb/noexpose-demo:v1 image, that isn't exposing any ports. Run the same set of commands on that image as well and notice the difference.
Method 2: Exposing ports through CLI or docker-compose
Sometimes application developers shy away from including an extra EXPOSE instruction in their Dockerfile.
In such a case to make sure other containers (through the docker API) can detect the port in use easily, you can expose multiple ports post-build, as part of the deployment process.
Either choose the imperative method, i.e. the CLI, or the declarative method, i.e. compose files.
CLI method
In this method, while creating a container, all you have to do is use the --expose option (as many times as needed) with the port number and optionally the protocol with a /. Here's one example:-
docker container run \
	--expose 80 \
    --expose 90 \
    --expose 70/udp \
    -d --name port-expose busybox:latest sleep 1d
I'm using the busybox image which doesn't expose any ports by default.
Compose file method
If you're using a compose file, you can add an array expose in the service definition. You can convert the previous deployment to a compose file like so:-
version: "3.7"
services:
	PortExpose:
    	image: busybox
        command: sleep 1d
        container_name: port-expose
        expose:
        	- 80
            - 90
            - 70/udp
Once you have the container running, just like before you can inspect it to know which ports are being exposed. The command looks similar.
docker container inspect -f \
	'{{range $exposed, $_ := .NetworkSettings.Ports}}
    {{printf "%s\n" $exposed}}{{end}}' \
    port-expose
Sample output:-
➟ docker container inspect -f '{{range $exposed, $_ := .NetworkSettings.Ports}}{{printf "%s\n" $exposed}}{{end}}' port-expose
70/udp
80/tcp
90/tcp
Publishing a port in Docker
Port publishing is a synonym for port forwarding where the requests from an incoming connection on a public port is forwarded to the container's port.
Similarly, the responses sent from the container through its port is sent to the client by forwarding the traffic to the the specified port in the host's port space.
There are two ways of publishing a port, one through the CLI and another using a compose file. Both methods also have one long syntax and one short syntax.
Method 1: Publish ports via Docker command
The two syntaxes are as follows:
-p [optional_host_ip]:[host_port]:[container_port]/[optional_protocol]--publish target=[container_port],published=[optional_host_ip]:[host_port],protocol=[optional_protocol]
For the optional host IP, you can use any IP address associated with any of the NICs. If the IP is omitted, docker will bind the port with all available IP addresses.
You're going to use the first one the most. The second one is more readable. Let's see an example using an nginx container. Run the following command:-
docker container run --rm --name nginx \
	--publish target=80,published=127.0.0.1:8081,protocol=tcp \
    -d nginx
With this command I'm simply binding the container's port 80 to my host's 8081 port on localhost. Now if you head over to http://localhost:8081 you'll see nginx running.
The previous command can be easily converted to the shorter form like so
docker container run --rm --name nginx \
	-p 80:127.0.0.1:8081/tcp -d nginx
Although it's shorter, it's harder to read.
You can also use -p or --publish multiple times to publish multiple ports.
Method 2: Publishing a port through a compose file
To publish a port using a compose file you'll need an array named ports in the service definition. This array can be a list of strings which looks similar to the short syntax of the CLI, or you can use a list of objects which is similar to the long syntax.
If I were to convert the previous nginx deployment using a compose file with an array of strings for the ports section it'd look like the following:-
version: "3.7"
services:
	Nginx:
    	image: nginx
		container_name: nginx
        ports:
        	- 80:127.0.0.1:8081/tcp
Let me also show how to use the array of objects syntax.
version: "3.7"
services:
	Nginx:
    	image: nginx
        container_name: nginx
        ports:
        	- target: 80
              published: 127.0.0.1:8081
              protocol: tcp
To see the list of all published ports, you can inspect the container like so-
docker container inspect -f '{{range $container, $host := .NetworkSettings.Ports}}{{printf "%s -> %s\n" $container $host}}{{end}}' nginxIf run you'll see the following output:-
➟ docker container inspect -f '{{range $container, $host := .NetworkSettings.Ports}}{{printf "%s -> %s\n" $container $host}}{{end}}' nginx
80/tcp -> [{127.0.0.1 8081}]
There is another, an easier way to list the published ports, using the docker container port command.
docker container port nginxExample output:-
➟ docker container port nginx
80/tcp -> 127.0.0.1:8081
When to expose a port and when to publish it?
This is a fair question. Exposing and publishing are not supposed to be competitors. Each serve a different purpose. If you are the developer of an image, you will be exposing the ports so that the user can better be sure where to attempt a connection. On the other hand, if you're using an image and you need to make it available to the outside world, you're going to be publishing the necessary ports.
I hope this article was helpful to you. If you have any questions, let me know in the comments down below.