

Isso is an open source commenting software that can serve as a great alternative to proprietary Disqus.
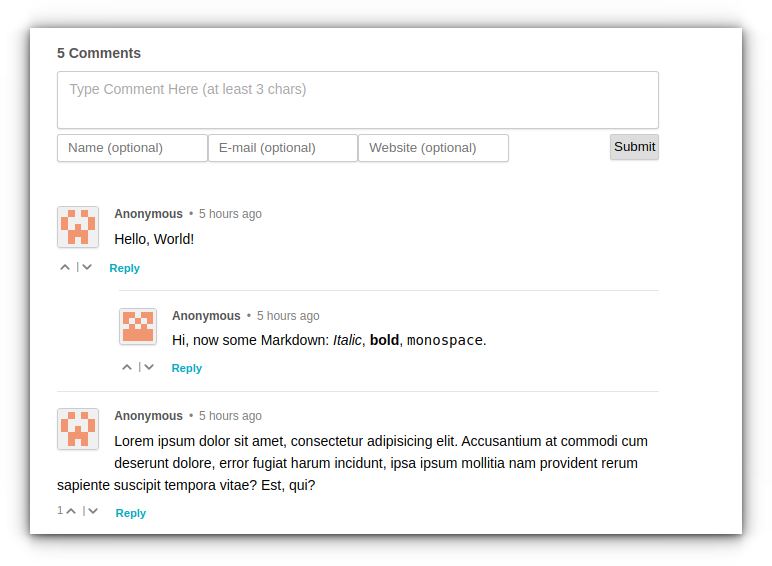
You can use it for adding a commenting system to your blog or website.
It works with WordPress, Ghost and many other frameworks thanks to a JavaScript embed. Here, I've used Ghost as a demonstrative example.
 Abhishek Prakash
Installing Isso with Docker with hybrid containerization
This document focuses on deploying Isso under a Nginx container with the essentials and takes a simplified approach by adopting the Docker Compose way. The configuration uses an image generated from building the official Dockerfile provided by the developers on GitHub.
The official guide does mention Nginx usage, which is based on host side installation. Here, as always, I've used a Docker based Nginx configuration.
The official documentation provides a basic one line example for Docker. But that needs to be extensively elaborated if considered for production usage.
Therefore, I've customized a Docker Compose version based on the same example and a custom Docker Compose based setup of Isso. The latter is no longer maintained, but is still a helpful reference.
With this guide, you can rebuild your Dockerfile and create a new image every time an update for Isso is released.
Prerequisites
It is not mandatory, but the tutorial will be much easier for you to follow if you have:
- Some knowledge of Docker
- Understanding of Docker Compose
You'll be deploying Isso behind a reverse proxy container, with SSL enabled subdomain.
Apart from the aforementioned topical knowledge, you'll need the following infrastructure requirements:
- A public facing Ubuntu Linux server. You can use a cloud service provider like Linode. A Nano server with 1 GB RAM will be sufficient for this deployment.
- Access to a domain and its DNS settings
- Docker and Docker Compose installed on your Linux server.
- Nginx reverse proxy already setup (Docker Compose file has been included in this tutorial)
If you need help, you can follow our guides on:
I'll be using isso.domain.com as an example for a Ghost blog available at domain.com. Change them appropriately as necessary. I'm using the following Nginx configuration on Docker Compose:
version: '3.7'

services:

  nginx-proxy:
    image: jwilder/nginx-proxy
    container_name: nginx-proxy
    ports:
      - "80:80"
      - "443:443"
    volumes:
      - ./html:/usr/share/nginx/html
      - ./dhparam:/etc/nginx/dhparam
      - ./vhost:/etc/nginx/vhost.d
      - ./certs:/etc/nginx/certs:ro
      - /var/run/docker.sock:/tmp/docker.sock:ro
      - ./client_max_upload_size.conf:/etc/nginx/conf.d/client_max_upload_size.conf
      - ./www.domain.com:/etc/nginx/vhost.d/www.domain.com
    labels:
      - "com.github.jrcs.letsencrypt_nginx_proxy_companion.nginx_proxy"
    restart: always
    networks:
      - net

  letsencrypt:
    image: jrcs/letsencrypt-nginx-proxy-companion
    container_name: letsencrypt-proxy-companion
    environment:
      DEFAULT_EMAIL: "[email protected]"
    depends_on:
      - nginx-proxy
    volumes:
      - ./certs:/etc/nginx/certs:rw
      - ./vhost:/etc/nginx/vhost.d
      - ./html:/usr/share/nginx/html
      - /var/run/docker.sock:/var/run/docker.sock:ro
    restart: always
    networks:
      - net

networks:
  net:
    external: true
Create an external network using docker create network net and deploy it using docker-compose up -d from the corresponding directory. Please check the Nginx Docker article linked above for complete details.
Debdut Chakraborty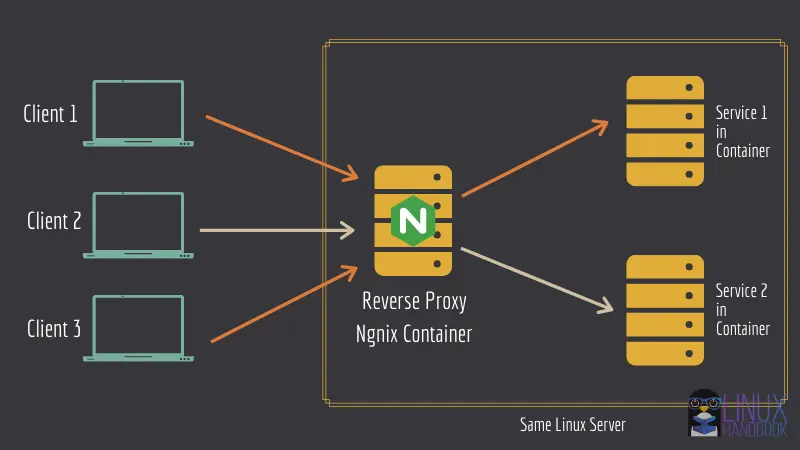
Step 1: Change the DNS settings
On your DNS provider's control panel, make sure your domain's A/AAAA records point to your Linux server's IP address.
Say you want to host Isso at isso.domain.com for your Ghost blog hosted at domain.com, you should add the following A record replacing the xxx.xxx.xxx.xxx with your server's IP address.
| Type | Host | Value | TTL |
|---|---|---|---|
| A Record | isso | xxx.xxx.xxx.xxx | 5 min. |
Step 2: Download Isso
Before you prepare the compose file for the Nginx container, you have to download Isso with Git.
Let's fetch it at /opt/isso.
Use git to download Isso and put it in under the /opt directory:
sudo git clone https://github.com/posativ/isso /opt/isso
Now switch to this directory:
cd /opt/isso
Now you're ready to build the official Dockerfile to generate the necessary image of Isso via Docker Compose:
Step 3: Edit configuration values
Before building the image, it is better to set the configuration file with the bare-minimum necessary parameters for production usage.
sudo nano isso.cfg
Section-wise Settings for the configuration file:
The [general] section:
- Use
dbpathto set the database path as seen from inside the container to be deployed. - Set the domain name for the
hostparameter, which would be your blog or website where you want to embed your Isso comment box on blog posts. Note that if you use non-www to www redirection for your blog, setwww.domain.comas host instead ofdomain.combecause that's the endpoint where the comments would ultimately be posted. - With
max-age, you can set a time range that allows users to edit/remove their own comments within 15 minutes(default). - I use
smtpas the notification method(via email) when new comments would be posted on the blog.
The [moderation] section:
Set this value to "true" to enable moderation for all comments posted on your website.
The [guard] section:
Set this value to "true" to enable basic spam protection for all comments posted.
The [server] section:
- With
listen, you specify the server to listen on. Isso supports both TCP/IP and unix domain sockets.
The [smtp] section:
Perhaps the most essential section, you set the basic credentials in here based on your SMTP service provider. With this setting, each time a visitor posts a new comment, you'll receive an email notification titled “New comment posted”. This allows you to get notified about new comments and moderate them easily right from your mailbox. The parameters for SendGrid are:
usernameis literallyapikeyas the value(common for all SendGrid users).passwordis your unique API Key specific to your API Key ID.hostwould besmtp.sendgrid.netportshould be587tois your email address where you wish to be notified about new comments.fromis the name and address you would see in your inbox. To make it easier, I've set the sender name as “New Commenter” with email address[email protected].
If you're not using SendGrid but some other SMTP service provider, the username, password, host, and port metrics would have to be changed accordingly based on their corresponding values.
To summarize, here is the complete configuration file to get you started:
[general]
dbpath = /db/comments.db
host = https://domain.com/
max-age = 15m
notify = smtp
[moderation]
enabled = true
[guard]
enabled = true
[server]
listen = http://0.0.0.0:8080/
[smtp]
username = apikey
password = replace-me-with-sendgrid-apikey
host = smtp.sendgrid.net
port = 587
to = [email protected]
from = New Commenter <[email protected]>
Step 4: Build the Isso Docker image based on the Official Dockerfile
Since you have already downloaded Isso from its GitHub repo at /opt/isso, the Dockerfile is already present.
So, let us build the image and name it isso:0.12.2:
docker build . -t isso:0.12.2
This image would be created locally with the 0.12.2 tag. It's time to use it in Docker Compose:
version: '3.7'

services:
  isso:
    image: isso:0.12.2
    restart: on-failure
    volumes:
      - ./:/config
      - ./:/db
    environment:
     - UID=4242
     - GID=4242
     - VIRTUAL_HOST=isso.domain.com
     - LETSENCRYPT_HOST=isso.domain.com
    networks:
     - net

networks:
  net:
    external: true
First, you set the image name and use an on-failure restart policy. Based on how the volumes are mounted as shown by the developers, both the /config and /db directories would be how it is seen inside the Isso container. UID and GID values 4242 are used to run the container as an unprivileged user.
VIRTUAL_HOST is used to make the Isso JS file accessible online for embedding on your site, and LETSENCRYPT_HOST provides it a free SSL certificate for HTTPS access. Our Nginx containers use a network called net. Therefore, this configuration also should use the same network.
You are now all set to deploy Isso with Docker!
Step 5: Deploy the Docker Compose file
Now, the crucial points to keep in mind are:
- This container must share the same network as Isso for them to be able to communicate with each other. As Isso will be using the
netnetwork, as your reverse proxy container is, this will use the same. If you have a different network configured, make sure you use that. - You should set an "on-failure" restart policy.
- You must protect the persistent data by using volumes (host-side under
/opt/isso) that are mounted at their respective locations inside the container.
The containers need environment variables to be set outside the docker-compose file. These are important values that are read from the host side, which is why Isso is a good example of a hybrid dockerization setup.
Let's spin up the Isso instance:
docker-compose up -d
Find out how the deployment went through with a real-time check:
docker logs -f isso_isso_1
If all goes well, you would get an output like this, as shown below:
2021-08-23 14:48:21,334 INFO: connected to SMTP server
2021-08-23 14:48:21,750 INFO: connected to https://domain.com/
[2021-08-23 14:48:21 +0000] [1] [INFO] Starting gunicorn 20.1.0
[2021-08-23 14:48:21 +0000] [1] [INFO] Listening at: http://0.0.0.0:8080 (1)
[2021-08-23 14:48:21 +0000] [1] [INFO] Using worker: sync
[2021-08-23 14:48:21 +0000] [8] [INFO] Booting worker with pid: 8
[2021-08-23 14:48:21 +0000] [9] [INFO] Booting worker with pid: 9
[2021-08-23 14:48:21 +0000] [10] [INFO] Booting worker with pid: 10
[2021-08-23 14:48:21 +0000] [11] [INFO] Booting worker with pid: 11
Step 6: Embed Isso code on your website
Based on the configuration discussed in the step 3, you must now update your website with the Isso embed code.
You can figure out where you should be embedding the JavaScript on your website.
<script data-isso="https://isso.domain.com/"
                data-isso-avatar="true"
                data-isso-vote="true"
                data-isso-vote-levels="-5,5"
                src="https://isso.domain.com/js/embed.min.js"></script><
        <section id="isso-thread"></section>
Steps for Ghost
On a Docker based deployment of Ghost, the process goes something like this:
Login to your ghost server and enter the ghost directory:
cd ~/ghost
The post.hbs file resides at /var/lib/ghost/current/content/themes/theme-name/post.hbs. Remember to use only the post.hbs for the theme that you are currently using for the embedding to take effect. Here I'm using the Casper theme. So the theme-name here would be casper. You can double-check that by entering your Ghost container's shell:
avimanyu@localhost:~$ docker exec -ti ghost_ghost_1 bash -c "ls /var/lib/ghost/current/content/themes/casper/"
LICENSE    author.hbs	  error.hbs    package.json  post.hbs
README.md  default.hbs	  gulpfile.js  page.hbs      tag.hbs
assets	   error-404.hbs  index.hbs    partials      yarn.lock
Copy the file using docker cp command:
docker cp ghost_ghost_1:/var/lib/ghost/current/content/themes/casper/post.hbs post.hbsNow that you have it inside your own self-hosted Ghost directory where the Docker Compose file resides, open that file and inside the article-comments section, embed the following code:
    <section class="article-comments gh-canvas">
        <script data-isso="https://isso.domain.com/"
                data-isso-avatar="true"
                data-isso-vote="true"
                data-isso-vote-levels="-5,5"
                src="https://isso.domain.com/js/embed.min.js"></script><
        <section id="isso-thread"></section>
    </section>
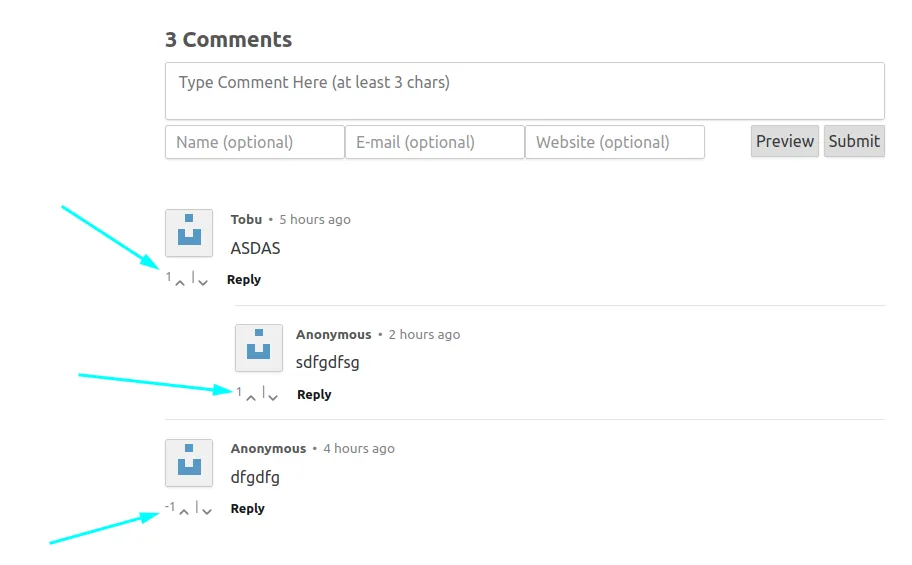
Here, data-isso-vote="true" enables voting for visitors and data-isso-vote-levels="-5,5" allows setting a range for those values(-5 to 5 in this case):
Mount the newly modified file on your Ghost Docker Compose configuration in the volumes section and update it as follows:
- ./post.hbs:/var/lib/ghost/current/content/themes/casper/post.hbs
Scale up a new Ghost instance based on this configuration:
docker-compose up -d --scale ghost=2 --no-recreate
After about a minute or so, remove the old Ghost container that's still running:
docker rm -f ghost_ghost_1Scale down to single container mode:
docker-compose up -d --scale ghost=1 --no-recreate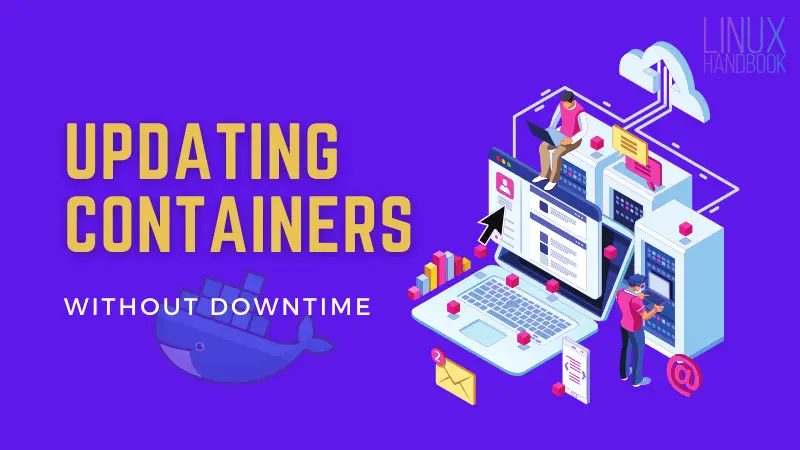
At this point, you have completed setting up Isso on your blog successfully!
Step 7: Access your Isso comments box on the website
Wait for a few minutes and point a browser to the Ghost domain where you just configured Isso.
For example, if you host your blog at domain.com, scroll down to the bottom of any blog post, and you'll find the comment box ready for use!

Stopping the containers
In case you want to bring down the container, you can do so by going to the directory where you had downloaded Isso (/opt/isso in our case) with Git and using this command:
docker-compose down
To start the deployment again, make sure you are working under the same /opt/isso directory and run:
docker-compose up -d
Bonus Tips
Here are some additional tips that should come in handy with your Isso setup:
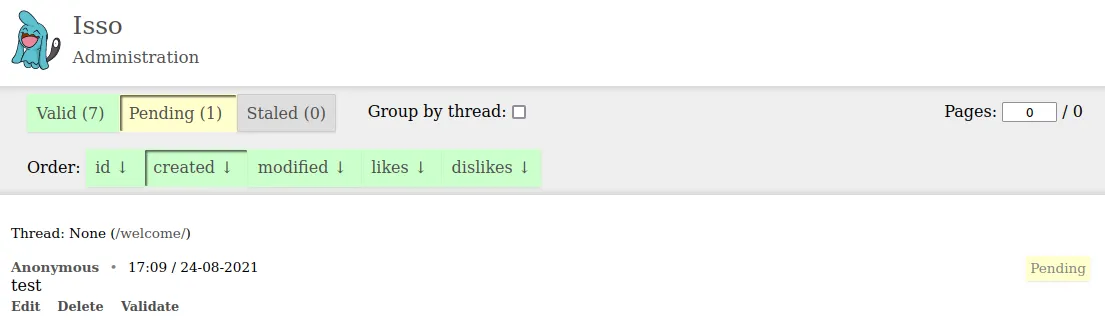
Web Administration Interface
Did you know that you can also access and moderate Isso comments on a web interface? The corresponding URL that serves that purpose is isso.domain.com/admin. Here, I've used isso for the sub-domain. But in order to enable it, you must set an additional section called [admin] in the configuration file(discussed in step 3) with the following contents:
[admin]
enabled = true
password = plain-text-password
Do note that plain-text-password seen above would literally be the value you use as the password:

After logging in, the web interface looks as shown below:
If you have Docker Content Trust enabled
The Dockerfile uses node:dubnium-buster as base image that apparently has no valid trust data when I attempted building it. Content trust is disabled by default on Docker. But if you have it enabled, you might get an error like this:
avimanyu@localhost:/opt/isso$ docker build . -t isso:0.12.2
WARN[0013] targets metadata is nearing expiry, you should re-sign the role metadata
WARN[0013] snapshot is nearing expiry, you should re-sign the role metadata
ERRO[0013] Can't add file /opt/isso/ansible/site.yml to tar: io: read/write on closed pipe
Sending build context to Docker daemon    2.8MB
ERRO[0013] Can't close tar writer: io: read/write on closed pipe
error during connect: Post http://%2Fvar%2Frun%2Fdocker.sock/v1.41/build?buildargs=%7B%7D&cachefrom=%5B%5D&cgroupparent=&cpuperiod=0&cpuquota=0&cpusetcpus=&cpusetmems=&cpushares=0&dockerfile=Dockerfile&labels=%7B%7D&memory=0&memswap=0&networkmode=default&rm=1&shmsize=0&t=isso%3A0.12.2&target=&ulimits=null&version=1: No valid trust data for dubnium-buster
So, make sure to temporarily set DOCKER_CONTENT_TRUST as 0 before building the image(step 4):
export DOCKER_CONTENT_TRUST=0Set it back to 1 after you have obtained the image:
export DOCKER_CONTENT_TRUST=1Updating Isso
Whenever a new version of Isso is released, you can clone the repository in a separate location:
git clone https://github.com/posativ/isso.git isso-update
cd isso-update
After moving into this separate location(isso-update), you can build a new image by using the latest version number as shown in step 4. Once that is done, edit the Isso Docker Compose file and update the image version number there as well.
Now, scale up a new Isso container, wait for about a minute and remove the old container. Finally, scale down to single container mode(as discussed in the latter part of step 6).
Making sure voting works
It took me a while to figure out why upvoting or downvoting on comments weren't working when I was attempting to. Isso is quite watchful and picky about these things.
I was able to successfully test upvoting/downvoting only after accessing the comments from a different IP address (which in my case was my mobile data). For testing comment voting on Isso, using a VPN would be a good idea.
Final notes
For a complete reference on the Isso application and all its features, you can refer to the official Isso documentation, particularly, the server and client subsections to make use of it extensively and maximize from its productivity.

Hope you find this guide useful in self-hosting your own commenting system on your site. If you have any suggestions, feedback, or queries, you can share them in the comment section below.
