

Rocket.Chat is an open source communication platform ideal for collaboration among organizations, teams, or forum members.
We use it for our internal communication at Linux Handbook and It's FOSS and absolutely love it.
Now, you may opt for a managed Rocket.Chat instance from the makers of Rocket.Chat itself. It would of course incur additional expenses, but you won't have to put in extra effort in deploying Rocket.Chat, updating it and maintaining it. In addition, it helps the development of the Rocket.Chat project as well.
If you want to avoid spending a lot or take matters in your hands with a 'do it yourself' approach, you may self-host Rocket.Chat on your server.
In this tutorial, I'll show the steps to deploy Rocket.Chat with Docker.
Self-hosting Rocket.Chat with Docker
Let's see what you need to deploy Rocket.Chat with Docker on a Linux server.
Requirements
Aside from familiarity with Linux commands, knowing the basics of Docker Compose will also be helpful here.
- A Linux server. You can use a physical server, virtual machine or cloud servers. You may sign up with our partner Linode and get $100 in free credits.
- Docker and Docker Compose installed on your server.
- Access to the DNS of your domain where you want to deploy Rocket.Chat.
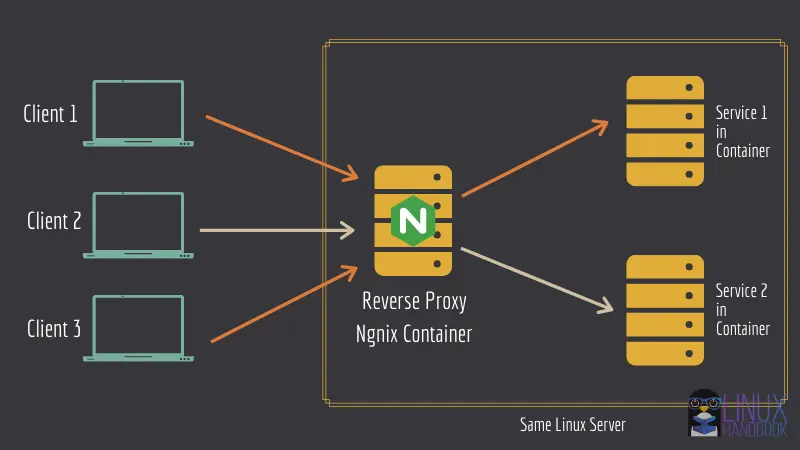
- Nginx reverse proxy setup with www/non-www redirection and allowed upload limits.
Step 0: Get the initial set up ready
You need to have Docker and Docker Compose installed on your system. You may refer to these tutorials to get instructions for Ubuntu.
Other than that, you also need to have Nginx reverse proxy setup. This is beneficial if you want to have more than one Rocket.Chat or some other web service installed on the same server.
This topic has previously been covered in detail in the tutorial linked below, so I am not going to repeat the same steps here. However, you must have this setup on your system.
Use the following Nginx configuration when you run Docker Compose, named as docker-compose.yml inside a separate directory. Make sure you change DEFAULT_EMAIL to your preference.
version: '3.7'

services:

  jwilder-nginx-proxy:
    image: jwilder/nginx-proxy
    container_name: jwilder-nginx-proxy
    ports:
      - "80:80"
      - "443:443"
    volumes:
      - html:/usr/share/nginx/html
      - dhparam:/etc/nginx/dhparam
      - vhost:/etc/nginx/vhost.d
      - certs:/etc/nginx/certs:ro
      - /var/run/docker.sock:/tmp/docker.sock:ro
      - ./client_max_upload_size.conf:/etc/nginx/conf.d/client_max_upload_size.conf
      #- ./www.domain.com:/etc/nginx/vhost.d/www.domain.com
    labels:
      - "com.github.jrcs.letsencrypt_nginx_proxy_companion.nginx_proxy"
    restart: always
    networks:
      - net

  letsencrypt:
    image: jrcs/letsencrypt-nginx-proxy-companion
    container_name: letsencrypt-proxy-companion
    environment:
      DEFAULT_EMAIL: "[email protected]"
    depends_on:
      - jwilder-nginx-proxy
    volumes:
      - certs:/etc/nginx/certs:rw
      - vhost:/etc/nginx/vhost.d
      - html:/usr/share/nginx/html
      - /var/run/docker.sock:/var/run/docker.sock:ro
    restart: always
    networks:
      - net

volumes:
  certs:
  html:
  vhost:
  dhparam:

networks:
  net:
    external: true
Before you deploy the above config, do check the reference if needed, and also ensure the preparative steps as discussed below.
Step 1: Preparing the deployment of Rocket.Chat server
I use Jwilder reverse proxy method here because it takes into account SSL certificates, www/non-www redirection and allowed upload limits.
How to handle SSL certificates has been covered in the link shared above in the requirements section. Additionally, I will describe how to enable www/non-www redirection(skip it for sub-domains) and increase permitted upload limits via Nginx.
WWW/non-WWW Redirection (Skip for sub-domains)
In case you want to self-host Rocket.Chat on a sub-domain, this section is irrelevant and you can move on to this next section. But if not, depending on your SEO preferences, you may want to set redirection of www to non-www or vice versa. For example, if your chat server is hosted at domain.com, users visiting www.domain.com must be redirected to it (just how GitHub's domain works).
Similarly, if you host it at www.domain.com, users visiting domain.com must be redirected (just how Linode's domain works).
WWW to non-WWW
Create a file named www.domain.com within the nginx docker compose directory with the following content and save it:
rewrite ^/(.*)$ https://domain.com/$1 permanent;
Non-WWW to WWW
Create a file named domain.com within the nginx docker compose directory with the following content and save it:
rewrite ^/(.*)$ https://www.domain.com/$1 permanent;
Now, suppose you want to use WWW to non-WWW redirection. All you have to do is bind mount the file in the volumes section of your Nginx service configuration:
- ./www.domain.com:/etc/nginx/vhost.d/www.domain.com
Increase Permitted Upload Limits
Image uploads can be affected by low upload size limits on Rocket.Chat. Since I'm using a reverse proxy, I've to additionally set a maximum upload limit and avoid issues when uploading images on Docker. Say for 1 GB, create a file named client_max_upload_size.conf and save it with the following content:
client_max_body_size 1G;
Later you need to mount it just as described with the previous file:
- ./client_max_upload_size.conf:/etc/nginx/conf.d/client_max_upload_size.confRun docker-compose up -d from the Nginx directory to update your Nginx configuration.
The Rocket.Chat deployment configuration essentially consists of three main components:
- MongoDB database backend
- MongoDB initialization of replica set
- Rocket.Chat itself as the web frontend
Since you're setting up Rocket.Chat with Docker, all the above components would be deployed as their own respective containers.
For the database service and replica set initialization, I'll use an internal network called rocket as it only needs to be visible for the Rocket.Chat service.
networks:
  - rocket
But for the Rocket.Chat service, of course, the same net network used on the reverse proxy configuration must be specified along with the rocket network, and only then would it be possible to get it up and running with the Nginx Docker container.
networks:
  - net
  - rocket
Now consider how they are configured individually with Docker Compose:
For MongoDB, I use the official MongoDB 4.0 image which is available on Docker Hub:
  mongo:
    image: mongo:4.0
    restart: always
    volumes:
     - ./data/db:/data/db
    command: mongod --smallfiles --oplogSize 128 --replSet rs0 --storageEngine=mmapv1
    networks:
      - rocket
Rocket.Chat also requires the MongoDB replica set to improve performance. So the image must be used separately to deploy a temporary service and initialize the replica set. It will run the necessary command, remove itself and won't stay running:
  mongo-init-replica:
    image: mongo:4.0
    command: 'bash -c "for i in `seq 1 30`; do mongo mongo/rocketchat --eval \"rs.initiate({ _id: ''rs0'', members: [ { _id: 0, host: ''localhost:27017'' } ]})\" && s=$$? && break || s=$$?; echo \"Tried $$i times. Waiting 5 secs...\"; sleep 5; done; (exit $$s)"'
    depends_on:
      - mongo
    networks:
      - rocket
For the Rocket.Chat service itself, I use the most recent version number tagged on Docker Hub launched by the developers as a stable release. Here, at this time of writing, it is 3.17.0 and based on an Official Rocket.Chat Docker Compose Configuration:
  rocketchat:
    image: rocketchat/rocket.chat:3.17.0
    command: bash -c 'for i in `seq 1 30`; do node main.js && s=$$? && break || s=$$?; echo "Tried $$i times. Waiting 5 secs..."; sleep 5; done; (exit $$s)'
    restart: always
    volumes:
      - ./uploads:/app/uploads
    environment:
      - PORT=3000
      - ROOT_URL=https://chat.domain.com
      - VIRTUAL_HOST=chat.domain.com
      - LETSENCRYPT_HOST=chat.domain.com
      - MONGO_URL=mongodb://mongo:27017/rocketchat
      - MONGO_OPLOG_URL=mongodb://mongo:27017/local
      - Accounts_UseDNSDomainCheck=false
    depends_on:
      - mongo
    networks:
      - net
      - rocket
Since this is a Nginx reverse proxy based configuration, you must include the additional environment variables, namely, VIRTUAL_HOST, LETSENCRYPT_HOST with your domain URL and Accounts_UseDNSDomainCheck set to false. Here, I've assumed chat.domain.com as an example domain name for your chat server.
Do note that the deployment uses a bind mounted configuration and therefore, the database and service volume directories would be created in the same directory that has the Docker Compose file.
Step 2: Deploying Rocket.Chat
Now you should have the docker-compose file ready. It's time to use this file.
Create the Rocket Chat docker compose directory on your server:
mkdir rocketchat
Go into the directory to edit the necessary files:
cd rocketchat
Now create the following docker-compose file based on our discussions so far:
version: "3.7"

services:
  rocketchat:
    image: rocketchat/rocket.chat:3.17.0
    command: bash -c 'for i in `seq 1 30`; do node main.js && s=$$? && break || s=$$?; echo "Tried $$i times. Waiting 5 secs..."; sleep 5; done; (exit $$s)'
    restart: always
    volumes:
      - ./uploads:/app/uploads
    environment:
      - PORT=3000
      - ROOT_URL=https://chat.domain.com
      - LETSENCRYPT_HOST=chat.domain.com
      - VIRTUAL_HOST=chat.domain.com
      - MONGO_URL=mongodb://mongo:27017/rocketchat
      - MONGO_OPLOG_URL=mongodb://mongo:27017/local
      - Accounts_UseDNSDomainCheck=false
    depends_on:
      - mongo
    networks:
      - net
      - rocket

  mongo:
    image: mongo:4.0
    restart: always
    volumes:
     - ./data/db:/data/db
    command: mongod --smallfiles --oplogSize 128 --replSet rs0 --storageEngine=mmapv1
    networks:
      - rocket

  mongo-init-replica:
    image: mongo:4.0
    command: 'bash -c "for i in `seq 1 30`; do mongo mongo/rocketchat --eval \"rs.initiate({ _id: ''rs0'', members: [ { _id: 0, host: ''localhost:27017'' } ]})\" && s=$$? && break || s=$$?; echo \"Tried $$i times. Waiting 5 secs...\"; sleep 5; done; (exit $$s)"'
    depends_on:
      - mongo
    networks:
      - rocket

networks:
  net:
    external: true
  rocket:
    internal: true
Now, you can start the Rocket.Chat instance:
docker-compose up -d
Access the Rocket.Chat server domain specified in the configuration using your domain URL.
Step 3: Setting up your Rocket.Chat Admin account
On accessing your chat-server URL for the first time, follow the on-screen instructions until you have claimed your site as admin.
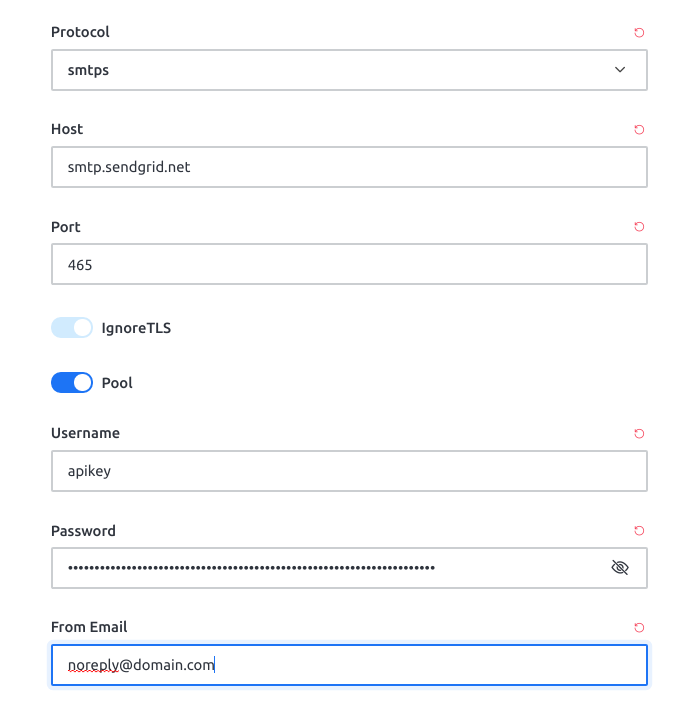
Step 4: Setting up SMTP for Email Notifications
In this example, I have used SendGrid as SMTP service. Here is a quick walkthrough on how to configure it:
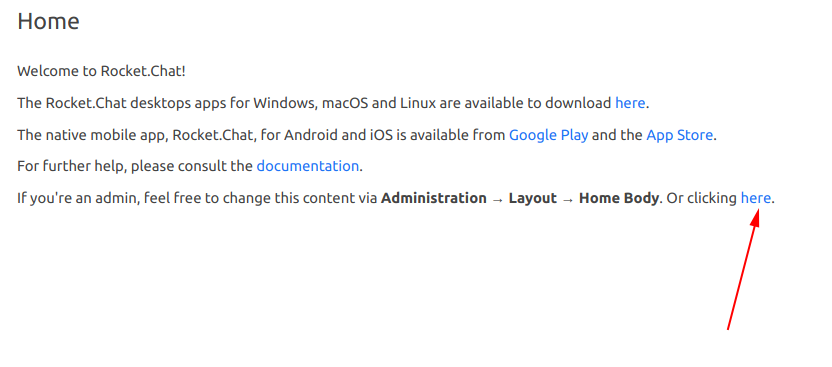
On the main chat server, click on the home icon:

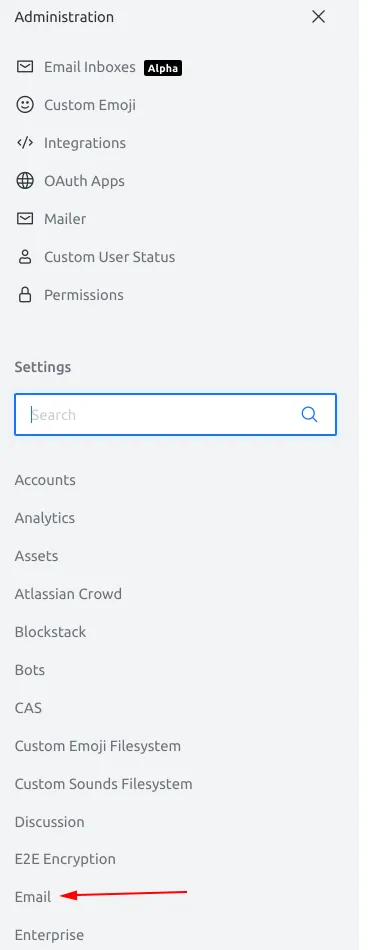
Navigate to the administration panel:
Scroll down a bit and open the Email Settings:
Once again, scroll down on the right until you see “SMTP”:
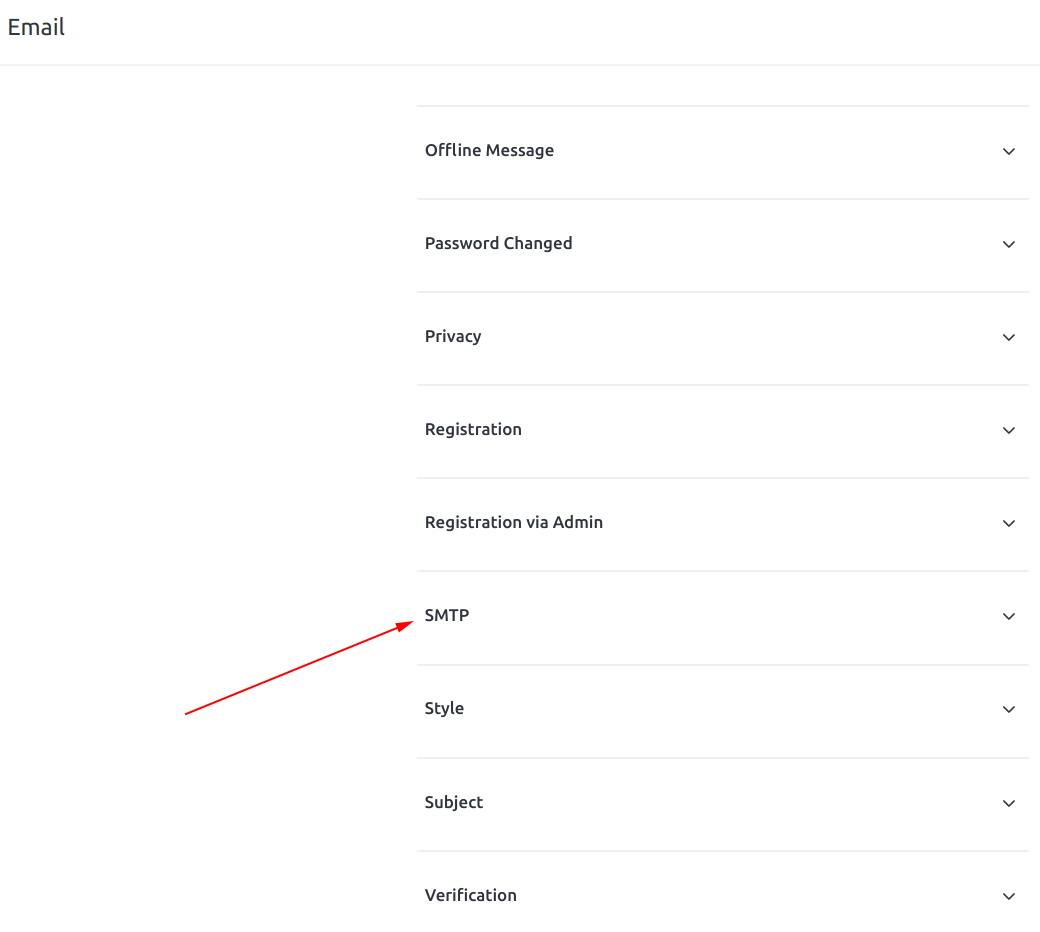
Expand it and make sure you choose the following settings, specifically the smtps protocol. The [email protected] “From Email”, is of course for demo purpose only. Customize it as you would see fit, based on what you want it to look like when the user receives a mailbox notification. So, change it as per your requirement:
That's it then! You have successfully self-hosted your very own, fully functional Rocket.Chat instance on your server!
Tips for your self-hosted Rocket.Chat instance
Here are a few tips that will help you in maintaining your instance.
Always use HTTPS in the Server URL
Make sure to always use HTTPS in the chat-server URL, particularly in the following two cases:
- When you inform users about the URL to log-in for the first time, make sure they use
httpsin the domain name. - Make sure the URL value, at
Admin Panel>Settings>General>Site URL, also useshttps.
Ensuring the above two tasks will prevent unwanted log-in or log-out issues in the future.
Monitor Rocket.Chat Logs in Real-time
If you want to check the container's logs while it's deployed in real time, you can run:
docker logs -f rocketchat_rocketchat_1
Backup and Restore Rocket.Chat Settings & Volumes without Downtime
Using a cloud + local approach, you can backup and restore your Rocket.Chat settings and volumes without downtime. I have discussed how to backup bind mounts(as used by Rocket.Chat) in the following article:
Quickly Update Rocket.Chat Containers without Outage
With the --scale flag on Docker Compose, you can create a new container based on the latest version of Rocket.Chat. When it's done, you can remove the old one. This results in negligible downtime when you scale down to single container mode. User access will not be affected while you perform the upgrade:
If you encounter a bug, have problems or have a suggestion, you can let me know by leaving a comment below.
