If you're like me, you probably have a bunch of computers. Those computers are probably all running Linux (right? right?)
If so, then you're probably tired of creating thumb drives every time you want to install an operating system, walking that over to the computer, sticking the thumb drive in, trying to figure out the key that accesses the boot menu for that model...etc etc.. you know how it goes.
Either that or you're just a geek like me and want to do it for the fun of it. I'm here now to show you a way to boot any Linux distro over the network from a central server, so you can install it to any computer on your network.
I'm going to show you a method using a PiHole DNS server, but there are many other routers that support this as well.
Stuff you'll need to do this:
- Either a VM or a separate machine to act as the actual Netboot server. In my case I just used a Proxmox VM (big surprise eh?) but anything running Ubuntu with at least 4 gigs of memory will suffice here.
- A Pi-Hole DNS server that is handling DHCP for your network. You'll need to create a DHCP reservation for the netboot server, and have it be static every time the client machine looks for it. You can also opt to use your router that supports netboot, but since mine doesn't, I'm doing it with Pi-hole.
- Good knowledge of Linux systems and Docker containerization
Step 1: Setting up the Netboot server
You're going to be running a piece of software called netboot.xyz in a docker container.
So, on your new Ubuntu VM or machine, the first thing you'll need to do is install docker and docker compose. We have a wonderful guide on how to do just that here.
Off of your home directory, you'll want to make the following directories in this structure:
mkdir netboot_xyz
cd netboot_xyz
mkdir assets
mkdir config
The next thing you'll need is a docker compose YAML file. I'll show you what mine looks like below, and you can adapt it to your setup:
version: "2.1"
services:
  netbootxyz:
    image: lscr.io/linuxserver/netbootxyz:latest
    container_name: netbootxyz
    environment:
      - PUID=1000 #current user
      - PGID=1000 #current group
      - TZ=Etc/UTC
      # - MENU_VERSION=1.9.9 #optional, sets menus version, unset uses latest
      - PORT_RANGE=30000:30010 #optional
      - SUBFOLDER=/ #optional
    volumes:
      - /home/doc/netboot_xyz:/config
      - /home/doc/netboot_xyz:/assets #optional
    ports:
      - 3000:3000
      - 69:69/udp
      - 8080:80 #optional
    restart: unless-stopped
This shows a web server being created on port 8080 for your assets (ISOs, basically), and also a management server on port 3000.
Notice the absolute paths in the volumes section. Make sure to get this part right or it won't start up.
Now, start the container with:
docker compose up -dVerify the successful start of the container by doing:
docker ps
Go to http://your.server.here:3000 and verify that you get the netboot.xyz menu. If that loads, you're ready to set up your Pi-hole.
Step 2: Setting up Pi-hole for PXE
SSH into your Pi-hole's server, and do the following:
 cd /etc/dnsmasq.d
 nano 07-pxe.conf
Paste the following into the newly created file. Shoutout to Linuxserver.io for this and configurations for a bunch of other routers as well.
dhcp-match=set:bios,60,PXEClient:Arch:00000
dhcp-boot=tag:bios,netboot.xyz.kpxe,,192.168.1.YOURSERVER
dhcp-match=set:efi32,60,PXEClient:Arch:00002
dhcp-boot=tag:efi32,netboot.xyz.efi,,192.168.1.YOURSERVER
dhcp-match=set:efi32-1,60,PXEClient:Arch:00006
dhcp-boot=tag:efi32-1,netboot.xyz.efi,,192.168.1.YOURSERVER
dhcp-match=set:efi64,60,PXEClient:Arch:00007
dhcp-boot=tag:efi64,netboot.xyz.efi,,192.168.1.YOURSERVER
dhcp-match=set:efi64-1,60,PXEClient:Arch:00008
dhcp-boot=tag:efi64-1,netboot.xyz.efi,,192.168.1.YOURSERVER
dhcp-match=set:efi64-2,60,PXEClient:Arch:00009
dhcp-boot=tag:efi64-2,netboot.xyz.efi,,192.168.1.YOURSERVER
Save and restart the Pi-hole.
Step 3: Testing the setup
To test this, I'm going to create a VM in Proxmox, and the only difference between this and any other VM I'd create is I'm going to tell it not to load any media.
You're also going to want to make sure you assign the VM enough RAM, or if doing this on bare metal, make sure there's at least 4 gigs of RAM in the machine. I've found that some ISOs will refuse to load without more than this in RAM (Proxmox VE is one of them).
This will make it default to iPXE booting, which is where netboot.xyz should catch it and bring you into the boot menu:
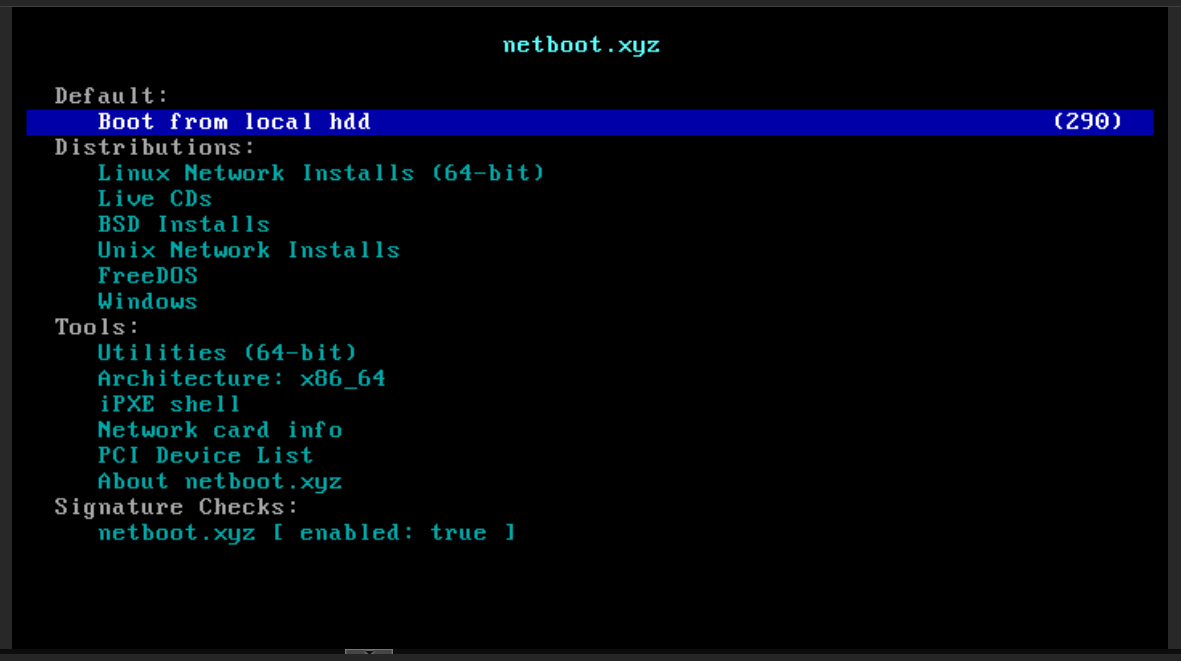
In this menu, you'll want to go to "Linux Network Installs" and pick the distribution you want to install. Netboot.xyz will take it from there, downloading the necessary files, and eventually bringing you to the installer of the O/S you have selected. If you're on bare metal, you may have to hit the boot menu key and select iPXE for your startup device.
And just like that, no more thumb drives (mostly) . I hope this is of help to you. Please let me know in the comments if you try this, and how it went for you. See you next time!