

Have you ever wondered about managing big amount of logs? At some point everyone sysadmin has, I believe. The solution is very simple: ‘Configure a Graylog Server.’
In the previous tutorial, I showed how to get started with Buildah to manage your Linux containers. In this tutorial, I’ll show you how to configure a Graylog server to manage a huge amount of log (Big data).
What is Graylog?
Graylog is an Open Source platform for log management. It lets you gather and aggregate the logs from different destinations. It then also enables you to visualize the logs in a web interface.
There are prerequisites to install and configure Graylog server, which are as below:
- Installing openJDK
- Installing MongoDB
- Installing Elasticsearch
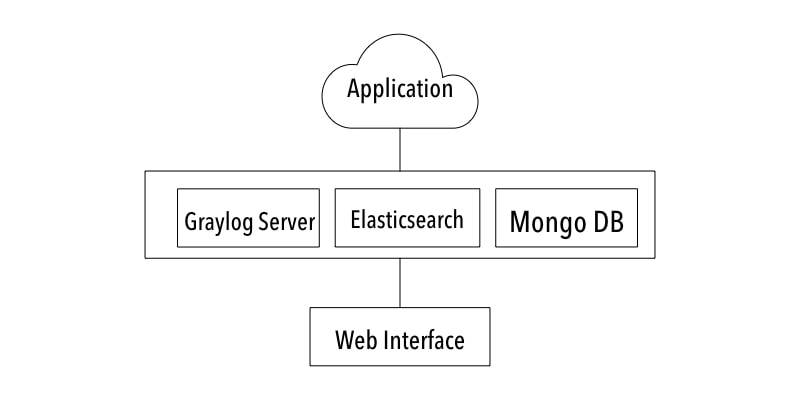
The fundamental components of Graylog server are:
MongoDB: A database, which stores configuration and meta information.
Elasticsearch: An engine, which makes searches efficient. Also it stores log messages. It offeres ease for searching. All input/output operations happen in this engine.
GrayLog Server: A parser, which would collect logs from different destinations.
Graylog Web Interface: A dashboard to manage log related configurations using GUI. Web Interface gives more easy and tidy approach to handle the configurations.
Let’s start with the Graylog server installation. We will go through the procedure step by step.
Prerequisite for Graylog server
Let’s first start by installing the required components of Graylog server.
Please note that I am using Red Hat Linux in this tutorial so the installation steps show Yum package manager. If you are using some other distribution, you should use the package manager of your distribution.
Installing openJDK
First we will install openJDK. Why do you need OpenJDK? Because, Elasticsearch is based on Java. You may also use OracleJDK but I prefer the open source version OpenJDK.
# yum install java-1.8.0-openjdk-headless.x86_64 -y

# yum install epel-release -y

# yum install pwgen -y
Installing Elasticsearch
After installing openJDK, let’s move towards Elasticsearch. This engine plays a fine role inside Graylog server. Elasticsearch engine can store, and search a huge amount of data. This is why it is preferred in handling Big Data.
Elasticsearch fulfills the requirement of applications which need complex searching. Elasticsearch helps to show the message in Graylog Web Interface, whenever user requests a query.
We are going to import the GPG key using the following command:
# rpm --import https://packages.elastic.co/GPG-KEY-elasticsearchSince default Elasticsearch repository is not available in Centos 7 / Rhel 7, we will need to create repo file manually including below entries in Elasticsearch repo file.
# vi /etc/yum.repos.d/elasticsearch.repo

[elasticsearch-2.x]
name=Elasticsearch repository for 2.x packages
baseurl=https://packages.elastic.co/elasticsearch/2.x/centos
gpgcheck=1
gpgkey=https://packages.elastic.co/GPG-KEY-elasticsearch
enabled=1
Now you are ready to install Elasticsearch package.
# yum install elasticsearch -y After installing Elasticsearch package, elasticsearch.yml configuration file will be generated, set the cluster name to graylog as below.
# vi /etc/elasticsearch/elasticsearch.yml

cluster.name: graylog
We are all set to start and enable elasticsearch.service
# chkconfig --add elasticsearch
# systemctl daemon-reload
# systemctl enable elasticsearch.service
# systemctl start elasticsearch.service
Once you started and enabled elasticsearch.service ; below curl command should give you output as shown.
curl -XGET 'http://localhost:9200/_cluster/health?pretty=true'

{ "cluster_name" : "graylog", "status" : "green", "timed_out" : false, "number_of_nodes" : 1, "number_of_data_nodes" : 1, "active_primary_shards" : 1, "active_shards" : 1, "relocating_shards" : 0, "initializing_shards" : 0, "unassigned_shards" : 0, "delayed_unassigned_shards" : 0, "number_of_pending_tasks" : 0, "number_of_in_flight_fetch" : 0, "task_max_waiting_in_queue_millis" : 0, "active_shards_percent_as_number" : 100.0 }
Installing MongoDB
We need to add MongoDB repo with below entries in the MongoDB repo file, since it’s not already available by default on Centos 7/ Rhel 7.
 # vi /etc/yum.repos.d/mongodb-org-3.2.repo

[mongodb-org-3.2]
name=MongoDB Repository
baseurl=https://repo.mongodb.org/yum/redhat/$releasever/mongodb-org/3.2/x86_64/
gpgcheck=1
enabled=1
gpgkey=https://www.mongodb.org/static/pgp/server-3.2.asc
Install MongoDB package.
# yum install mongodb-org -yStart and enable mongod.service.
# chkconfig --add mongod
# systemctl daemon-reload
# systemctl enable mongod.service
# systemctl start mongod.service
Installing and configuring Grylog server

Once all the prerequisites are done and checked. It’s time to configure and install graylog server. You can download the latest open source version of graylog server from its website.
# rpm -Uvh https://packages.graylog2.org/repo/packages/graylog-2.2-repository_latest.rpmInstall Graylog server:
# yum install graylog-server -y Generate a secret key using below command.
# pwgen -N 1 -s 96
D4bqf7doK2zVjFOie043Gk3NgVV1548R7imGV74MHUJa08xvwlNxWvroGjBlQd1mtAYThbym3UNUVFhMY9Wu3CFyKmd35WW
Set a hash password for root user. Note that you will be using this password while signing up at the Graylog Web Interface.
# echo -n YourPassword | sha256sum
e7cf3ef4f17c3999a94f2c6f612e8a888e5b1026878e4e19398b23bd38ec221a
Now enter the root password and the generated key in the file server.conf. Also add other required parameters.
# vi /etc/graylog/server/server.conf

password_secret = D4bqf7doK2zVjFOie043Gk3NgVV1548R7imGV74MHUJa08xvwlNxWvroGjBlQd1mtAYThbym3UNUVFhMY9Wu3CFyKmd35WWZ
root_password_sha2 = e7cf3ef4f17c3999a94f2c6f612e8a888e5b1026878e4e19398b23bd38ec221a
root_email = [email protected]
root_timezone=UTC
elasticsearch_discovery_zen_ping_unicast_hosts = <your-server-ip-address>:9300
elasticsearch_shards=1
script.inline: false
script.indexed: false
script.file: false
Enter these two parameters with specified value in the same file, in order to access Graylog web interface. Graylog web interface will be listening to tcp ports 12900 nd 9000 on web browser.
rest_listen_uri = http://192.168.1.200:12900/
web_listen_uri = http://192.168.1.200:9000/
# chkconfig --add graylog-server
# systemctl daemon-reload
# systemctl enable graylog-server.service
# systemctl start graylog-server.serviceConfiguring firewall ports
We have seen earlier, we mentioned some ports in configuration files for web interface purpose. We are managing those ports with the help of firewall. Below are the steps to add those tcp ports in your firewall settings permanently. Please execute the below commands to manage ports :
# firewall-cmd --permanent --zone=public --add-port=9000/tcp
# firewall-cmd --permanent --zone=public --add-port=12900/tcp
# firewall-cmd --permanent --zone=public --add-port=1514/tcp
After adding ports in your firewall, do not forget to run below command, in order to reflect the changes you just made.
# firewall-cmd --reloadTo manage selinux policy, we are going to install policycoreutils-python packag
# yum install policycoreutils-python -yBelow command makes sure that your web interface has network to be accessed
# setsebool -P httpd_can_network_connect 1Using semanage command we are going to allow the Graylog REST API and Elasticsearch HTTP API to web interface. If you want to know the semanage command syntax, you can refer to the semanage manpage.
# semanage port -a -t http_port_t -p tcp 9000
# semanage port -a -t http_port_t -p tcp 9200
Allowing MongoDB default port.
# semanage port -a -t mongod_port_t -p tcp 27017Accessing Graylog Web Interface
Open your web browser and type the URL http://your_ip_address:9000. You will be redirected to following page.
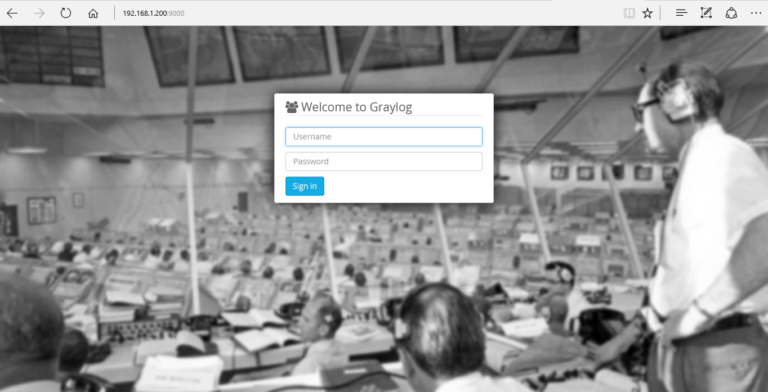
To sign in into Graylog web interface, enter the username admin and password – YourPassword (which we have set as mentioned in above command). The default username and password for Graylog web interface is ‘admin’, ‘admin’.
That’s it. Now you can manage your application/server logs in a visual way all thanks to the awesome open source Graylog server.
I hope you find this tutorial helpful. Please leave your suggestions in the comment section.
Written by Servesha Dudhgaonkar
