Do you use AWS Elastic Container Registry (ECR) to store and manage your Docker images?
In that case, you may have encountered a problem: the ECR token expires every 12 hours, and you need to renew it manually or programmatically to pull images from ECR.
This can be a hassle, especially if multiple clusters or namespaces need access to ECR.
Fortunately, there is a solution: you can use Kubernetes CronJobs to update the ECR token in your clusters or namespaces automatically.
In this article, I will show you how to set up a CronJob that runs every 10 hours and updates the ECR token in a secret that your pods or deployments can use to pull images from ECR.
This way, you don’t have to worry about token expiration and can focus on your application development. Let’s get started!
Prerequisites
Before you begin, make sure you have:
- An AWS account: You need an AWS account to create and use an ECR repository. You can sign up for free here if you don't have one.
- An ECR repository: You need an ECR repository to store and manage your Docker images. If you don’t have one, you can create one using the AWS Console or the AWS CLI.
- AWS credentials (access key and secret access key): You need AWS credentials to authenticate with ECR and get a token. You can create a new IAM user or use an existing one that has the AmazonEC2ContainerRegistryReadOnly policy attached.
- A Kubernetes cluster: You need a Kubernetes cluster to run your CronJob and your pods or deployments that pull images from ECR. You can use any Kubernetes provider or platform, such as Amazon EKS, Minikube, etc.
- kubectl: You need kubectl to interact with your Kubernetes cluster and create resources. You can install kubectl on your local machine or use a cloud shell.
Once you have all the prerequisites ready, you can proceed to the next section, where you will set up a CronJob to update the ECR token secret.
Let’s get started!
Step 1: Create a secret, a configmap, and a service account for the CronJob
The first step is to create a secret, a configmap, and a service account that the CronJob will use to access AWS and update the ECR token secret.
I will use the default namespace for this example, but you can use any namespace you want.
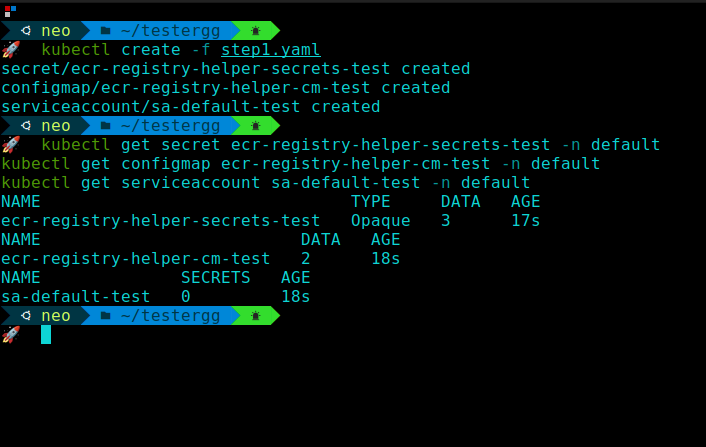
To create the secret, the configmap, and the service account, save the following content as ecr-registry-helper.yaml:
apiVersion: v1
kind: Secret
metadata:
  name: ecr-registry-helper-secrets
  namespace: default
stringData:
  AWS_SECRET_ACCESS_KEY: "" # Replace with your AWS secret access key
  AWS_ACCESS_KEY_ID: "" # Replace with your AWS access key ID
  AWS_ACCOUNT: "" # Replace with your AWS account ID
---
apiVersion: v1
kind: ConfigMap
metadata:
  name: ecr-registry-helper-cm
  namespace: default
data:
  AWS_REGION: "eu-central-1" # Replace with your ECR region
  DOCKER_SECRET_NAME: regcred # Replace with your desired ECR token secret name
---
apiVersion: v1
kind: ServiceAccount
metadata:
  name: sa-default
  namespace: default
Then, apply the file using:
kubectl apply -f ecr-registry-helper.yamlYou can verify that the secret, the configmap, and the service account are created by running:
kubectl get secret ecr-registry-helper-secrets -n default
kubectl get configmap ecr-registry-helper-cm -n default
kubectl get serviceaccount sa-default -n default
Step 2: Create a role and a role binding for the CronJob
The next step is to create a role and a role binding that grants the CronJob permission to delete and create secrets in the desired namespace.
I will use the default namespace and the regcred secret name for this example, but you can use any namespace and secret name you want.
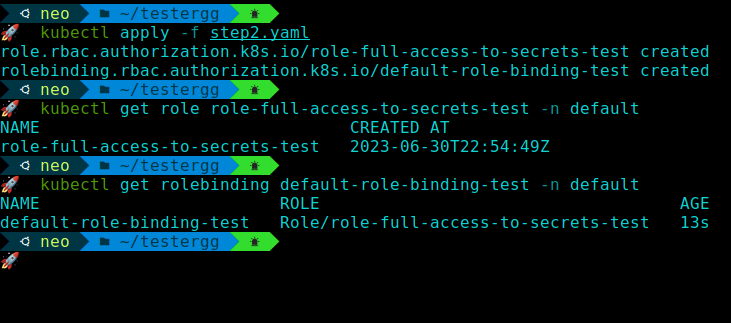
To create the role and the role binding, save the following content as ecr-registry-helper-rbac.yaml:
apiVersion: rbac.authorization.k8s.io/v1
kind: Role
metadata:
  namespace: default
  name: role-full-access-to-secrets
rules:
- apiGroups: [""]
  resources: ["secrets"]
  resourceNames: ["regcred"] # Replace with your desired ECR token secret name
  verbs: ["delete"]
- apiGroups: [""]
  resources: ["secrets"]
  verbs: ["create"]
---
kind: RoleBinding
apiVersion: rbac.authorization.k8s.io/v1
metadata:
  name: default-role-binding
  namespace: default
subjects:
- kind: ServiceAccount
  name: sa-default # Replace with your service account name if different
  namespace: default
  apiGroup: ""
roleRef:
  kind: Role
  name: role-full-access-to-secrets # Replace with your role name if different
  apiGroup: ""
Then, apply the file using:
kubectl apply -f ecr-registry-helper-rbac.yamlYou can verify that the role and the role binding are created by running:
kubectl get role role-full-access-to-secrets -n default
kubectl get rolebinding default-role-binding -n default 
Step 3: Create a CronJob that runs a script to update the ECR token secret
The final step is to create a CronJob that runs a script every 10 hours (or any other interval you prefer) to update the ECR token secret. The script uses AWS CLI to get a new ECR token and then uses kubectl to delete and create the secret with the token.
To create the CronJob, save the following content as ecr-registry-helper-cronjob.yaml:
apiVersion: batch/v1
kind: CronJob
metadata:
  name: ecr-registry-helper
  namespace: default
spec:
  schedule: "0 */10 * * *" # Replace with your desired schedule
  successfulJobsHistoryLimit: 2
  suspend: false
  jobTemplate:
    spec:
      template:
        spec:
          serviceAccountName: sa-default # Replace with your service account name if different
          containers:
          - name: ecr-registry-helper
            image: omarxs/awskctl:v1.0
            imagePullPolicy: IfNotPresent
            envFrom:
              - secretRef:
                  name: ecr-registry-helper-secrets # Replace with your secret name if different
              - configMapRef:
                  name: ecr-registry-helper-cm # Replace with your configmap name if different
            command:
              - /bin/bash
              - -c
              - |-
                ECR_TOKEN="$(aws ecr get-login-password --region ${AWS_REGION})"
                NAMESPACE_NAME=default # Replace with your desired namespace
                kubectl delete secret --ignore-not-found $DOCKER_SECRET_NAME -n $NAMESPACE_NAME
                kubectl create secret docker-registry $DOCKER_SECRET_NAME --docker-server=https://${AWS_ACCOUNT}.dkr.ecr.${AWS_REGION}.amazonaws.com --docker-username=AWS --docker-password=${ECR_TOKEN} --namespace=$NAMESPACE_NAME
                echo "Secret was successfully updated at $(date)"
          restartPolicy: Never
Then, apply the file using:
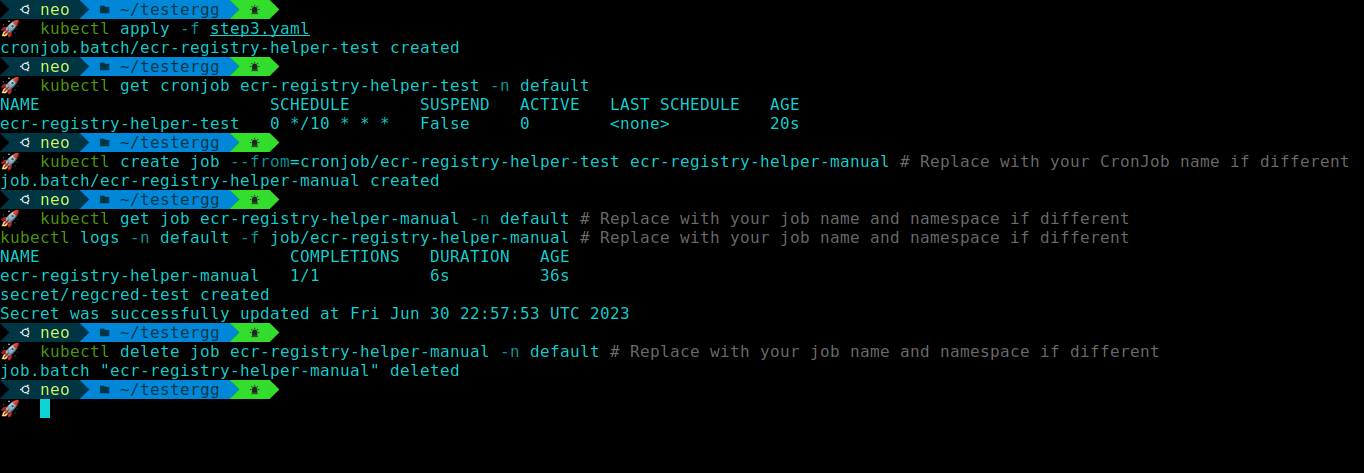
kubectl apply -f ecr-registry-helper-cronjob.yamlYou can verify that the CronJob is created by running:
kubectl get cronjob ecr-registry-helper -n default 
Step 4: Test and verify the CronJob
The last step is to test and verify that the CronJob is working as expected and regularly updating the ECR token secret.
You can do this by manually triggering the CronJob and checking the logs of the CronJob pods.
To manually trigger the CronJob, run the following command:
kubectl create job --from=cronjob/ecr-registry-helper ecr-registry-helper-manual # Replace with your CronJob name if differentThis will create a one-time job that runs the script and updates the ECR token secret. You can check the status and logs of the job by running:
kubectl get job ecr-registry-helper-manual -n default # Replace with your job name and namespace if different
kubectl logs -n default -f job/ecr-registry-helper-manual # Replace with your job name and namespace if different
You should see something like:
Secret was successfully updated at Sat Jan 1 00:00:00 UTC 2023 # Replace with your actual date and timeYou can delete the job after verifying it by running:
kubectl delete job ecr-registry-helper-manual -n default # Replace with your job name and namespace if different
You can also use the secret to pull images from ECR by creating a pod or a deployment that references the secret. For example, you can save the following content as test-pod.yaml:
apiVersion: v1
kind: Pod
metadata:
  name: test-pod
  namespace: default
spec:
  containers:
  - name: test-container
    image: <your-account>.dkr.ecr.<your-region>.amazonaws.com/<your-image>:<your-tag> # Replace with your ECR image
    imagePullPolicy: Always
  imagePullSecrets:
  - name: regcred # Replace with your secret name if different
Then, apply the file using:
kubectl apply -f test-pod.yamlYou can verify that the pod is running and pulling the image from ECR by running:
kubectl get pod test-pod -n default
kubectl describe pod test-pod -n default
Alternative Step: Run the whole manifest at once
If you want to run the whole manifest at once, you can combine the files ecr-registry-helper.yaml, ecr-registry-helper-rbac.yaml, and ecr-registry-helper-cronjob.yaml into one file, such as ecr-registry-helper-all.yaml.
Make sure to replace the values with your own.
apiVersion: v1
kind: Secret
metadata:
  name: ecr-registry-helper-secrets
  namespace: default
stringData:
  AWS_SECRET_ACCESS_KEY: "" # Replace with your AWS secret access key
  AWS_ACCESS_KEY_ID: "" # Replace with your AWS access key ID
  AWS_ACCOUNT: "" # Replace with your AWS account ID
---
apiVersion: v1
kind: ConfigMap
metadata:
  name: ecr-registry-helper-cm
  namespace: default
data:
  AWS_REGION: "eu-central-1" # Replace with your ECR region
  DOCKER_SECRET_NAME: regcred # Replace with your desired ECR token secret name
---
apiVersion: v1
kind: ServiceAccount
metadata:
  name: sa-default
  namespace: default
---
apiVersion: rbac.authorization.k8s.io/v1
kind: Role
metadata:
  namespace: default
  name: role-full-access-to-secrets
rules:
- apiGroups: [""]
  resources: ["secrets"]
  resourceNames: ["regcred"] # Replace with your desired ECR token secret name
  verbs: ["delete"]
- apiGroups: [""]
  resources: ["secrets"]
  verbs: ["create"]
---
kind: RoleBinding
apiVersion: rbac.authorization.k8s.io/v1
metadata:
  name: default-role-binding
  namespace: default
subjects:
- kind: ServiceAccount
  name: sa-default # Replace with your service account name if different
  namespace: default
  apiGroup: ""
roleRef:
  kind: Role
  name: role-full-access-to-secrets # Replace with your role name if different
  apiGroup: ""
---
apiVersion: batch/v1
kind: CronJob
metadata:
  name: ecr-registry-helper
  namespace: default
spec:
  schedule: "0 */10 * * *" # Replace with your desired schedule
  successfulJobsHistoryLimit: 2
  suspend: false
  jobTemplate:
    spec:
      template:
        spec:
          serviceAccountName: sa-default # Replace with your service account name if different
          containers:
          - name: ecr-registry-helper
            image: omarxs/awskctl:v1.0
            imagePullPolicy: IfNotPresent
            envFrom:
              - secretRef:
                  name: ecr-registry-helper-secrets # Replace with your secret name if different
              - configMapRef:
                  name: ecr-registry-helper-cm # Replace with your configmap name if different
            command:
              - /bin/bash
              - -c
              - |-
                ECR_TOKEN="$(aws ecr get-login-password --region ${AWS_REGION})"
                NAMESPACE_NAME=default # Replace with your desired namespace
                kubectl delete secret --ignore-not-found $DOCKER_SECRET_NAME -n $NAMESPACE_NAME
                kubectl create secret docker-registry $DOCKER_SECRET_NAME --docker-server=https://${AWS_ACCOUNT}.dkr.ecr.${AWS_REGION}.amazonaws.com --docker-username=AWS --docker-password=${ECR_TOKEN} --namespace=$NAMESPACE_NAME
                echo "Secret was successfully updated at $(date)"
          restartPolicy: Never
To apply the file, run:
kubectl apply -f ecr-registry-helper-all.yamlThis will create all the resources needed for the CronJob in one go. You can verify that they are created by running:
kubectl get secret ecr-registry-helper-secrets -n default
kubectl get configmap ecr-registry-helper-cm -n default
kubectl get serviceaccount sa-default -n default
kubectl get role role-full-access-to-secrets -n default
kubectl get rolebinding default-role-binding -n default
kubectl get cronjob ecr-registry-helper -n default
Conclusion
In this article, you have learned how to set up a CronJob to update the ECR token secret in Kubernetes with CronJobs automatically. This way, you don’t have to worry about token expiration and can focus on our application development.
You have also learned how to test and verify that the CronJob is working as expected and regularly update the ECR token secret.
I hope you found this article useful and informative. If you have any questions or feedback, please feel free to leave a comment below. Thank you for reading!

