UFW firewall comes pre-installed in Ubuntu and as the name suggests UFW logs can offer inside-out information on how your firewall deals with incoming and outgoing requests.
But before that, you'd need to verify whether the UFW logging is enabled or not:
sudo ufw status verbose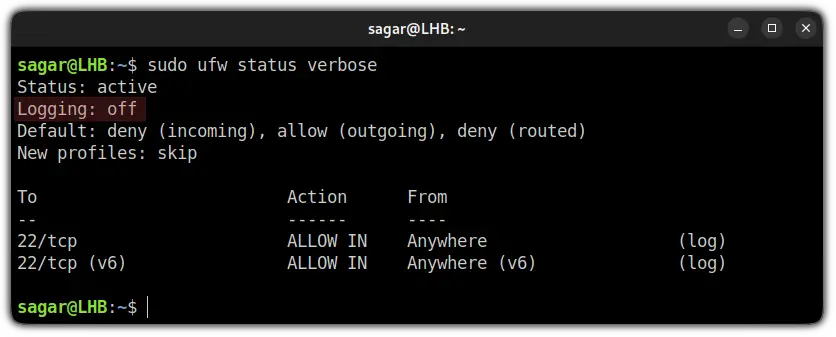
If you get an output saying Logging: on (low), you are good to go but if it shows Logging: off as shown above, use the following command to turn on UFW logging:
sudo ufw logging onOnce you have UFW logging on, you can use the less command to check the UFW firewall logs in your system:
sudo less /var/log/ufw.log
So many complex terms, right? Well, you don't have to worry about them; I will break down every term used in UFW logs in a moment.
But before that, let me share various ways to check UFW logs.
How to check UFW Firewall logs in Linux
There are various ways to check the UFW firewall logs; I've already shared one of them at the beginning of this guide.
So let's have a look at the remaining ones.
Check Firewall logs using the tail command
If you are looking for a way by which you can monitor the firewall logs live, you can use the tail command.
By default, the tail command will show the last 10 lines of the file but when used with the -f option, you can monitor can have the live coverage of firewall logs:
tail -f /var/log/ufw.log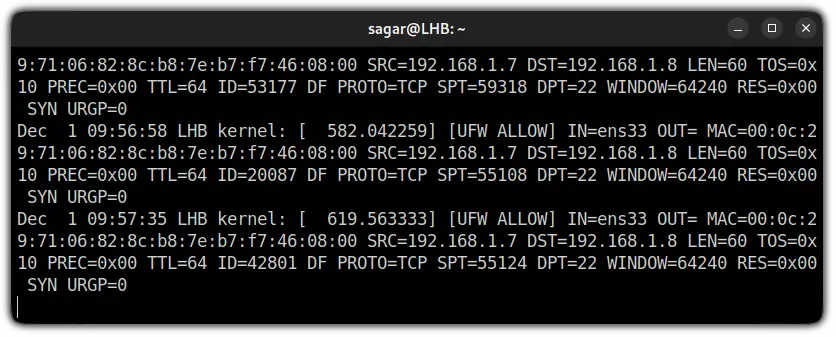
Check Firewall logs using the grep command
Apart from /var/log/ufw, there are two other places where you will find the UFW firewall logs. But, those locations are not only specific to the firewall logs.
Meaning, you will find logs of other services there too. And in those times, you can use the grep command to filter out the results.
So either you can filter UFW firewall logs from syslog:
grep -i ufw /var/log/syslogOr you can filter results from kern.log:
grep -i ufw /var/log/kern.logAs both will give you the same results:
Now, let's have a look at different levels of UFW firewall logging.
How to change UFW Firewall Logging Level
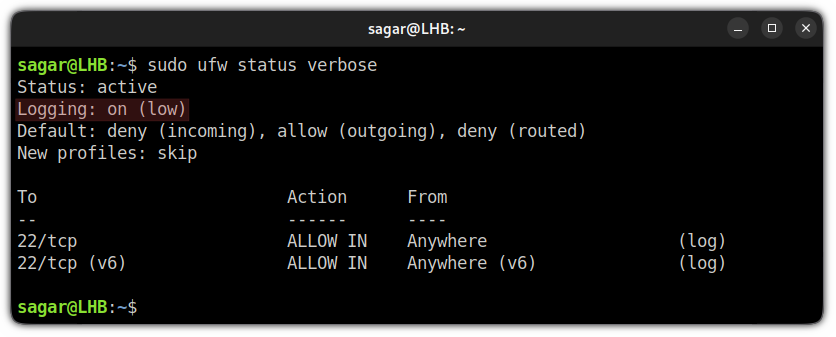
By default, the logging will be clocked at the low level:
But before I jump to how you can change the default rule, let me explain the different levels of logging that are available to you.
Different levels of UFW Firewall logging
There are 5 levels of UFW logging.
off: Means logging is disabled.low: Will store logs related to blocked packets that do not match the current firewall rules and will show log entries related to logged rules.
Yes, you can specify logged rules too, and will show you how in the later part of this guide.medium: In addition to all the logs offered by the low level, you get logs for invalid packets, new connections, and logging done through rate limiting.high: Will include logs for packets with rate limiting and without rate limiting.full: This level is similar to the high level but does not include the rate limiting.
Now, if you want to change your default or the current level of logging, you just have to follow the given command structure:
sudo ufw logging logging_levelSo if I want to change my current logging level to medium, it can be done using the given command:
sudo ufw logging medium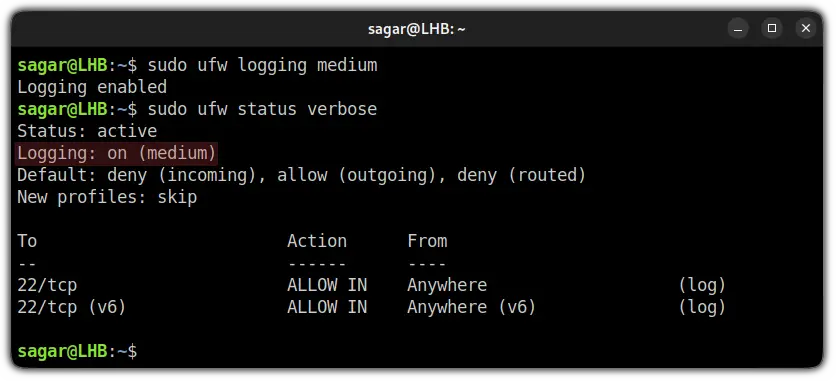
How to add UFW logging rule
As I mentioned earlier, you can add a logging rule especially if you want to monitor specific services.
I would recommend you turn your logging level low to have less clutter in logs and you can be more specific about the intentional monitoring.
To add the logging rule, you just have to follow the command syntax:
sudo ufw allow log service_nameFor example, I have added a log rule for port no. 22 (SSH):
sudo ufw allow log 22/tcp
Interpret UFW Firewall logs
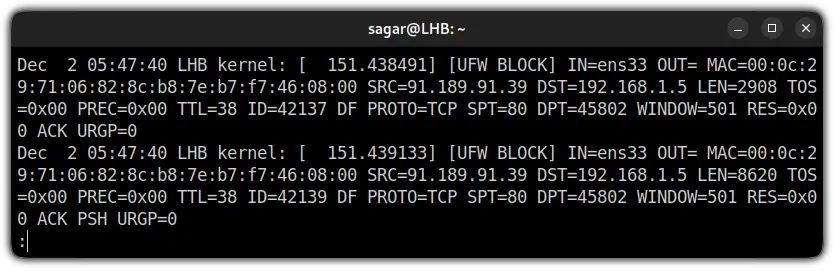
Once you use any of the shown methods to get UFW firewall logs, you will end up getting something like this (for default settings):
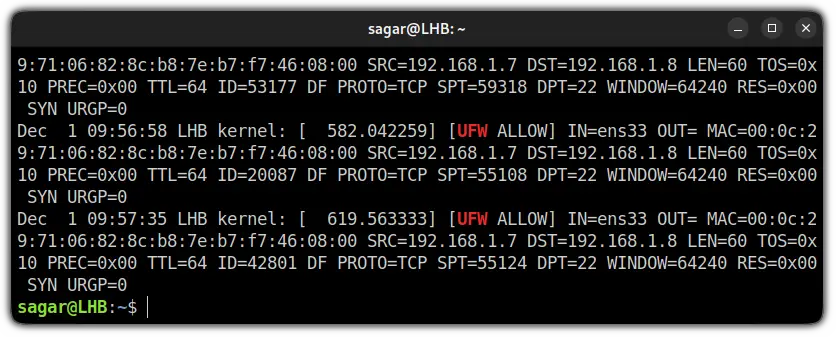
And if you added the UFW logging rule as I showed earlier, you will find some extra :
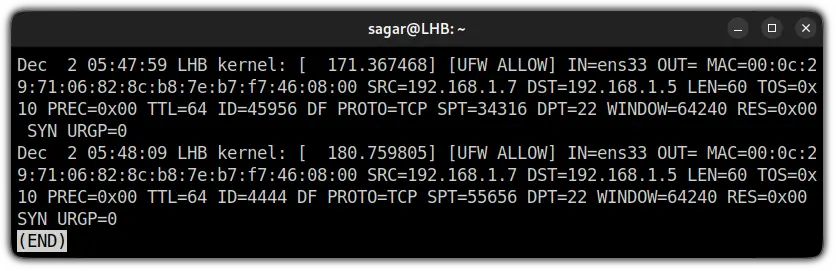
As you can see, there is a slight difference in both images and I will be covering both of them here.
Dec 2 05:48:09 LHB kernel: [ 180.759805]: Shows the date, time, hostname, and kernel time since boot.[UFW BLOCK]: If you are using UFW logs in the default settings, the logging level is locked at the low level. This means it will only show the rejected packets that do not fit in UFW rules.
AndUFW BLOCKis simply indicating that packet was blocked.[UFW ALLOW]: Despite the default logging level, if you added a logging rule, it will log every detail related to that service andUFW ALLOWis indicating that packet was allowed.IN=ens33: Shows the interface from which the packet has arrived.OUT=: For most of the users, this will not hold any value and if it is indicating any value, means there was an outgoing event.MAC=00:0c:29:71:06:82:8c:b8:7e:b7:f7:46:08:00: The whole string of numbers and alphabets is nothing but a combination of source and destination MAC addresses.SRC=192.168.1.7: Indicates the IP address of the packet source.DST=192.168.1.5: Shows the IP address of the packet's destination and it will be the IP of your system.LEN=60: Shows the length of the packet (60 bytes in my case).TOS=0x10: Indicates the type of service.PREC=0x00: Shows "Precedence" type of service.TTL=64: Shows the TTL (Time To Live) for the package. In simple terms, it will show you how long the packet will bounce till it expires if the destination is not specified.ID=4444: Will give you a unique ID of the IP datagram and will be shared by the fragments of the same packets.DF: The "Do not fragment" flag of TCP.PROTO=TCP: Shows the protocol used for transmission of the packet.SPT=55656: Gets the source port for the packet.DPT=22: Indicates the destination port of the packet.WINDOW=64240: Shows TCP window size.RES=0x00: Indicates the reserved bits.SYN URGP=0: Here, theSYNflag indicates the request to make a new connection andURGP=0means the connection was not established.ACK: The acknowledgment flag is used to indicate that the packet is successfully received by the host.PSH: The Push flag indicates that the incoming data needs to be passed down to the application instead of getting buffed.
Wrapping Up
In this guide, I covered some of the basic aspects of UFW firewall logs which include how you can enable them, change levels, and contents of firewall logs.
You can learn more on UFW in this guide below.
I hope you will find this helpful and if you have any doubts or suggestions, please let me know in the comments.