Some time ago, I wrote an article where I explained how I built my Proxmox node on a budget.
This homelab is merely a hobby and holds a few things that I only use for personal use. So when I set it up, I didn't consider the possibility of accessing it from the outside. I just used an internal IP within my network to reach it, and any of its VMs or LXCs.
The setup work fine until recently when I had to go on vacation. While abroad, I had the necessity to review a few things in it, and I found the challenge of accessing it while I was away from home.
The Problem
This led me to research and perform a few changes to be able to set it to be seen from the outside. This was to be done without investing a lot of money or change my network connection.
In my country (Uruguay) the current ISP will not give you a static IP for your residential connection. Actually, not only the IP is dynamic, it changes like every hour! So it makes it really difficult to access something at home, even if you know the public IP your router is getting.
I already had a domain name purchased from years ago, as I use it for emails that I host at Google. I also have some subdomains pointed to some servers for working purposes. But now I simply wanted to point a subdomain to my homelab, without having to invest anymore money in it, as I already pay for this domain on a yearly basis.
The Solution... kinda
That led me to get a free account with a dynamic IP provider. Again, I am on a budget, so I opened an account with noip.com, and set up a dynamic IP there. It gave me a subdomain under their own domains, something like helder.ddns.net (not my real subdomain, but I am not publishing it for security reasons).
Now, the problem is I wanted to use my own domain, so it would imply to pay extra in noip.com to do this. Unless... there was other way ;)
I'll be using Proxmox here. If you are new to it, take advantage of our beginner's series.

A new container to update my DDNS
In my Proxmox node, I set up a very small LXC to simply hold my DDNS updater. Which is simply a service that runs in this container to keep updating my real IP to DDNS service and inform it about my IP changes, which again occurs every hour.
I set up a new LXC with Ubuntu 22.04, and then I followed the instructions on how to set it up, given by noip.com in their DUC page:
Download and install the linux DUC in terminal
wget https://www.noip.com/download/linux/latest
tar xf noip-duc_3.1.0.tar.gz
cd /home/$USER/noip-duc_3.1.0/binaries && sudo apt install ./noip-duc_3.1.0_amd64.deb
Once it is installed, we need to set it up to be a service that automatically runs whenever the container is started:
cd /home/$USER/noip-duc_3.1.0/binaries
sudo cp debian/service /etc/systemd/system/noip-duc.service
sudo vi /etc/default/noip-duc
Now, you need to create the user information from our noip.com account, for the DUC to be able to update it automatically:
NOIP_USERNAME=<your noip.com username>
NOIP_PASSWORD=<your noip.com password>
NOIP_HOSTNAMES=<yourdomain in noip.com. In my case the example I used was helder.ddns.net>
Save your file, and now let's make this a service:
sudo systemctl daemon-reload
sudo systemctl enable noip-duc
sudo systemctl start noip-duc
You don't need to worry about running it in a cron, as the script automatically runs every 5 minutes by default (it can't be lower than that). If needed, you can read its manual in case you want it to update in longer intervals.
I have my own domain and my noip domain, how to make this one and only one?
So, as I mentioned earlier, I already paid for a domain long time ago, so I wanted to use a subdomain of it, but my IP being dynamic doesn't allow me to point it.
I created an account in noip.com which solves my dynamic IP issue, but now I need to make these two guys to talk to each other.
The solution was simpler than you might imagine. It was just a matter of understanding how DNS works. So, I went ahead and created a new CNAME in my DNS manager that simply points my noip.com sub-domain:
Create a CNAME
homelab.domain.net —> helder.ddns.net
What this does is simply inform DNS around the world whenever my subdomain homelab.domain.net is called out, to go look where my DDNS domain is currently set up to. The DDNS has the capability to automatically update every 5 minutes, so this will surely work to have continuously point my subdomain to my homelab (again, this is just a personal home environment, is not intended for production), so its works! And in a budget!
Bonus: setting SSL for my Proxmox
This might not be crucial or important, but you can set up SSL on your Proxmox and that way make sure when you connect from the outside, the connection is encrypted to your node.
First, you need to make the Proxmox server understand the domain you are going to associate to it. So, do the following in Proxmox console:
vim /etc/hostsOnce there, make sure you enter all hostnames associated to your Proxmox internal IP:
192.168.1.130 homelab.domain.net proxmoxNow, you need to create and associate the SSL certificate. To do that, go to your node GUI, and look for the section "Certificates":
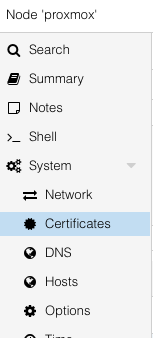
Here, you can add a certificate using Let's Encrypt. Just select "Add" and a dialog will show up. In the challenge type, leave the HTTP selected and in domain, you need to enter the domain you have previously configured. From our example: homelab.domain.net.
Make sure your Proxmox node has port 80 open. In my case, I created a network forwarder at my router to make all 80 traffic go to my Proxmox node.
You will need to create an account for Let's Encrypt. This is asked so you can enter your email associated to your account, where you will receive a confirmation link to enter your information. This allows LetsEncrypt to be able to link the domain you wish to create the certificate for and contact you for anything needed for it.
Select the entry you just created and click on the "Order Certificate Now"

This will run automatically and show you the progress. Once it finishes, you will have automatically all things created and your Proxmox server will be now using SSL.
Conclusion
Even though accessing Proxmox environment from the outside is not so common, as normally organizations or individuals don't want to expose their nodes, it is possible.
In my case, the homelab is exclusively for personal purposes and I would rather not invest money on this task, so I had to figure out a way. As I already am paying for a domain that I use for other purposes and of course, having a single subdomain would suffice my intentions.
It is also not common to have a dynamic IP on your connection these days, especially one that changes so fluently like mine. But in the end, having knowledge of DNS and networking paid on this matter, so I could hack my way around to this.