Nextcloud is the perfect solution for a self-hosted Google Drive or Dropbox alternative.
I am not going to tell you why you should use Nextcloud. Instead, I am going to show you how to install Nextcloud server with Docker containers.
The tutorial uses Ngnix reverse proxy set up so that you can deploy your Nextcloud instance with SSL. This way, your Nextcloud deployment URL will be using HTTPS and you'll be transferring files securely.
Towards the end of the tutorial, I'll share some tips for Linode cloud users for reducing the effort on Nextcloud deployment.
Prerequisites
Before moving forward, some things need to be taken care of. Here's what you need:
- A Linux server either a physical one, a virtual machine or in a cloud server.
- Docker and Docker Compose installed on your Linux server. If you need help follow docker installation guide on Ubuntu and CentOS. Similarly, you can follow the docker-compose installation tutorials on Ubuntu and CentOS.
- Some knowledge of Docker and Docker Compose is good to have.
- A domain name. This deployment, like all the other ones from Linux Handbook, is done under an actual domain name with HTTPS.
- Some experience with shell and Linux commands since there's a lot of movement in there.
- Access to an SMTP service like Sendgrid. You'll need it for sending email notifications, password reset etc.
- Time and patience.
Deploying Nextcloud server with Docker in reverse proxy
Let's see the steps one by one.
Step 1: Set up reverse proxy
With reverse proxy, you can deploy several web services on the same server. This is not optional because you need let's Encrypt container for SSL.
There are two ways you can set the Ngnix reverse proxy..
If you're not using Linode, please go through my article on how to set up nginx-reverse-proxy with Docker.
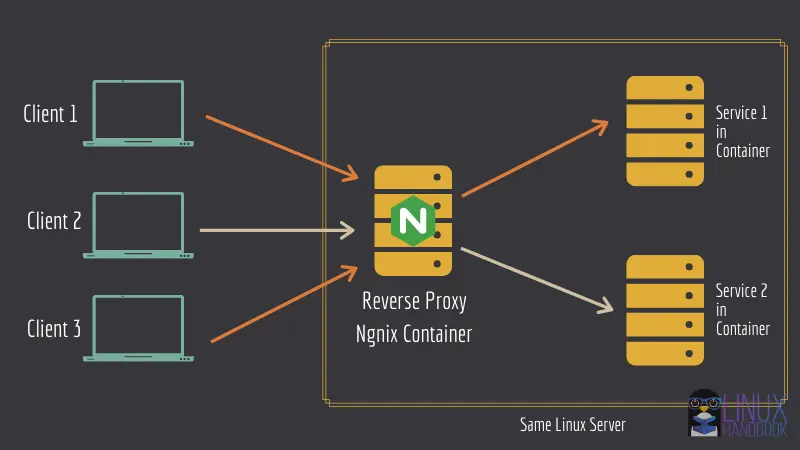
If you are using Linode, I recommend you use our reverse-proxy-jwilder StackScript to easily deploy your server with everything already set up for you.
The reverse proxy deployment should be done using a separate Compose file so that you can restart or update web-services without disturbing your reverse proxy setup.
I have already prepared the compose files in our public GitHub repository. Since this is not a detailed article about the reverse-proxy deployment, I shall not go into the Compose file details.
You can either use git, or wget to download the files. If using git, clone the whole repository:
git clone https://github.com/linuxhandbook/tutorial-snippets && \
	cd tutorial-snippets/Reverse_Proxy
Otherwise, just download the necessary files:
mkdir -p ~/Reverse_Proxy && cd ~/Reverse_Proxy
for file in max_upload_size.conf env.example docker-compose.yaml; do
	wget https://raw.githubusercontent.com/linuxhandbook/tutorial-snippets/main/Reverse_Proxy/${file}
done
There are three files here:
- env.example: Rename it to .env and change the value of
DEFAULT_EMAILto your email - max_upload_size.conf: This file makes sure that you can upload files as big as 1 GB in size (the default is 2 MB).
- docker-compose.yaml: Biggest of them all. Discussed in brief in the next paragraph.
Create a docker network named net. This is used in the docker-compose.yaml file.
docker network create net
The docker-compose file looks like this:
Finally, deploy the containers
docker-compose up -d
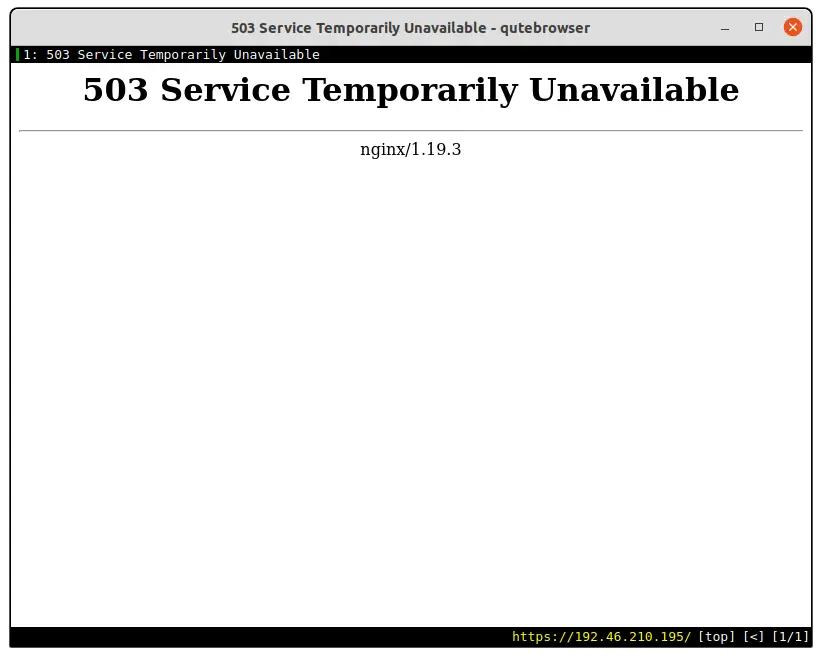
On a successful deployment, you should get a 503 when trying to visit the IP address of the server that is hosting this reverse-proxy. That's okay. You don't have a web service running on it just yet.
Step 2: Deploy Nextcloud
There are two components here: one is the database, another is Nextcloud itself, or rather let's call it the frontend.
For the backend database, any MySQL-based database will work. I'm going with MariaDB, especially the image tag (or version) 10.5.9.
For Nextcloud, I'll use the version 21.0.0, this is the latest at the time of writing this article.
Therefore, the images used are
mariadb:10.5.9nextcloud:21.0.0
The skeleton files, i.e. the compose file and the env files are already uploaded to our public GitHub repository. You can either download that or rewrite them while reading the explanations.
I recommend you download the files, and then go through everything to understand what's going on, there's no need for you to rewrite everything from scratch.
You can either clone our whole GitHub repository, or just download the necessary files.
If you cloned the "tutorial-snippets" repository while deploying the reverse-proxy, just change your current directory to tutorial-snippets/Nextcloud.
The working git command is as follows:
git clone https://github.com/linuxhandbook/tutorial-snippets && \
    cd tutorial-snippets/Nextcloud
Otherwise, use the following shell code to create a directory named "Nextcloud" and download the files in there.
mkdir -p ~/Nextcloud && cd ~/Nextcloud
for file in env.example docker-compose.yaml; do
    wget https://raw.githubusercontent.com/linuxhandbook/tutorial-snippets/main/Nextcloud/${file}
done
Copy the env.example file to .env . You'll be editing this file later for the environment variables. Keeping the original file is just for the sake of backup, nothing else.
cp env.example .envNow, let me go through the services definitions:
1. NCDatabase
The NCDatabase service looks like this:
NCDatabase:
	image: "mariadb:10.5.9"

	volumes:
		- "NCMariaDB:/var/lib/mysql"

	environment:
		- MYSQL_ROOT_PASSWORD
		- MYSQL_RANDOM_ROOT_PASSWORD
		- MYSQL_DATABASE
		- MYSQL_USER
		- MYSQL_PASSWORD

	restart: "on-failure"
	networks: ["common"]
This is the database service, and as stated previously, it uses the mariadb:10.5.9 image as its blueprint.
For persistent storage, I'm using a volume named NCMariaDB, it is mounted at /var/lib/mysql, where MariaDB stores its data.
The environment variables are handled using a .env file, I'll talk about that in a moment.
I like the on-failure restart policy, but you're free to choose unless-stopped or always. You may want to read more on restart policy in Docker.
The common network is common between this and the frontend service, it is there to make sure communication is possible between these containers.
Environment Variables
This is a Docker-based deployment, you are bound to set up some environment variables. Now open this .env file in your favorite text editor and start changing the values as the following:
MYSQL_ROOT_PASSWORD or MYSQL_RANDOM_ROOT_PASSWORD: Either set MYSQL_RANDOM_ROOT_PASSWORD to 1 or set a strong root password for MariaDB. Use openssl to generate a random password.
MYSQL_DATABASE & MYSQL_USER: There are some defaults set, but you can change these if necessary. Set these to your preferred database name and user name respectively.
MYSQL_PASSWORD: Password for the user (MYSQL_USER) that will have access to the main MariaDB database (MYSQL_DATABASE).
MYSQL_HOST: This is the service name of the database container. If you're not going to change the service name in the Compose File, leave this as it is.
2. NCFrontend
This is the Nextcloud frontend service. This service is as simple as the previous one. Take a look:
NCFrontend:
	image: "nextcloud:21.0.0"

	volumes:
	  - "NCData:/var/www/html"

	environment:
		- LETSENCRYPT_HOST
		- VIRTUAL_HOST
		- TRUSTED_PROXIES
		- OVERWRITEPROTOCOL
		- MYSQL_DATABASE
		- MYSQL_USER
		- MYSQL_PASSWORD
		- MYSQL_HOST
		- SMTP_HOST
		- SMTP_PORT
		- SMTP_NAME
		- SMTP_PASSWORD
		- MAIL_FROM_ADDRESS
		- NEXTCLOUD_TRUSTED_DOMAINS
		- NEXTCLOUD_ADMIN_USER
		- NEXTCLOUD_ADMIN_PASSWORD

	depends_on:
		- "NCDatabase"
	networks: ["net", "common"]
Image used is nextcloud:21.0.0, as I previously said, is the latest version at the time of this writing.
To make sure you keep your data safe, and don't lose it in an unfortunate event of a simple container restart, data must be persisted. Nextcloud saves its data/information in /var/www/html, so this location is made persistent using a volume named NCData.
The depends_on array is an interesting one. It makes sure that the values, i.e. the services mentioned in it are deployed first before the current one starts.
Here, I'm making sure that the database is starting before Nextcloud itself, to avoid any connection issues.
There are two networks. The first one is net, which was also part of the reverse-proxy deployment. This is necessary because the reverse-proxy needs to be able to communicate with the proxied services, i.e. Nextcloud. The common network is for the nextcloud and database containers to be able to communicate successfully.
Environment Variables
Open the .env file (the same one you used for MariaDB) in your favorite text editor and start changing the values as the following:
LETSENCRYPT_HOST, VIRTUAL_HOST & NEXTCLOUD_TRUSTED_DOMAINS: Set these to the domain/subdomain you want to host your Nextcloud instance on.
TRUSTED_PROXIES: The subnet of the network, shared by the reverse proxy and this frontend. You can get the subnet using the following command (make sure jq is installed)
docker inspect -f '{{ json .IPAM.Config }}' net | jq -r .[].Subnet
OVERWRITEPROTOCOL: The overwriteprotocol parameter is used to set the protocol of the proxy. As we're using HTTPS, set this to HTTPS.
SMTP_HOST & SMTP_PORT: The SMTP server address and the port it'll be listening on, for SendGrid it is smtp.sendgrid.net and port 587 for automatic TLS.
SMTP_NAME & SMTP_PASSWORD: The username & password for authentication. For SendGrid the value of the username is very consistent. It is apikey. For the password, it's going to be your API key.
MAIL_FROM_ADDRESS: The value of the From SMTP header. Set this to something like [email protected].
NEXTCLOUD_ADMIN_USER & NEXTCLOUD_ADMIN_PASSWORD: Instead of using the web UI the first time to create the admin user, you can instead create that right at the deployment stage through these variables. Set these to your admin user's username and password. If you left it, you'll be prompted to create an account the first time you launch Nextcloud.
Volumes
I have two internal volumes defined in this network, NCMariaDB for MariaDB and NCData for Nextcloud. Whether to keep these internal or external is up to you.
Many will say it's risky to keep these internal since you can easily make the mistake of using docker-compose down -v and remove the volumes along with the containers. At the same time, with external volumes, you can make the mistake of docker volume prune and delete all your data.
Decide which one is going to be safer for you. If you decide to make them external, open the Compose file and change the volumes definition to something like this:-
volumes:
  NCMariaDB:
    external: true
  NCData:
    external: true
Afterward, create the volumes:
for volume in NCMariaDB NCData; do
  docker volume create ${volume}
done
Networks
There's not much here. You'll notice there are two networks defined. One is for the frontend and reverse-proxy, and the other one is for the frontend and the backend to be able to communicate.
The database container and nextcloud frontend have a common network named "common", this is there for these two containers to be able to communicate with each other. You can make this internal, which will limit the database container from accessing the public internet, but I am not sure what advantage[s] you might get from this.
Still if you want to do this, it should look like this:
networks:
	net:
		external: true
	common:
		internal: true
Finally, deploying Nextcloud
There's nothing else left to do. Just run the following command
docker-compose up -d
The necessary images are going to be pulled and then deployed.
Once deployed, there should be a total of four containers running on your server.
debdut@localhost:~$ docker ps -a
CONTAINER ID   IMAGE                                           COMMAND                  CREATED       STATUS       PORTS                                      NAMES
1dce1c7909fe   jrcs/letsencrypt-nginx-proxy-companion:latest   "/bin/bash /app/entr…"   7 hours ago   Up 7 hours                                              reverse_proxy_LetsencryptCompanion_1
d29719999132   jwilder/nginx-proxy:latest                      "/app/docker-entrypo…"   7 hours ago   Up 7 hours   0.0.0.0:80->80/tcp, 0.0.0.0:443->443/tcp   reverse_proxy_NginxProxy_1
cd719cb2a677   nextcloud:21.0.0                                "/entrypoint.sh apac…"   7 hours ago   Up 7 hours   80/tcp                                     nextcloud_NCFrontend_1
60dff2062aa5   mariadb:10.5.9                                  "docker-entrypoint.s…"   7 hours ago   Up 7 hours   3306/tcp                                   nextcloud_NCDatabase_1
You may have more containers running as well if there were containers running previously. The bottom line is this Nextcloud deployment consists of four containers, the nginx container, the letsencrypt companion container, mariadb container and finally the actual nextcloud container.
Post deployment
Before wrapping this up, I wanted to mention one quick thing you may wanna know post deployment.
First open your browser and head over to the domain this Nextcloud instance is hosted on (VIRTUAL_HOST). You should see a screen similar to this, if you did not set the admin user using the compose file
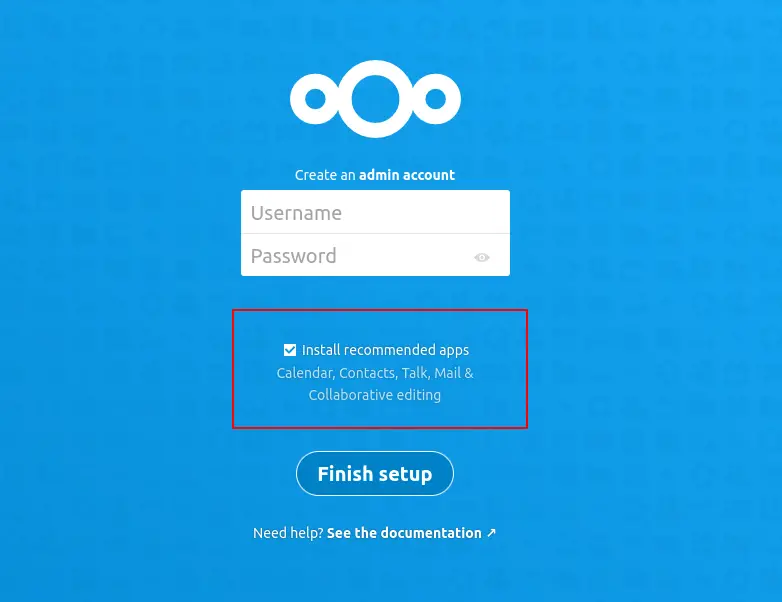
Since the database environment variables are shared through the common .env file, you won't see the more common web install UI that asks for the database information like hostname, port, database username password.
A similar checkbox can be seen there as well. I recommend you uncheck this box and install whichever apps you need later on from the app list.

For more post deployment tips, read this awesome article written by my colleague Avimanyu:
That's it. I hope this detailed tutorial helps you with your Nextcloud server installation with Docker. If you have questions or suggestions, please let me know in the comment section and I'll be glad to help you out.