

When you get a VPS or a dedicated (bare metal) server, the hosting provider lets you choose the operating system you want to install.
Typically, you can choose from a list of about ten systems. What if your favorite Linux system is not included in that list?
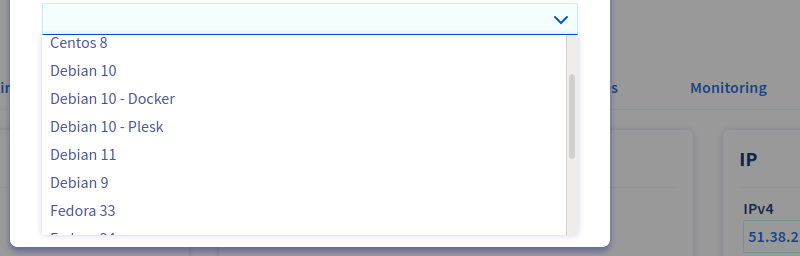
There are perhaps several methods to install a particular Linux distribution of your choice on a remote server.
I wanted to use the ultra lightweight Alpine Linux. It is available as an option on Linode but not on OVH. I primarily use OVH so I used this method to get Alpine on my server.
It may be appropriate for other distributions on other server providers as well:
- Install a "default OS", the one your server provider offers.
- Use this system to download an image of the desired OS; that image must be usable as a live environment.
- Reboot to this live environment.
- Install the new OS (next to the default OS).
Steps 3 and 4 are similar to installing an OS on a laptop or desktop computer via a "live medium", except the physical medium is replaced by an ISO file.
The key tools to use in this tutorial are:
- IPMI/KVM over IP, or any similar tool.
- GNU GRUB, the well-known bootloader.
The former must be supported by the provider (otherwise do not start applying the following instructions!), and allows you to monitor and control the boot process of the machine.
The latter is generally already installed along with the default OS, but can be (re)installed and tweaked to suit your needs.
Step 1: Install the default OS on the new server
A common choice is Debian GNU/Linux, but whatever you choose, it's better to keep it after Alpine is installed (we will do dual booting).
This way, Debian will be your customized "rescue" system, quicker to access than the usual rescue mode offered by the provider. Since this way of installing an OS looks somewhat "experimental", you may need an alternate system.
In the rest of this article, the default, primary OS is assumed to be Debian.
Once Debian is ready and running, SSH to it. You don't need to connect to a root account, but you may need sudo because you will download the new OS and you may want to store it at a location owned by root (for example /boot/ or even /).
And if you need to follow the step 3.1, you will need root privileges again.
Be sure that GRUB is installed. If there is a directory such as /boot/grub/, you can bet it's OK!
Step 2: Get the desired OS (Alpine Linux in our case)
Let's get the latest Alpine release! Visit the download page in order to copy the link to the desired flavor. Generally, you'll pick an x86_64 image. For a VPS, which resembles a bare metal server but is in fact a virtual machine (as the "V" states), you probably need the "virtual" ISO file.
The examples through this article show the virtual one, but of course replace it by the one that fits your needs.
Download the Alpine Linux by using the link you copied earlier.
cd /
sudo wget https://dl-cdn.alpinelinux.org/alpine/v3.14/releases/x86_64/alpine-virt-3.14.2-x86_64.iso
Check whether the file is OK or corrupted: you can run sha256sum...
sha256sum alpine-virt-3.14.2-x86_64.iso
fcba6ecc8419da955d326a12b2f6d9d8f885a420a1112e0cf1910914c4c814a7  alpine-virt-3.14.2-x86_64.iso
…and compare the hash value with the one you can find on the download page. If the two strings match, it's OK.
Step 3: Boot the image file
The actual game starts now!
3.1: Look at the ISO structure
First, you have to find the location of two important files within the ISO file you just downloaded: the kernel and the initramfs (or initrd).
One solution is to mount the ISO and inspect it:
$ sudo mount -o loop alpine-virt-3.14.2-x86_64.iso /mnt/
mount: /mnt: WARNING: device write-protected, mounted read-only.
$ ls -l /mnt/
total 6
dr-xr-xr-x 1 root root 2048 August  27 11:11 apks
dr-xr-xr-x 1 root root 2048 August  27 11:11 boot
dr-xr-xr-x 1 root root 2048 August  27 11:11 efi
$ ls -l /mnt/boot/
total 28554
-r--r--r-- 1 root root   123781 August  27 11:11 config-virt
dr-xr-xr-x 1 root root     2048 August  27 11:11 dtbs-virt
dr-xr-xr-x 1 root root     2048 August  27 11:11 grub
-r--r--r-- 1 root root  6022546 August  27 11:11 initramfs-virt
-r--r--r-- 1 root root 13258752 August  27 11:11 modloop-virt
dr-xr-xr-x 1 root root     2048 August  27 11:11 syslinux
-r--r--r-- 1 root root  3632749 August  27 11:11 System.map-virt
-r--r--r-- 1 root root  6194624 August  27 11:11 vmlinuz-virt
We have found them: boot/vmlinuz-virt and boot/initramfs-virt. You can now sudo umount /mnt.
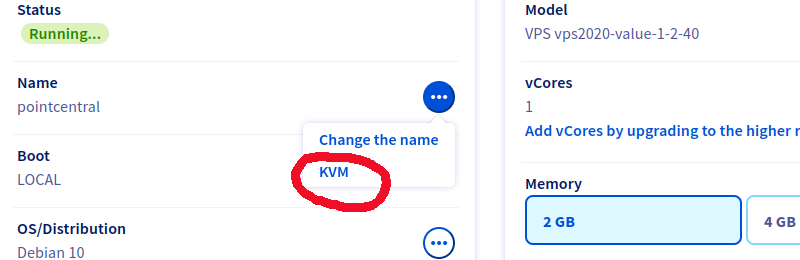
3.2: Reboot
Close the SSH session(s). It's time to use KVM (or similar technology), you normally find it on the web interface:
It leads you to something like the console shown on the screenshot below. It's the screen you would have if you were in front of a monitor physically connected to the server.
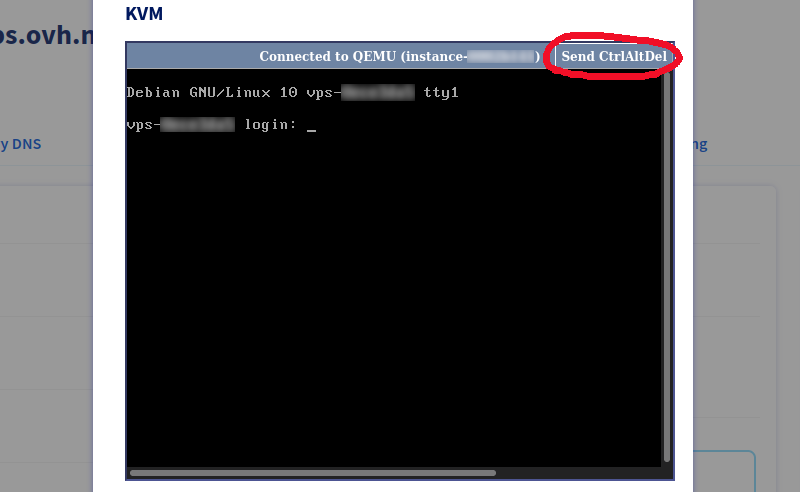
Here, there is a "Send CtrlAltDel" button, so one just have to click on it. But you can also login and sudo reboot.
3.3: Use the ISO file
Once rebooted, the machine displays the GRUB menu. Quickly, click on the console to ensure this element of the web page has the focus, then press an arrow key so the GRUB countdown is stopped.

If you want to stop this tutorial and run Debian again, choose the first option. To continue this tutorial, press c to access the GRUB command-line prompt.

You might have to select the partition on which you stored the downloaded OS image (the ISO file). When possible, GRUB mounts the first partition of the first disk, and implicitly selects it as the root device.
If your Debian partition is the first partition, and you stored the ISO file on it (like we did at step 2), you don't have anything to do. Else, you have to redefine the root device, with a command such as set root=(hd0,2). Please have a look at the GRUB manual for further explanations.
Tell GRUB to mount the ISO file as a virtual block device:
grub> loopback l /alpine-virt-3.14.2-x86_64.iso
Here I have chosen a simple identifier, l, but you can use anything you want that do not conflict with something else (a GRUB command name or a filename). Note that at step 2, I chose to put the file at the root of the filesystem, that's why I write /alpine….
Next, define the linux (kernel) and the initrd objects, by using the results you got at step 3.1:
grub> linux (l)/boot/vmlinuz-virt
grub> initrd (l)/boot/initramfs-virt
The parentheses around the loopback object are mandatory. (l)/ acts as the root directory for the ISO file's internal filesystem.
Launch the defined system, that is the initrd environment based on the linux kernel. The whole is a temporary, mini init system to load and run the "real" live system.
grub> boot
A few seconds after you enter the boot command, the init system stops with an error message such as "Mounting boot media: failed".
That's because this process needs to load the Alpine live environment, but the ISO image is no longer mounted (you exited GRUB to enter another system). You are presented an emergency shell with which you can mount the image again:
Method A: If you don't plan to resize or move the partition containing the ISO file
If you already resized the partition and made place for Alpine, you can remount the live system the simplest way:
$ mount /dev/sda1 /media/sda1
$ mount -o loop -t iso9660 /media/sda1/alpine-virt-3.14.2-x86_64.iso /media/cdrom
At step 4 you won't be able to resize sda1 (at least, it is difficult).
Of course, replace sda1 with the appropriate device name if the ISO file is not stored on the first partition of the first disk. Mountpoint directories /media/sdXN are already created according to the detected partitions.
You must add the -t iso9660 option and specify /media/cdrom as the target directory, or else it won't work.
Method B: If you wish to resize or move the partition containing the ISO file
If the Debian partition takes all the available disk space, or for any other reason you have to modify the partition that contains the ISO file, the fact the ISO file itself contains the live system will prevent you from unmounting the partition's filesystem.
One solution is to copy the ISO file to RAM, then remount this copy:
# mount /dev/sda1 /media/sda1
# cp /media/sda1/alpine-virt-3.14.2-x86_64.iso /dev/shm
# umount /dev/sda1
# mount -o loop -t iso9660 /dev/shm/alpine-virt-3.14.2-x86_64.iso /media/cdrom
The same remarks as for the method A (about command line details) apply. Here we temporarily mount sda1, just to get a copy of the ISO file.
Whether you followed the method A or B, entering the exit command (or pressing ^D) then continues the process of booting the live Alpine system.
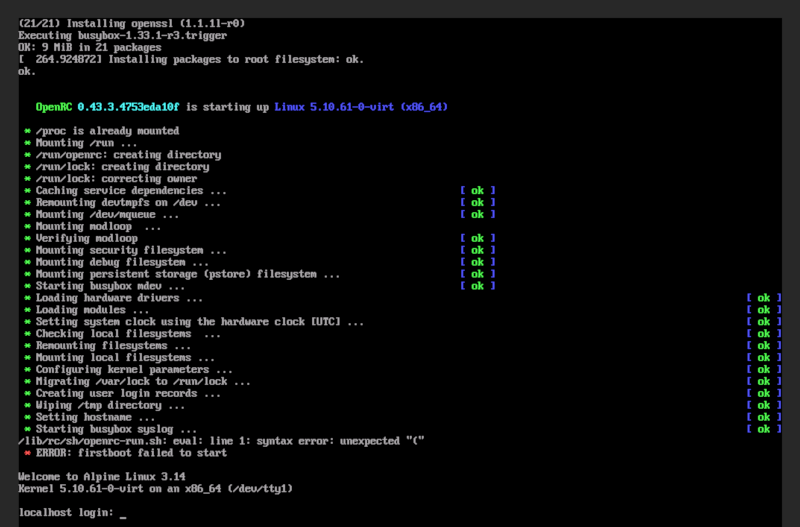
From the tiny letters on the screenshot above, you can guess that the Alpine live system is running correctly and waits for a login, although a minor error occurred.
Step 4: Install the new OS (Alpine Linux)
You are almost there.
4.1: Use the installer
The exact process of installing the operating system is beyond the scope of this tutorial. Use the installer and other tools offered by the live environment to manage partitions (you may need LVM) and install the OS.
For Alpine, login as root (no password by default) and try the setup-* commands. You can apk add parted e2fsprogs e2fsprogs-extra to get useful tools for managing filesystems and partitions. More info at Alpine wiki.
In all cases:
- Remember that you are still using KVM; choose temporary passwords for root and normal users.
- Be sure the network is properly configured not only for the live system, but also for the system being installed on disk. Also, an SSH server must be installed along with the OS.
- Unless you know what you are doing, do not reinstall GRUB, nor change its config, from here. It's easier to modify the GRUB configuration from your alternate, "rescue" Debian installation.
Let's say you have installed Alpine on sda2. You can now tell the live system to reboot the server, or you can logout then click the Send CtrlAltDel button (if any).
4.2: Add a GRUB entry
Boot Debian. You can keep the KVM window open, but you should login by using a normal SSH connection from your local shell. You will need root access.
The point now is to tell GRUB that there is another operating system available on another partition, so we'll add an entry to the GRUB menu.
First, mount /dev/sda2 /mnt and inspect /mnt/boot. Check the name of the kernel and the initrd for the new OS you just installed. They should be the same as the ones you found when you inspected the ISO file's boot folder at step 3.1, but that's not required. umount /mnt.
Run blkid and note the UUID associated to /dev/sda2.
Edit /etc/grub.d/40_custom. Add the "Alpine Linux" section with the information you just obtained (replace {UUID} with the concrete UUID string):
#!/bin/sh
exec tail -n +3 $0
# This file provides an easy way to add custom menu entries.  Simply type the
# menu entries you want to add after this comment.  Be careful not to change
# the 'exec tail' line above.

menuentry "Alpine Linux" {
    search --no-floppy --fs-uuid --set=root {UUID}
    linux /boot/vmlinuz-virt root=UUID={UUID} modules=sd-mod,ext4
    initrd /boot/initramfs-virt
}
This is a minimal menu entry and you are likely to add other options and modules to the linux line, as you refine your installation. You need the sd-mod module so the kernel can read your disks, and the ext4 one if you installed Alpine on an Ext4 filesystem.
"Alpine Linux" is the title that will appear in the GRUB menu, you can change it to anything you want.
Also, perhaps you'd like Alpine to be the default choice when the server reboots. Edit /etc/default/grub and modify the GRUB_DEFAULT line. By default this parameter is set to 0 and refers to the first entry. In our example, Alpine is the third entry so set it to 2.
In order to take the changes in these files into consideration, you must re-generate /boot/grub/grub.cfg. Debian has an easy tool for that: just run update-grub. Test your changes by rebooting the server and monitoring what is happening via KVM.

Launch Alpine (if you made it the default entry choice it should start automatically) and see whether it boots up and behaves correctly or requires changes in the GRUB entry. If you want to test changes in the GRUB entry without making them permanent, press e instead of Enter once the Alpine entry is selected in the boot menu:
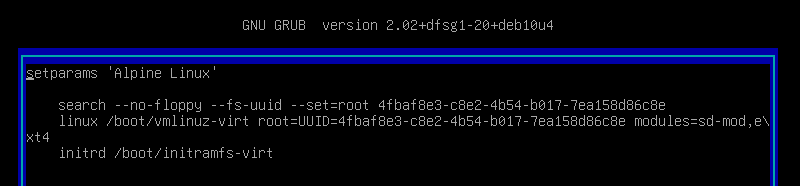
4.3: Final considerations
Once the newly installed OS is running correctly, you can SSH to it and change the passwords you previously defined via KVM. Close the KVM tool in your web browser. Use KVM only to reboot to Debian or monitor the Alpine startup process.
You can now install programs and tweak your system. Good luck!
Author info: Paul Desplanque is 100% self-taught in computers-related things. With 8 years of PHP development experience behind him, Paul is quite adept in self-hosting.
