![How to Set Up Remote Access to Docker Daemon [Detailed Guide]](/content/images/size/w30/format/avif/2021/02/docker-remote-access-set-up.png)

I have written in detail about how to SSH into a docker container. This tutorial takes the same concept to another level by enabling remote access to Docker.
With docker remote access, whenever you run a docker command on your local host, the effects take place on the remote server.
Let me explain that in detail.
What is Docker remote access?
Before you dive into the setup, let me recall how docker works.
Docker works in something called a client-server architecture. The main component that handles all your containers, volumes, networks, etc is the docker daemon that runs in the background.
The docker command is nothing but the client application. The client and the daemon communicate via the docker API over a traditional Unix socket that you can find at /run/docker.sock or /var/run/docker.sock. The client asks the daemon to do something, or retrieve information, and the daemon does just that.
How does this interest you? Since the communication protocol used between the docker client and server is plain HTTP, you should be able to send requests to the server remotely, if you can make the daemon listen for HTTP requests at a port instead of a local UNIX socket.
As it turns out, you can totally do that. The daemon can indeed listen at not only the UNIX socket but also a TCP port. As if that wasn't enough, starting with docker version 18.09, you can even use SSH for the communication protocol.
In this tutorial, I'm going to walk you through the whole process of how you can configure your host and a remote server, so that you can use docker commands from one host and have it run on another host, without having to SSH-ing into the remote server.
Benefits of using remote docker access
Still wondering about the benefits of this approach? Here are a few of them:
- No need to log into a server to start or stop a service. All can be done remotely.
- Many monitoring tools, like Portainer, need access to the Docker API endpoint to monitor details like networks, running containers, etc. Normally to add a server to the endpoint list, you'd have to deploy a Portainer agent on the server first and bind some port from the container to the host. Instead, you could just let it access the docker daemon directly, this would save a lot of your resources.
- You could write various automation scripts right in your local computer to control/manage one or more remote docker servers. Since you don't have to SSH into the remote server, there's no need to maintain a stable connection. This could be a good option if you have unstable or slow internet connection.
- If your local system isn't powerful enough to run containers, or say you don't have enough storage, you can use a remote server for your docker host, and control it remotely via a TCP port or SSH.
- Expanding the previous point, servers on the cloud are nowadays very scalable. As long as you're fine with the costs, you can scale the docker host as much as necessary without having to worry about buying a newer SSD or HDD (if you still use it).
The advantages themselves can be scaled up or down, depends on whether the person in question really needs this or not. If you don't, that's fine. But if you do you're in the right place.
Is Docker remote access secure?
Friends at docker have already considered this. Using SSH for the in-between protocol, it is as secure as your SSH sessions are. More on this in later section of this tutorial.
If you are not keen on using SSH, exposing the API through a public port, without any form of authentication, is not exactly the best idea now, is it?
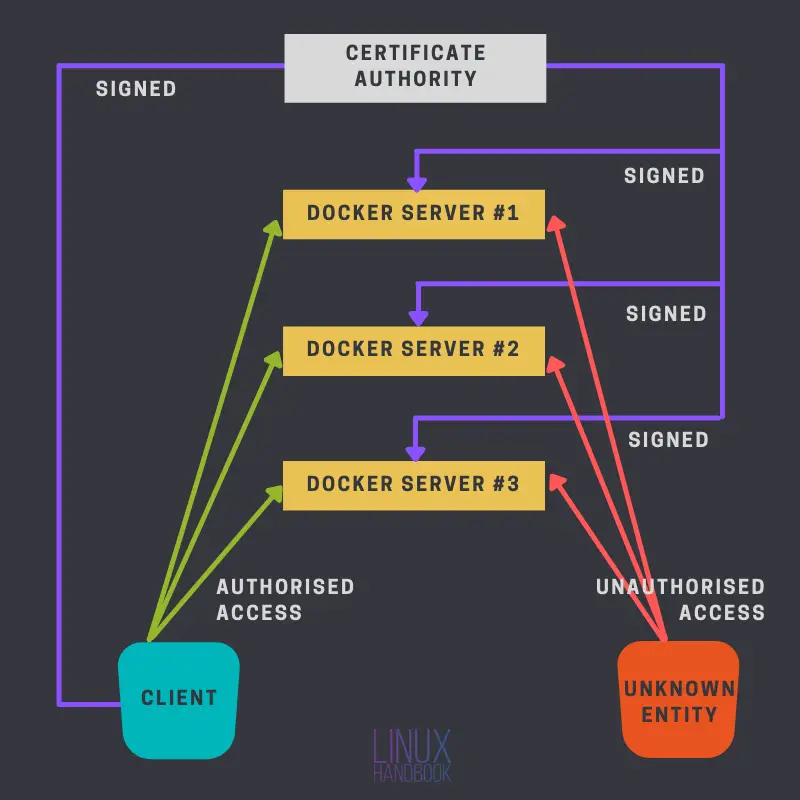
That's why we have TLS authentication. Unless someone else has got a certificate signed by your CA (along with the CA certificate), he/she should not be able to do you any harm.
The following diagram explains this:
I'm first going to talk about how you can configure your local and remote servers for this setup, with SSH. It is much easier and I recommend you go this route if the other method seems a bit tricky to you.
What do you need for this set up?
Before moving forward, you need a couple of things, some mandatory, some optional.
- As this is already pretty clear, you'll need a server on the cloud, I personally recommend Linode.
- Docker must be installed on this remote server. You may refer to our guide on installing Docker on Ubuntu and CentOS.
- Optionally, some knowledge of
opensslmay be beneficial if you're planning on using the TCP port method. - Access to the server via SSH public key authentication.
Method 1: Setup remote Docker access using SSH
One of the best thing about using SSH here is that it requires a lot less work than the other method. If you already have SSH keys set up, it's literally a one-step process.
Before moving forward I want you to have this mental picture in place, for understanding how this SSH method works, and why it's configured the way it's configured.
To confirm the above statement, run any docker command at the end of this section (while testing) with the -l debug flag. This will print the exact command being executed on your local machine.
Prerequisites
The prerequisites for this configuration are as follows:
1. SSH public key authentication
You must have SSH public key authentication enabled between the participating machines. Here's a quick recap on how you can do so,
- Use the command
ssh-keygento generate a public and private key pair. - Use
ssh-copy-id user@ipcommand to copy over the public key to the remote server. - Make sure
PubKeyAuthenticationis set toyesin the remote SSHD config file. Additionally I recommend turning password authentication off (setPasswordAuthenticationtono).
2. The login user must be in the docker group
Since effectively you're logging in as some user, and requesting the docker server some information or to do something, the remote user (that you're logging in as) must have enough permissions to send the request through the remote's "local DOCKER_HOST" (which is as previously stated, mostly /var/run/docker.sock). You can have that permission by adding that remote user to the docker group.
By "remote local DOCKER_HOST" I mean the local DOCKER_HOST of the remote server.
This can be a turn off for many such as myself, as I personally don't like using the docker group for a sudo-less execution.
You can use the usermod command to add an existing user to the docker group.
sudo usermod -aG docker [username]
Configuration changes on your local system
Here are the things you need to tweak on your local, personal system from where you'll be controlling the docker servers.
1. Change DOCKER_HOST on your local system
Believe it or not, there's only one thing to do here. Set the environment variable DOCKER_HOST to the correct combination of remote username, server IP and the port sshd is running on. Like this:
DOCKER_HOST=ssh://[email protected]:22
Alternatively, you can also use the -H flag like I've done here with the docker command
docker -H ssh://[email protected] info
You can add an alias in Linux like this instead:
alias docker="docker -H ssh://[email protected]:22"
Test the configuration
It doesn't matter which method you opted for (environment variable or alias), testing this is just a matter of running a simple docker command like docker info.
Also try running docker -l debug info and notice the command being executed.
Method 2: Using a public TCP port with TLS authentication
This method is more complicate than the previous one, but has it's advantages like not having to use the docker group at all.
The idea here is simple, you're going to create your own certificates and private keys, and then use a TCP port to access the docker daemon through not plain HTTP, but a secure HTTPS channel.
It is analogous to a website. In case of a website, you configure it with a web server to use different keys and certificates, which are later confirmed by the browser that they're valid and they're verified by some trusted organization (like Let's Encrypt or DigiCert). Once that verification is done, encrypted HTTP requests are sent to the web server to get the necessary data.
Similarly, here instead of a traditional web server, you'll be configuring the docker daemon's server to use certain certificates and private keys. Therefore, whenever someone is about to send a request to the daemon server, step one is to ensure that the participants are trusted, as long as the client has the same CA certificate and the certs are signed by that CA, a connection will be established and the client will be able to send [encrypted] requests to the server.
Preparing the certificates and keys
In the following steps, you'll be generating certificates and private keys for your server and client.
Certificate Authority
To make the transactions simple, I'll be using my client machine to generate all the files. You can use a separate machine for that if necessary. A CA certificate is nothing but a self-signed certificate.
But first, you need to generate your CA's private key. Use the following command to do so
openssl genrsa -aes256 -out ca-key.pem 4096
Let's break down the command:
- genrsa: This option tells
opensslto generate a private key based on the RSA algorithm. - -aes256: This encrypts the private key with a user provided passphrase, using 256 bit AES. AES is simply an encryption technique (Advanced Encryption Standard).
- -out: Specifies the output file name.
- Finally, I put the key length (in bits).
Provide a passphrase to secure the key. Next, you'll create a certificate for your CA, which will be signed with the key you just created. Create that using the following command:
openssl req -x509 -new -key ca-key.pem -days 365 -subj '/CN=CertificateAuthority' -out ca-cert.pem
To many, this might seem like a mystery, like what exactly is it doing? Well, let me break it down for you:
- req: This option is used primarily for creating CSRs. Here we're using it to create a self signed certificate.
- -x509: This tells
opensslto generate a signed certificate instead of a CSR. - new: This creates a new certificate request, and asks the user for the relevant field values.
- -key: The key that's going to be used.
- -days: Validity of the certificate in days.
- -subj: Instead of getting prompted for every single detail, we assign the relevant field values directly with this option. I've set the Common Name here only. You can omit this flag, and you'll be prompted of every single detail.
- -out: The output filename.
Provide the passphrase for the key when prompted.
Docker server
Next, you need to generate your server's certificates and private keys.
For this, you'll be creating a CSR first, a Certificate Signing Request, and then it'll be signed by the CA. Generate the private key first:
openssl genrsa -out server-key.pem 2048
The syntax is the same as you used previously, with exceptions. One, not encrypting the key this time. Because other programs are going to need to read this file unattended, if encrypted, you'll be facing some errors. Two, the key length is 256 bytes here. I opted for a longer key for the CA. You can use the same length for this one too, this is to show you the different options available at your disposal.
Next generate the CSR:
openssl req -new -key server-key.pem -subj '/CN=docker-host' -out server.csr
Edit the /etc/hosts file, and add the IP of the Docker host with a constant hostname. You'll have to add this to all your clients wanting to access this host. If this host has an FQDN assigned to its IP, you can use that instead. An FQDN, Fully Qualified Domain Name is a domain name that is associated with your IP in the DNS servers. This isn't your local hostname. An FQDN is resolved to your IP in not only your LAN but anywhere around the world as long as it's part of a public DNS record and the resolver is using that DNS server.The flags are the same as you used when generating your CA certificate. Here I don't have the -x509 flag, as this isn't a self-signed certificate, your CA is going to sign this one. Therefore, sign it,
openssl x509 -req -days 365 -in server.csr -CA ca-cert.pem -CAkey ca-key.pem -CAcreateserial -extfile <(echo "extendedKeyUsage = serverAuth") -out server-cert.pem
- x509: This option is used to sign CSRs.
- -req: This option is there for
opensslto expect a CSR. - -in: Passes the CSR file.
- The options -CA, -CAkey takes the CA certificate and the CA key as arguments respectively.
- -CAcreateserial: With this option,
opensslcreates a CA serial number file if not one already exists. - -extfile: Passes the file containing the certificate extensions to use. Here I've used the
extendedKeyUsageextension.
Now you should have the CA-signed server certificate server-cert.pem and server's private key server-key.pem.
Docker client
Now you need to set up your docker client. The process is somewhat the same as before. Create a private key > generate a CSR > sign that CSR with your CA.
For clarity, I'll still document those here. Generate the private key:
openssl genrsa -out client-key.pem 2048
Next, generate the CSR:
openssl req -new -key client-key.pem -subj '/CN=docker-client' -out client.csr
Here, enter your client's hostname for CN's value. Finally, sign the CSR:
openssl x509 -req -days 365 -in client.csr -CA ca-cert.pem -CAkey ca-key.pem -CAcreateserial -extfile <(echo "extendedKeyUsage = clientAuth") -out client-cert.pem
Here the only difference is the "extended key usage" extension value. I have clientAuth instead of serverAuth. Enter your passphrase when prompted.
Setting up the environment
Once the certificates and private keys are ready, you need to tell your docker engine and client about them, along with exposing the engine API to a public TCP port and letting the client use the docker engine that's not sitting at the local machine.
The following steps go through exactly that.
The docker host
First, copy over three files from the administrator's machine, the CA certificate (ca-cert.pem), this host's private key (server-key.pem) and CA signed certificate (server-cert.pem). Create a directory /etc/docker/certs to keep these files in.
sudo mkdir /etc/docker/certs
Next, open the daemon config file, and add the following (You'll find the config in /etc/docker/daemon.json):
{
    "tlsverify": true,
    "tlscacert": "/etc/docker/certs/ca-cert.pem",
    "tlscert": "/etc/docker/certs/server-cert.pem",
    "tlskey": "/etc/docker/certs/server-key.pem",
    "host": "tcp://0.0.0.0:2376"
}
The last option tells the daemon to listen to the TCP port 2376. Save the file and restart docker.
sudo systemctl restart docker
While the team behind docker recommends using port 2376 for this, theoretically you can use any other unused/unreserved port.The client
The client-side is arguably easier to set up. Create a directory ~/.docker:
mkdir ~/.dockerInside of that directory, place three files, with the correct naming, like below (The names we used previously during this article are placed inside of those brackets)
- ca.pem: The CA certificate (
ca-cert.pem). - key.pem: Client's private key (
client-key.pem). - cert.pem: Client's certificate (
client-cert.pem).
Next, set up two environment variables
- DOCKER_HOST Set this variable's value to
tcp://docker-host:2376. Use the hostname you set in vim /etc/hostname for the corresponding host/ip. - DOCKER_TLS_VERIFY Set this to 1.
You can use ~/.bashrc to automatically configure these. Use the export command to set these variables:
export DOCKER_HOST=tcp://docker-host:2376
export DOCKER_TLS_VERIFY=1
Again, for the hostname, use the appropriate value from /etc/hosts. If you have an FQDN for this IP, use that instead.Test the setup
Now that everything is done, you can test it by running docker info, or run any random container, whichever comes to your mind. You can also use curl to test it (Remember? These are simple HTTP requests). Use the following as an alternative to docker info
curl https://docker-host:2376/info --cert ~/.docker/cert.pem --key ~/.docker/key.pem --cacert ~/.docker/ca.pem
This will output a JSON object that you can parse using something like jq. You can also try and run an Nginx server with docker, and see which system has it running. Because visually it seems like docker is running on your local system, this is a prime example/test that you can perform. Simply run
docker run -d --rm --name remote_nginx -p 8080:80 nginx:latest
Now, use curl to check both localhost and the remote IP. First localhost,
curl http://localhost:8080
You should see an output like this
curl: (7) Failed to connect to localhost port 8080: Connection refused
Now try the same with the remote IP,
curl http://docker-host:8080
You should see nginx's template site there. You can also simply use a browser to surf those locations, localhost, and remote host.
Which method to use? TCP or SSH?
Both methods has their own merits. The SSH method is easier if you don't want to go through many hoops. But some applications like Portainer won't work with the SSH method for remote daemon access. Using the TCP method also eliminates the issues of "using or not using the docker group" by default. Choose whichever method satisfies your purpose.
I hope this tutorial was helpful and informative. If you have any questions, do let me know in the comments below.