

LVM or Logical Volume Management is a solution for easy management of block devices within the GNU/Linux environment via virtual blocks. Disk management in Linux environments using LVM provides a high-level view of the structure of disks present on a system. This gives much more flexibility in allocating storage to applications and users. Volumes created using LVM can be resized and moved almost at will.
In this detailed tutorial, you'll learn how you can efficiently manage block devices using LVM.
I'll guide you through the step-by-step process of
- Installing LVM
- Creating linear and striped LV
- Solving full disk problem
- Removing LV.
Before you see any of that, let's quick go over the basic concept of LVM.
Basics of LVM
Everyone who has formatted a disk in the Linux environment knows that it involves certain steps and limitations such as the number of virtual and extended partitions. Also, if you create the wrong partitioning, you'll have issues.
For example, if you left little space for /var/log, your web services will be stopped if it runs out of disk space.
And what would be the solution? Add another disk, format, partition and later move your /var/log to that location. That's a lot of work, but it solves the problem. Now imagine if it happened with more important partitions like your PostgreSQL database path (/var/lib/postgresql/XX/main), your MongoDB (/var/lib/mongo) or MySQL (/ var/lib/mysql).
The advantage of LVM is precisely the management of these block devices in a more intelligent way that allows facilities like disk expansion.
Basically, you take the block devices, which can be – HDDs, SSDs or NVMes and group them into groups of volumes that are later consumed in logical volumes.
Therefore, in the LVM architecture we have 3 important elements, PV, VG and LV linked to filesystems:
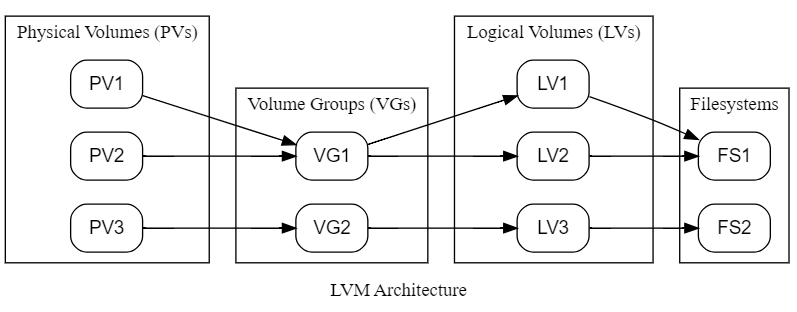
- PV: Physical Volume, physical volume or our hard disk without being partitioned.
- VG: Volume Group, group of volumes or set of PVs.
- LV: Logical Volume, logical volume, that is, our partition.
In this structure, the LV ends up being something similar to the partition you would have on a hard drive. But in this case, it is part of a structure that can involve one or more disks.
In the creation order, you must follow this same sequence, create your PVs, group them into one or more VGs and finally create the LVs.
Linear and Striped LVs
Within LVM, you have two ways of consuming disks, or PVs, one Linear and the other Striped.
The linear format causes the disks that are part of a VG to be consumed one by one. Let's say, if I have two 1 TiB disks, first all 1 TiB of the first disk would be consumed and only then would it start to make use of the second disk.
Striped format has the distribution of data between the two disks, leading to better use of the resource and increasing IOPs (input/output operations per second), a very important disk performance metric.
Creating the LVM Lab
Let's explore a bit of LVM by getting your hands dirty. Create a virtual machine and add 3 extra disks in addition to the main disk.
In VirtualBox, it should look something similar to the following image:
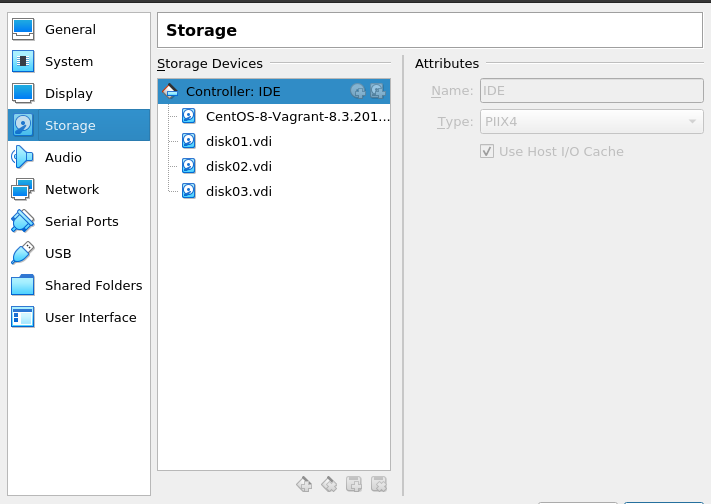
If you are in a Linux environment with Vagrant and VirtualBox installed, you can use the Vagrantfile below to create it in one go:
Vagrant.configure("2") do |config|
  config.vm.box = "centos/8"
  config.vm.network "private_network", ip: "192.168.100.10"
  config.vm.disk :disk, name: "disk01", size: "100MB"
  config.vm.disk :disk, name: "disk02", size: "100MB"
  config.vm.disk :disk, name: "disk03", size: "100MB"
  config.vm.provider "virtualbox" do|vb|
   vb.cpus = "1"
   vb.memory = "512"
  end
end
In this tutorial, you are using the experimental flag to enable the extra disk creation feature. To do the same in your terminal, export the variable VAGRANT_EXPERIMENTAL="disks" before starting the machine.
Once you have the machine running, access your terminal and as the root user, identify whether the disks are present with the lsblk command:

The three disks sdb, sdc and sdd will be used to create LVM in my case.
Installing LVM
Installing LVM is very simple and basically consists of installing the lvm2 package present in most Linux distributions.
As I am using Centos, I will use dnf for installation.
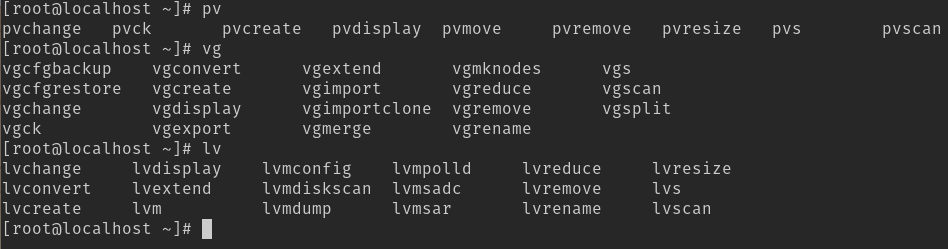
dnf install -y lvm2Once you finish installing LVM, the following utilities will be available in the terminal:
Creating the first logical volume
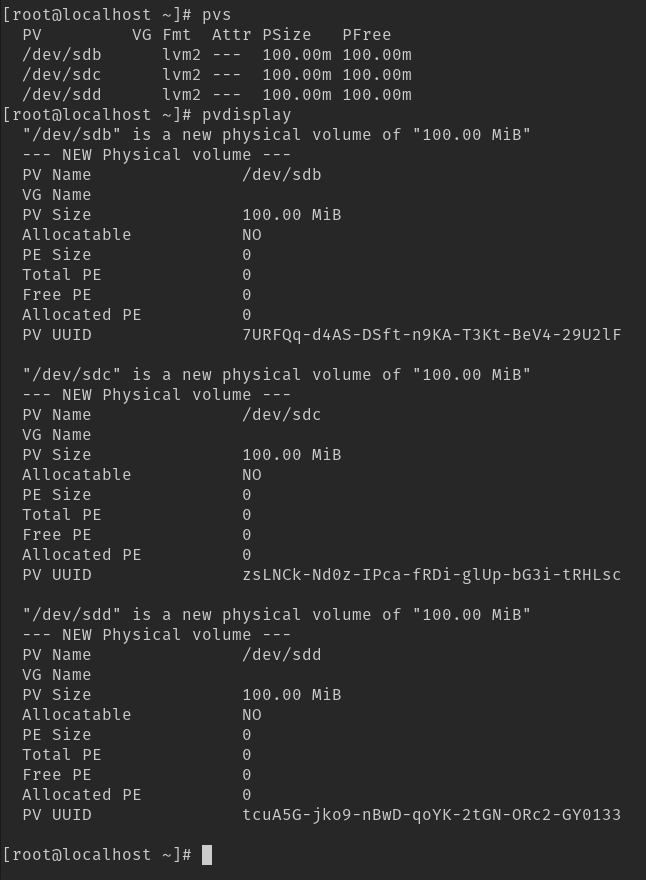
As already mentioned, to create the LV, you first need to create the PV and VG. Therefore, start by creating the PV for each extra disk present in our system.
pvcreate /dev/sdd /dev/sdc /dev/sdbIt is possible to view these PVs via two commands: pvs and pvdisplay:
Now create the VG by grouping these HDs into a single group. To do this, use the vgcreate command:
vgcreate /dev/sdb /dev/sdc /dev/sddCheck the Volume Groups using vgs and vgdisplay commands:
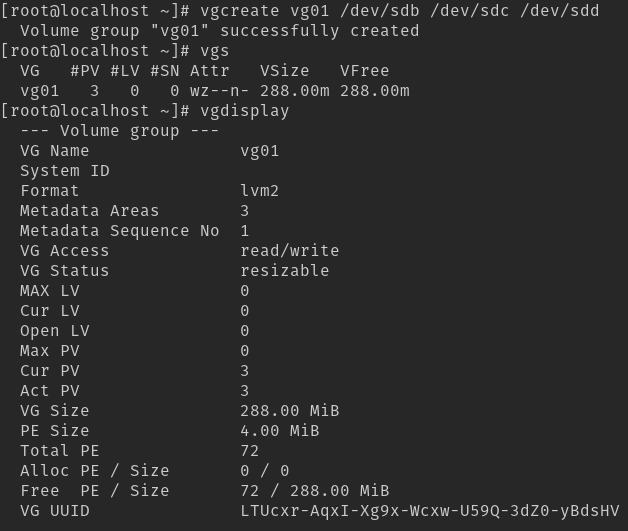
Basically, at this point, Volume Group, vg01, acts as a large block device that will be broken into LVs that behave like partitions. While creating LVs, you need to specify its name and size:
lvcreate -L 50Mib -n lv_var_log vg01
From the reported parameters, you have:
-L 50MiB: Determines the size of the space that will be created, in this case 50MiB.
-n lv_var_log: This is the name given to LVM.
vg01: The Volume Group that will be used to create this LV.
In this case, as the form of consumption was not specified, you are left with the default Linear.
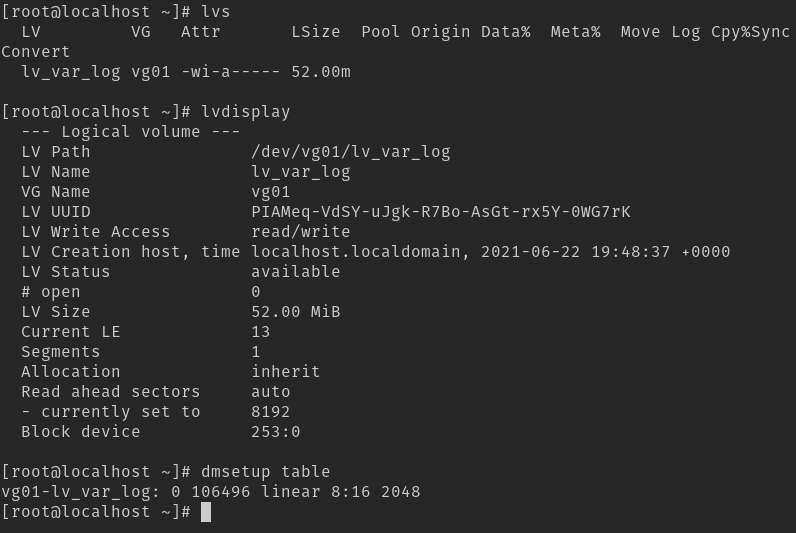
Now you can format this partition and mount it for your use but first, let's visualize the new disk that is in the path /dev/vg01/lv_var_log.
Use lvs and lvdisplay commands and you can see its Linear format via dmsetup, a low-level disk management utility.
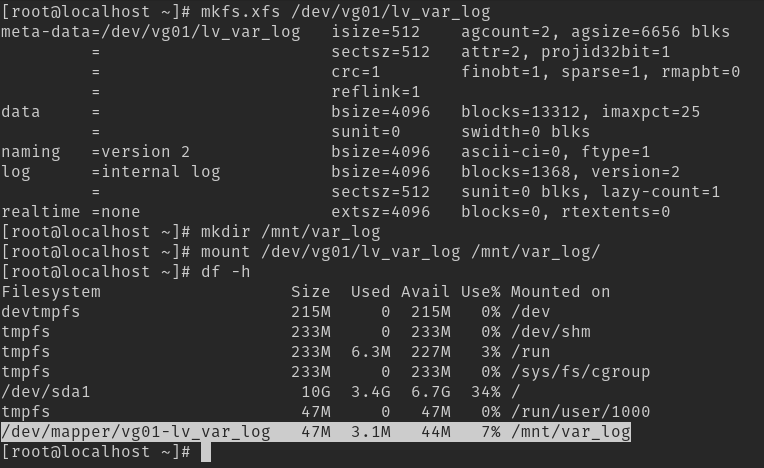
Formatting and using the partition is very simple. Use the mkfs.xfs command and later you can mount this LVM with the mount command.
Solving the 'disk full' problem in LVM
Now that you have a directory mounted, let's simulate the famous initial disk full problem.
First, consume your 50 MiB of space. You can use the dd command for this purpose.
dd if=/dev/urandom of=/mnt/var_log/large_file bs=1MiB count=50In this command, you have the following parameters:
- if=/dev/random: Character device for Input File
- of=/mnt/var_log/large_file: Output file
- bs=1MiB: Amount of data to read/write at a time
- count=50: Number of blocks that will be written
You will read and write 1 MiB at a time, 50 times, trying to generate a 50 MiB file. You will immediately encounter the following problem:

This indicates that you have no more disk space. Unlike an installation without LVM where it would be necessary to add another disk to solve this problem, with LVM you will simply expand your lv_var_log with the lvextend command:
lvextend -L +50MiB vg01/lv_var_log
The arguments are similar to lvcreate, but in this case. you will add more disk space, hence the +50MiB.
This alone will not solve the problem. You need to inform File Systems that it should use this space. Use xfs_growfs:
vxfs_growfs /mnt/var_log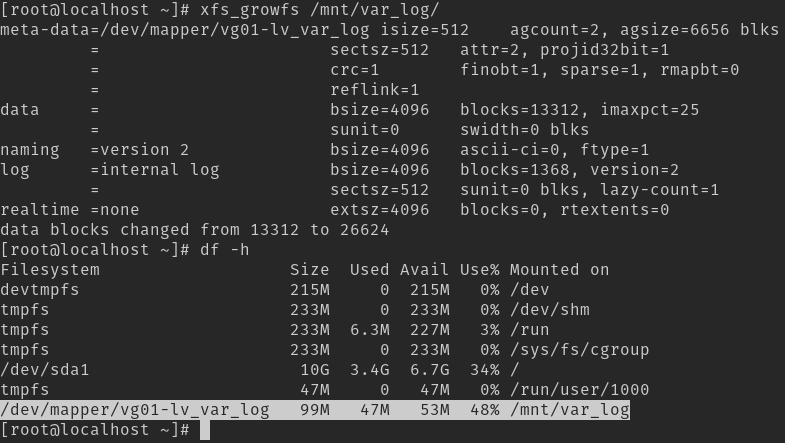
This will solve the disk space problem and you will be able to create your file. Using the lvs itself, you can check which disks are being used to serve this LV:
lvs vg01 -o +devices
Here, you are adding the output of the devices to the lvs output.
Creating a striped logical volume
As mentioned, the striped LV will use the distribution of data over a group of disks, making better use of space and allowing greater IOPs.
To create a striped LV, use the same lvcreate, but now with the --stripes 2 parameter:
lvcreate -L 50MiB -n lv_striped --stripes 2 vg01
Looking at the disks via dmsetup, you will see that the format used is striped, indicating that the data was distributed. You can also view it via lvs as already mentioned.

Removing LV
Removing a logical volume is simple. Just use the lvremove command and enter the LV you want to remove next to the VG:
lvremove vg01/lv_striped
Final Words
LVM is a powerful ally in disk management. Even though most cloud technologies don't use LVM directly, they still use some variant of LVM like cLVM for cluster solutions.
Understanding how to use LVM not only enhances your ability to manage disk resources effectively but also lays a strong foundation for understanding more advanced concepts such as cLVM, which are integral in complex cluster solutions.
