Ghost is an open source CMS focused on membership and newsletter.
Discourse is an open source forum software focused on community building.
You combine Ghost and Discourse and you get the 'perfect' combination of building a community around your membership site.
Only, it's not perfect. The members need to create different accounts on both platforms. This is an inconvenience especially when both platforms allow single sign-on (SSO).
To solve this problem, Vikas has created a Discourse on Ghost (DoG) plugin. Using this, you can seamlessly integrate the members of your Ghost website with the Discourse forum.
In this tutorial, I'll show you how to use DoG to set up Ghost SSO on Discourse.
The official documentation misses some key points that I discovered in my test and hence I created this tutorial to help others with my experience.
Setting up Discourse on Ghost
Before you go any further, I suggest reading the information on the official webpage.
Now that you have some idea, let's see what you need for this tutorial.
Prerequisites
- Self-hosted Ghost instance with Node, not Docker. Preferably, the server should be Debian/Ubuntu based.
- Self-hosted Discourse community forum on a subdomain or another domain but should not be a subfolder (like site.com/forum/)
Step 1: Install Discourse on Ghost (DoG)
Log in as root to the server that hosts your Ghost website.
You need to create a directory that will contain the code for DoG. The directory could be anywhere. I kept it at /root/, home directory of the root user.
Create the directory:
mkdir discourse-on-ghostAnd switch to this newly created directory:
cd discourse-on-ghost
Now install the dependencies for DoG using node:
npm install @potluri/discourse-on-ghostCreate the environment variables file named by copying it from the just installed code. This file will be modified in the next section.
cp node_modules/@potluri/discourse-on-ghost/.env.example .envNow create the entry point script:
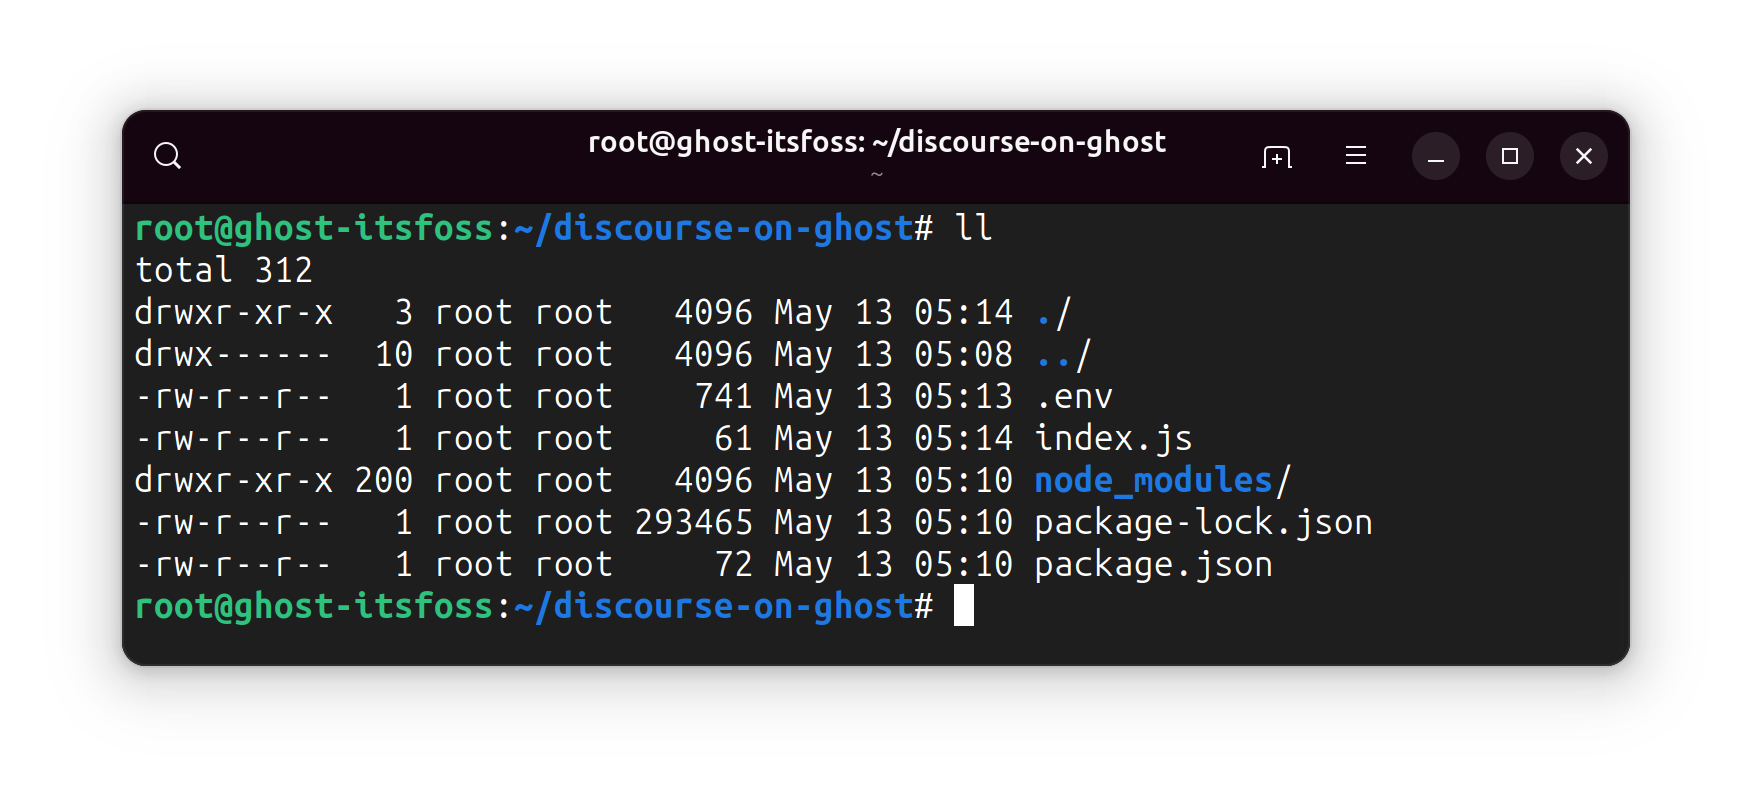
echo "import('@potluri/discourse-on-ghost/build/targets/node.js');" > index.js
Your directory content should look like this now.
Step 2: Create integration in Ghost for DoG
Log in to the front end of your Ghost install. Go to Settings -> Integration:
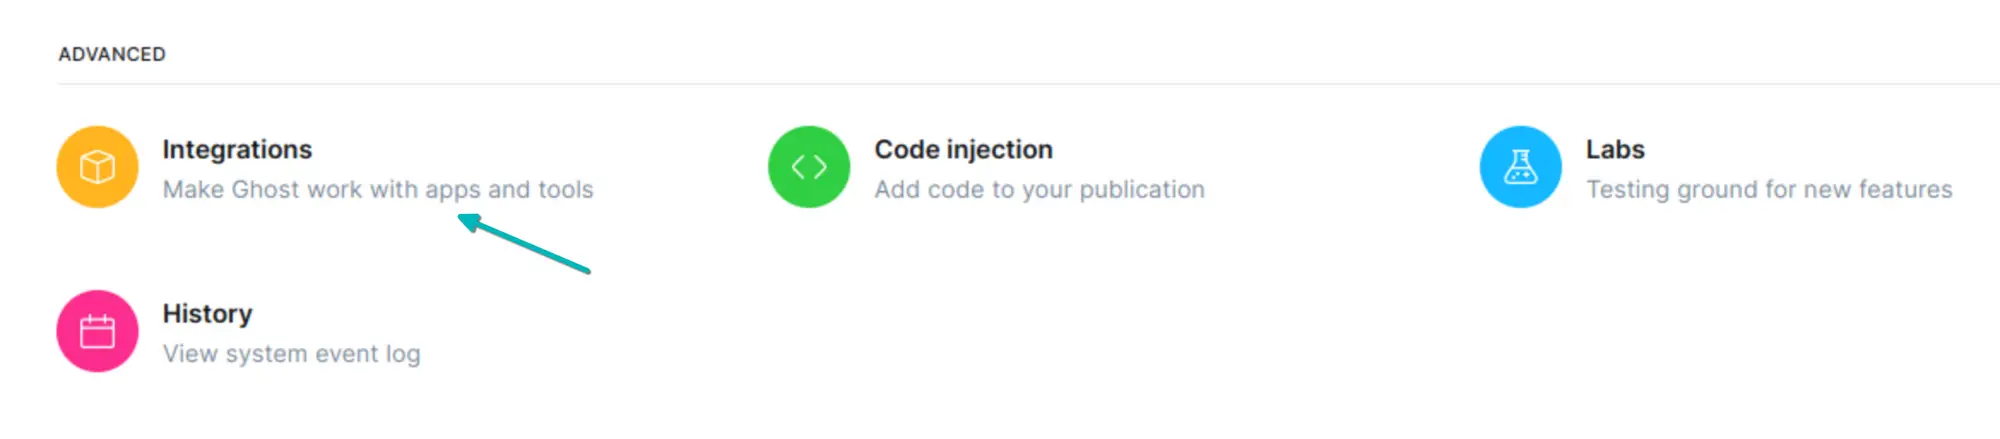
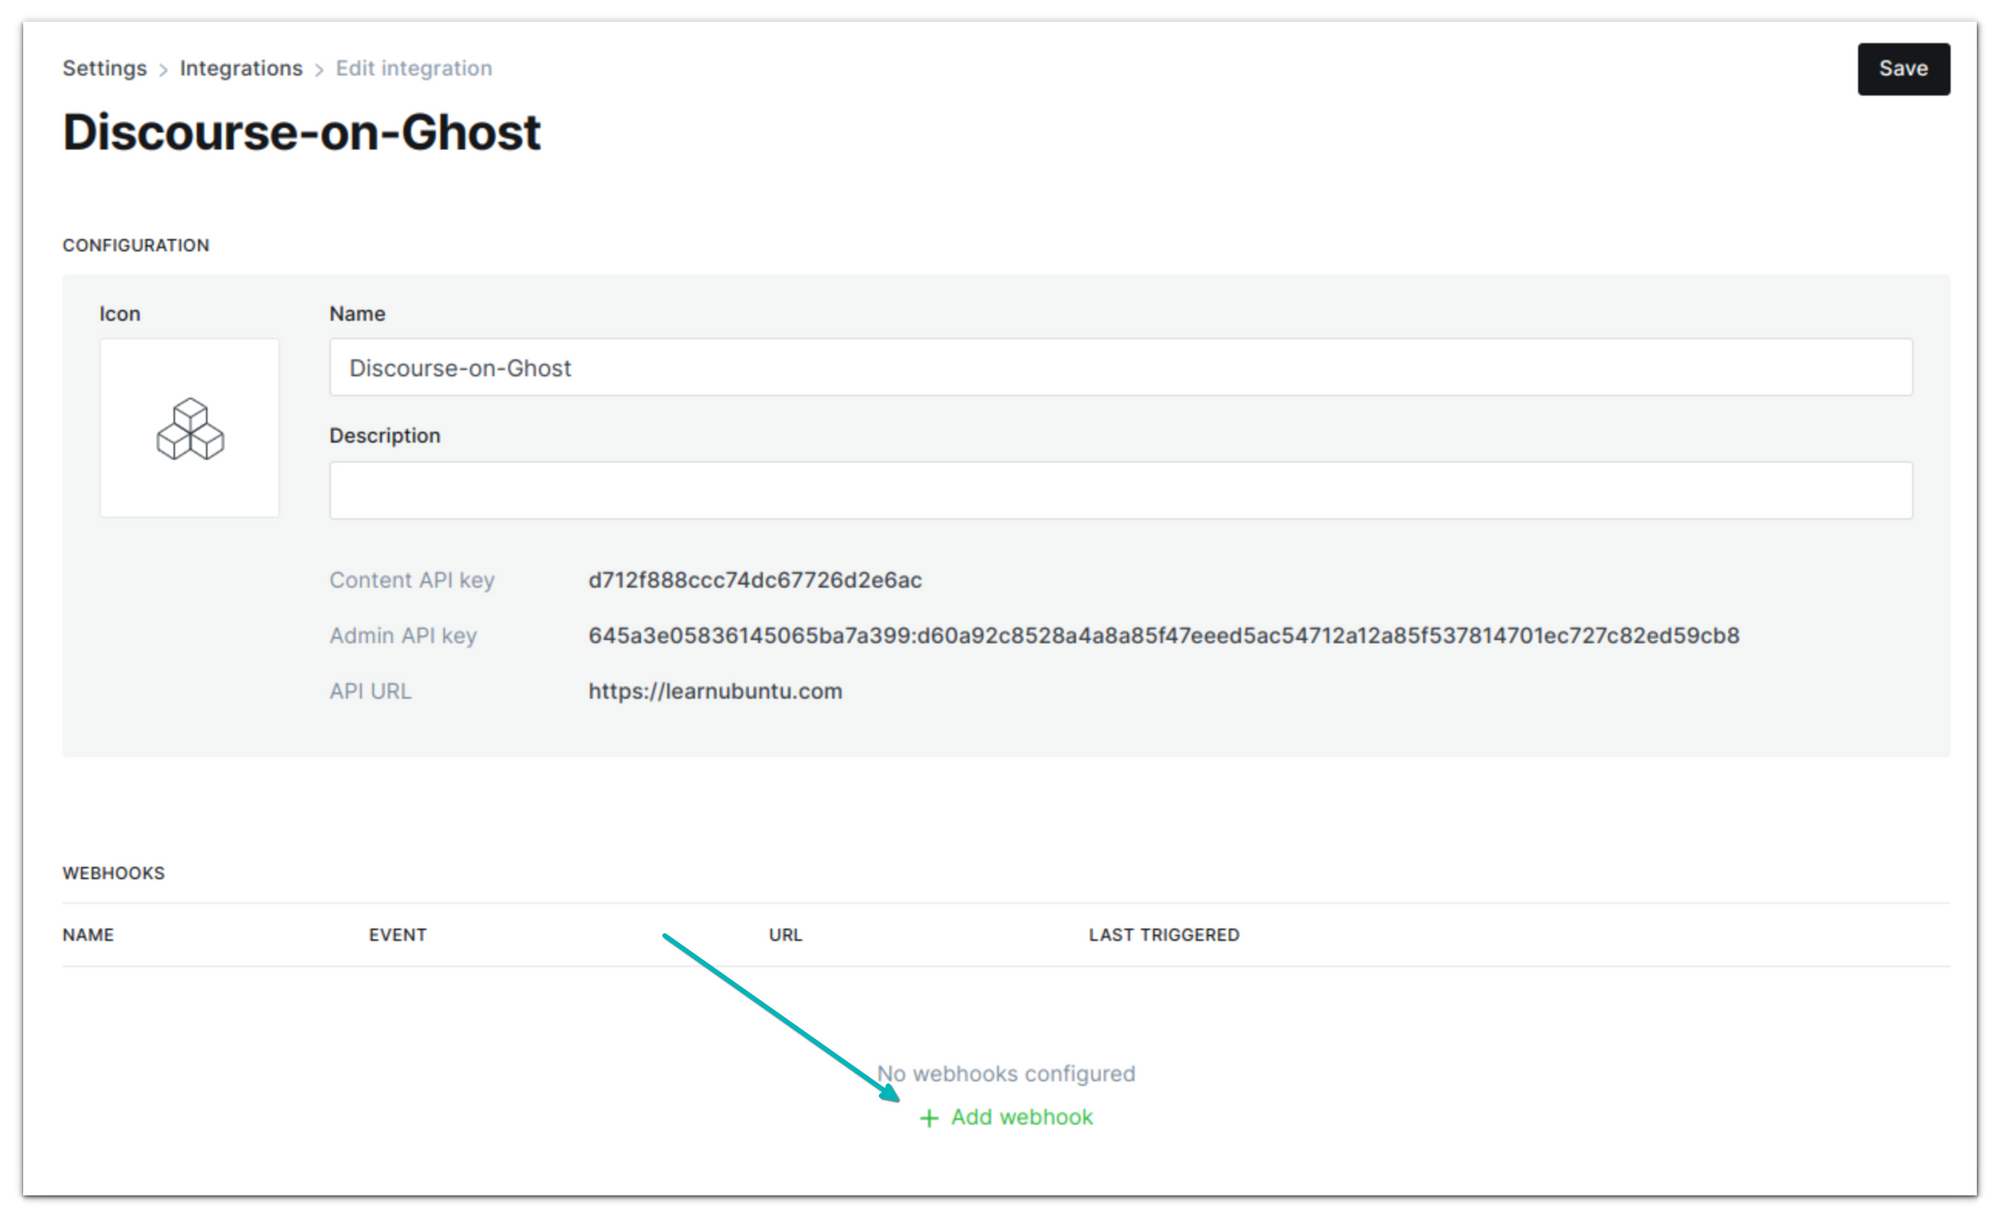
Here, create a new integration. Name it anything relatable, like DoG or Discourse-Ghost-SSO.

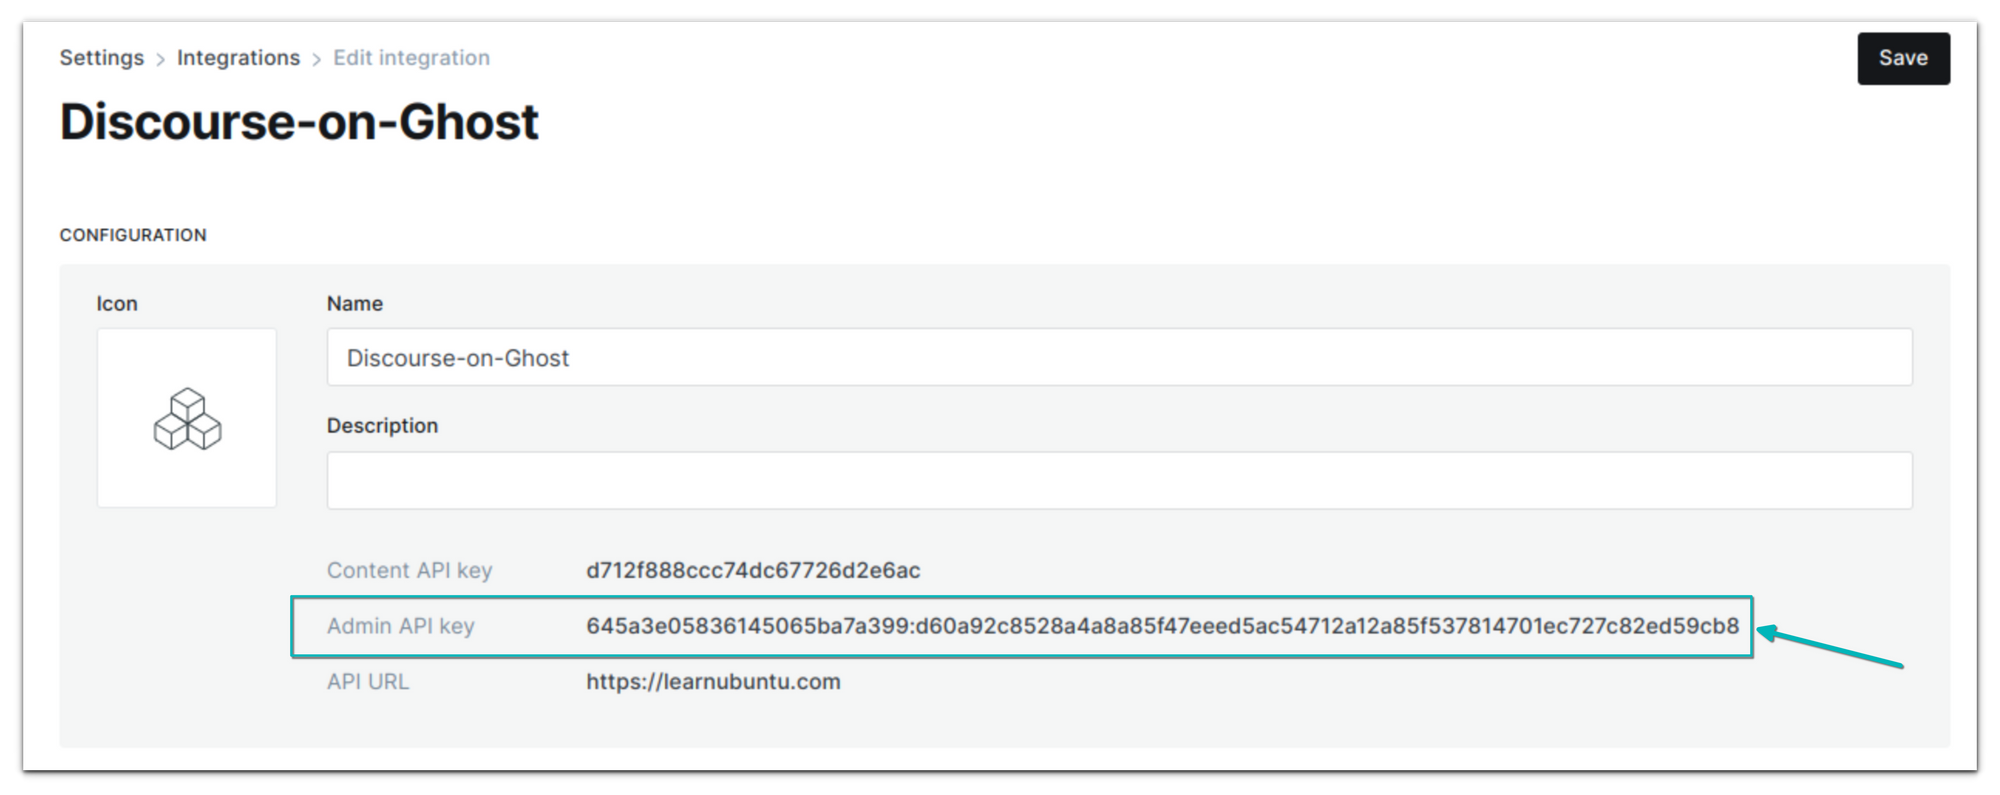
If you go to the newly created integration, it will show a few parameters. Among them, Admin API key is what you need in later sections.
Step 3: Create API in Discourse
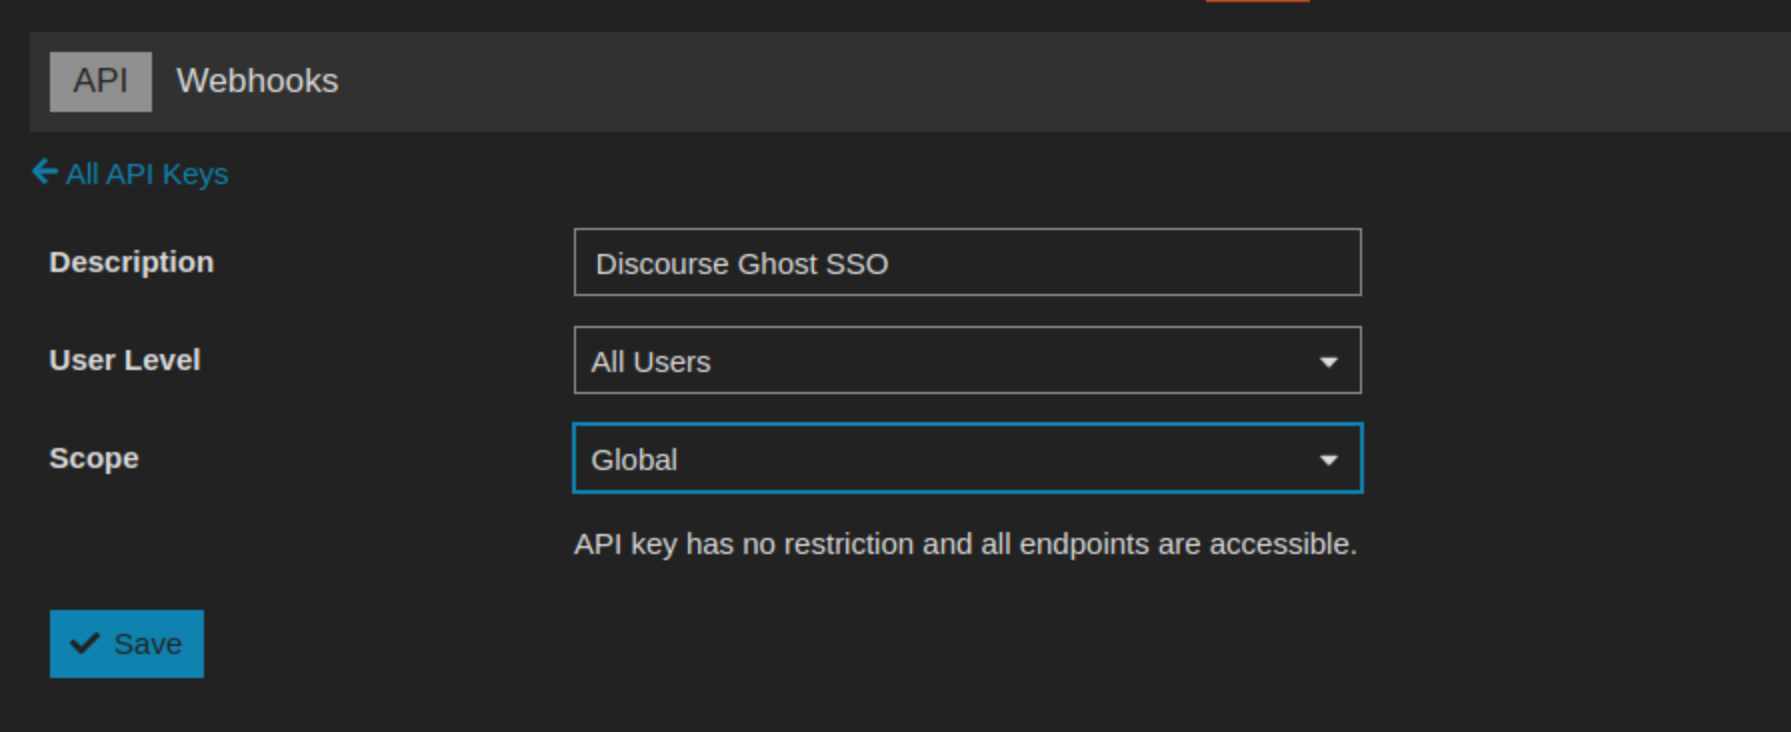
Now log in to your Discourse forum as admin. Go to the Admin area -> API tab and create a new API key.
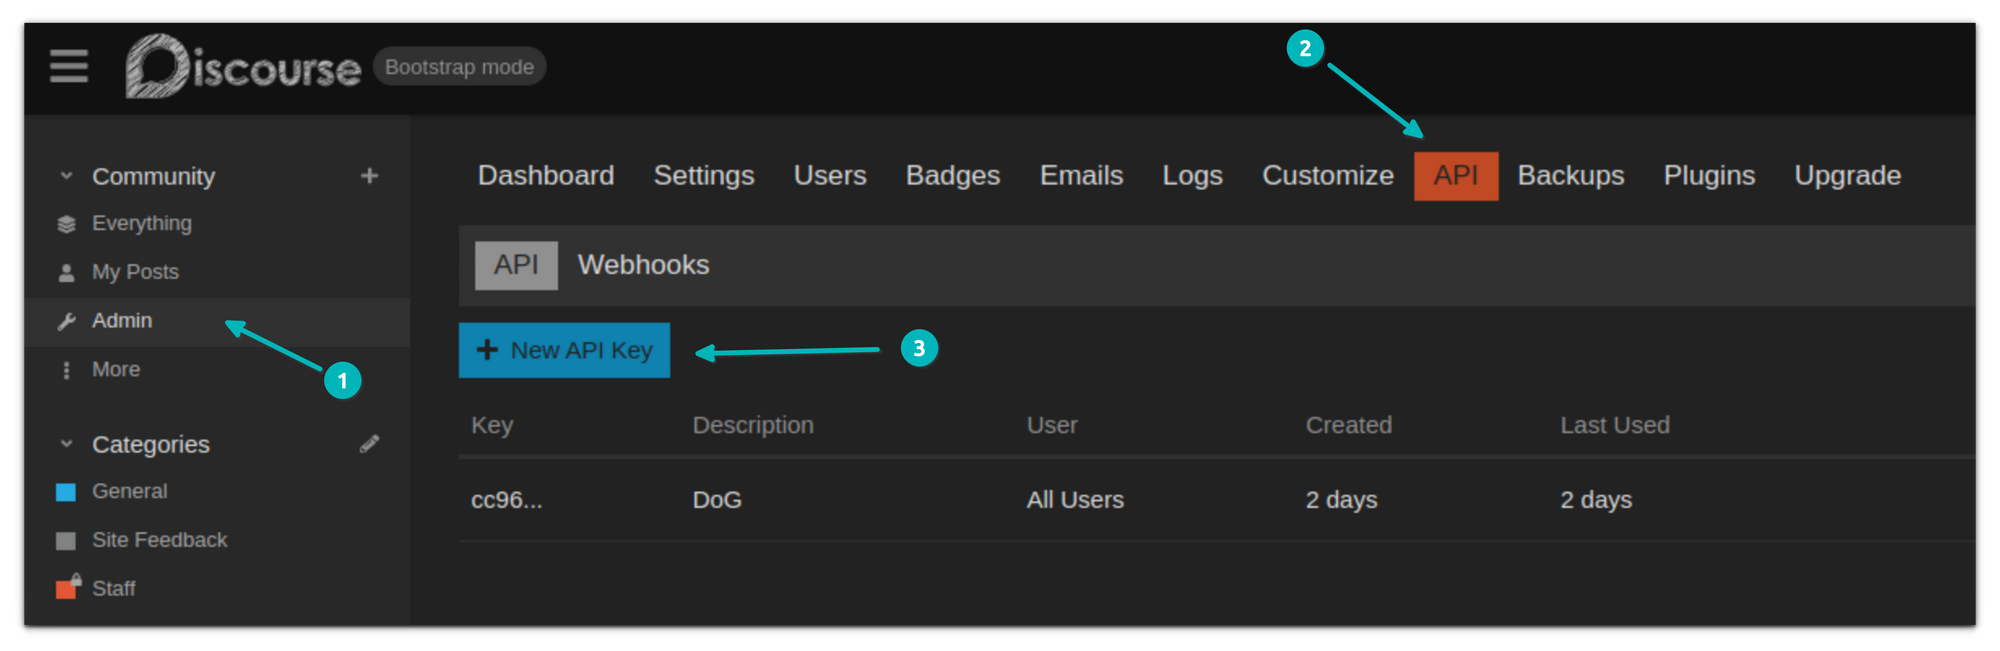
Give the API a relatable name, with user level set to All Users and Scope to Global:
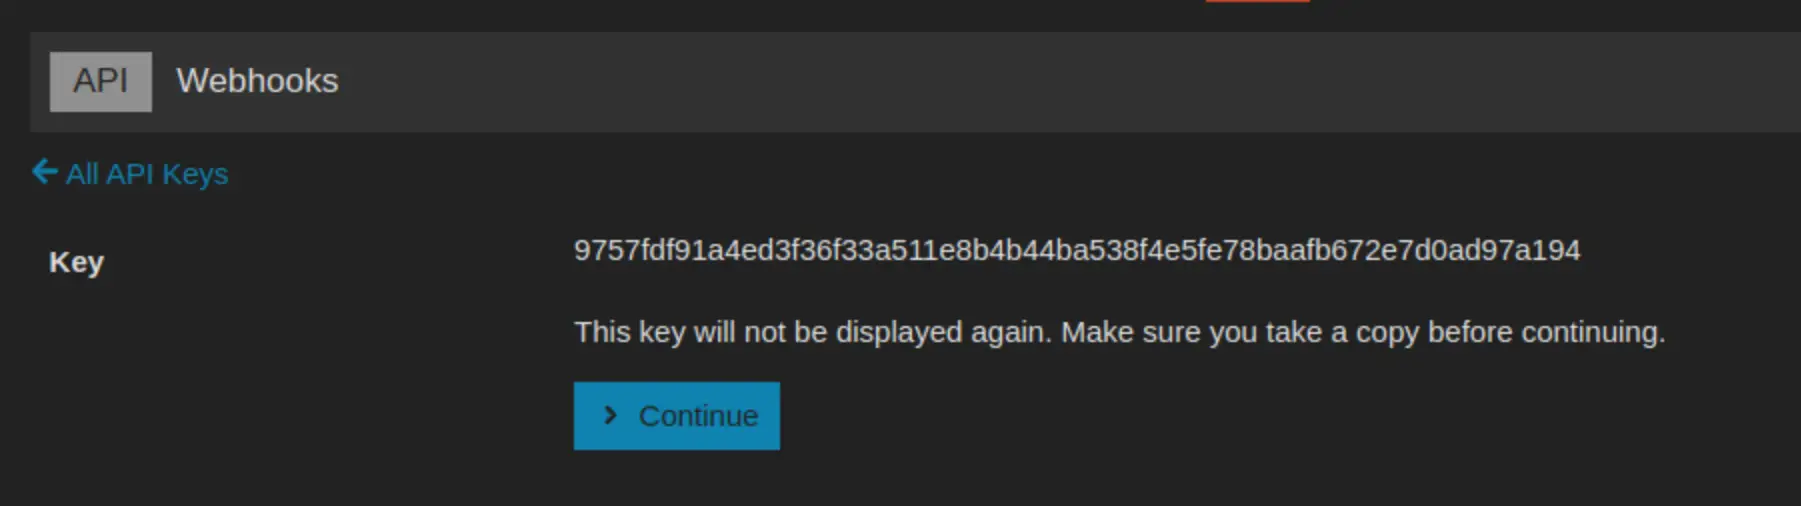
Note down the generated key because it won't be displayed again. We'll be using this key in the next section.
Step 4: Configure DoG
Back to the server that hosts Ghost.
In the discourse-on-ghost directory, you created in Step 1, you have to edit the .env file you had created earlier.
This file has some default entries, but you must also change some parameters. You can refer to this page for details on those environment variables.
This is the default .env file you get:
DOG_HOSTNAME="127.0.0.1" # Optional
DOG_PORT="3286" # Optional
DOG_GHOST_URL="http://127.0.0.1:2368/"
DOG_GHOST_ADMIN_URL="" # Optional - defaults to DOG_GHOST_URL
DOG_DISCOURSE_SHARED_SECRET=""
DOG_GHOST_ADMIN_TOKEN=""
DOG_DISCOURSE_URL="http://127.0.0.1:4200/"
DOG_DISCOURSE_API_KEY=""
DOG_DISCOURSE_API_USER="" # Optional
DOG_LOG_DISCOURSE_REQUESTS="false"
DOG_LOG_GHOST_REQUESTS="false"
DOG_GHOST_MEMBER_WEBHOOKS_ENABLED="false"
DOG_GHOST_MEMBER_UPDATED_WEBHOOK_ID="BAFF1EDBEADEDCAFEBABB1ED"
DOG_GHOST_MEMBER_DELETED_WEBHOOK_ID="BAFF1EDBEADEDCAFEBABB1ED"
DOG_GHOST_MEMBER_DELETE_DISCOURSE_ACTION="suspend"
DOG_DISCOURSE_SSO_TYPE="session"
DOG_JWT_GHOST_SSO_PAGE="" # Optional (absolute path)
DOG_SSO_NO_AUTH_REDIRECT="" # Optional (url)
Here are the parameters you have to change with suggestions on their values.
- DOG_GHOST_URL: Use the URL of your Ghost website without the trailing slash like https://myurl.com
- DOG_DISCOURSE_SHARED_SECRET: This is a long 64 characters alpha-numeric string, in all lower cases. You can use a random string generator online to get one. Keep in mind that only a to f letters are allowed.
- DOG_GHOST_ADMIN_TOKEN: Use the Admin API key generated with the Ghost integration you created in Step 2.
- DOG_DISCOURSE_URL: URL of your Discourse community forum.
- DOG_DISCOURSE_API_KEY: The API key you generated in the step 3.
- DOG_GHOST_MEMBER_UPDATED_WEBHOOK_ID: There is a 24 characters string but change it with the same length, alpha-numeric but lowercase string. Keep in mind that only a to f letters are allowed.
- DOG_GHOST_MEMBER_DELETED_WEBHOOK_ID: Same as above. There is a 24 characters string but change it with the same length, alpha-numeric but lowercase string. Keep in mind that only a to f letters are allowed.
- DOG_SSO_NO_AUTH_REDIRECT: The landing page of your Ghost website for the login or signup. You can also use the portal links https://site.com/#/portal/account. Don't add the trailing slash.
Here's what the .env file looks like for my demo site:
DOG_HOSTNAME="127.0.0.1" # Optional
DOG_PORT="3286" # Optional
DOG_GHOST_URL="https://learnubuntu.com/"
DOG_GHOST_ADMIN_URL="" # Optional - defaults to DOG_GHOST_URL
DOG_DISCOURSE_SHARED_SECRET="5368a5f6992140c165953482682a6440cdfe02f1c9f6ab6ee9ef097857bc7d5a"
DOG_GHOST_ADMIN_TOKEN="6457822b4cf40f06511b2bd4:ee3fb9a1f83131ea29dac4b7d2d979a42e295daf848bdb4feaerrtdb9b81a0aa"
DOG_DISCOURSE_URL="https://community.learnubuntu.com/"
DOG_DISCOURSE_API_KEY="9757fdf91a4ed3f36f33a511e8b4b44ba538f4e5fe78baafb672e7d0ad97a194"
DOG_DISCOURSE_API_USER="" # Optional
DOG_LOG_DISCOURSE_REQUESTS="false"
DOG_LOG_GHOST_REQUESTS="false"
DOG_GHOST_MEMBER_WEBHOOKS_ENABLED="false"
DOG_GHOST_MEMBER_UPDATED_WEBHOOK_ID="baff1edddadedcafebabb1ed"
DOG_GHOST_MEMBER_DELETED_WEBHOOK_ID="baff1edddadedcafebabb1ee"
DOG_GHOST_MEMBER_DELETE_DISCOURSE_ACTION="suspend"
DOG_DISCOURSE_SSO_TYPE="session"
DOG_JWT_GHOST_SSO_PAGE="/sso/" # Optional (absolute path)
DOG_SSO_NO_AUTH_REDIRECT="https://learnubuntu.com/#/portal/account" # Optional (url)
Now that everything is set in the .env file, run the script.
node node_modules/@potluri/discourse-on-ghost/build/targets/node-first-run.jsIf things go right, you should see an output like this:
# node node_modules/@potluri/discourse-on-ghost/build/targets/node-first-run.js
[2023-05-13 05:23:20] INFO [discourse:sync] Created group tier_free
[2023-05-13 05:23:20] INFO [discourse:sync] Created group tier_default-product
Otherwise, it will show errors and hints about what is wrong with your environment file.
If you see no error at this stage, you can move to the next phase of changing the Nginx server.
Step 5: Set up NGNIX
Create a directory structure api/external_discourse_on_ghost in the directory where Ghost is installed.
I am using the one-click install that Digital Ocean provides. My Ghost install is in /var/www/ghost and they advise using the ghost-mgr account for any Ghost related tasks. So, I switched to this account and the directory. This may be different for you if you are not using DigitalOcean's one-click Ghost install.
cd /var/www/ghost
mkdir -p api/external_discourse_on_ghost
Now I have a /var/www/ghost/api/external_discourse_on_ghost directory on Ghost.
Next, modify the NGINX configuration that was automatically created while installing Ghost. You can find the file in /etc/nginx/sites-enabled/your.site-ssl.conf.
Add the following before the last line:
location /ghost/api/external_discourse_on_ghost {
	proxy_set_header X-Forwarded-For $proxy_add_x_forwarded_for;
	proxy_set_header X-Forwarded-Proto $scheme;
	proxy_set_header X-Real-IP $remote_addr;
	proxy_set_header Host $host;
	proxy_pass http://127.0.0.1:3286;
}
Actually, this is where you give it the relative location of the /api/external_discourse_on_ghost. In some cases, you may have to provide the subdirectory path if that's where Ghost resides.
This is what it looks like for my test site learnubuntu.com:
server {
    listen 443 ssl http2;
    listen [::]:443 ssl http2;

    server_name learnubuntu.com;
    root /var/www/ghost/system/nginx-root; # Used for acme.sh SSL verification (https://acme.sh)

    ssl_certificate /etc/letsencrypt/learnubuntu.com/fullchain.cer;
    ssl_certificate_key /etc/letsencrypt/learnubuntu.com/learnubuntu.com.key;
    include /etc/nginx/snippets/ssl-params.conf;

    location / {
        proxy_set_header X-Forwarded-For $proxy_add_x_forwarded_for;
        proxy_set_header X-Forwarded-Proto $scheme;
        proxy_set_header X-Real-IP $remote_addr;
        proxy_set_header Host $http_host;
        proxy_pass http://127.0.0.1:2368;

    }

    location /ghost/api/external_discourse_on_ghost {
        proxy_pass http://127.0.0.1:3286;
        proxy_set_header X-Forwarded-For $proxy_add_x_forwarded_for;
        proxy_set_header X-Forwarded-Proto $scheme;
        proxy_set_header X-Real-IP $remote_addr;
        proxy_set_header Host $http_host;
    }

    location ~ /.well-known {
        allow all;
    }

    client_max_body_size 50m;
}
Save the file and run the following command as root user:
nginx -s reloadNothing is shown as the output. That's normal.
Step 6: Configure DoG service
Ubuntu uses systemd, so you can create a new systemd service for the Discourse on Ghost.
For me, the systemd unit file looks like this but you have to made a few modifications:
[Unit]
Description=Discourse on Ghost
Documentation=https://github.vikaspotluri.me/discourse-on-ghost

[Service]
Type=simple
# Don't forget to update this!
WorkingDirectory=/root/discourse-on-ghost
# The user might be different for `jwt` mode
User=root
Environment="NODE_ENV=production"
# You can get your node path by running `which node`
ExecStart=/usr/bin/node index.js
Restart=always

[Install]
WantedBy=multi-user.target
In the above, change the WorkingDirectory value to the location where you saved discourse-on-ghost, the directory you created in Step 1.
Save the above as /lib/systemd/system/discourse_on_ghost.service using root user.
And then run the following commands one by one as root user:
systemctl daemon-reload
systemctl enable discourse_on_ghost.service
systemctl start discourse_on_ghost.service
Once done, verify that everything is alright by checking the status of the systemd service:
systemctl status discourse_on_ghost.serviceIt should show loaded and active (running):
● discourse_on_ghost.service - Discourse on Ghost
     Loaded: loaded (/lib/systemd/system/discourse_on_ghost.service; enabled; vendor preset: enabled)
     Active: active (running) since Sun 2023-05-07 12:08:43 UTC; 2 days ago
       Docs: https://github.vikaspotluri.me/discourse-on-ghost
   Main PID: 759 (node)
      Tasks: 11 (limit: 2338)
     Memory: 35.9M
     CGroup: /system.slice/discourse_on_ghost.service
             └─759 /usr/bin/node index.js
Step 7: Configure Discourse
You have most of the things you need. Now, log in to the Discourse site as admin. Go to the login sidebar tab in the Settings. You can also search for discourse connect.

You have to provide discourse connect url value. It should be the location of API directory you created in Step 5. For me, it was https://learnubuntu.com/ghost/api/external_discourse_on_ghost/sso as shown in the image above. Mind that you have to give it the full URL of your Ghost website.
The next field you have to fill is discourse connect secret. Remember the .env file you created in Step 4? Use the value of DOG_DISCOURSE_SHARED_SECRET from the .env file.
Now, check the enable discourse connect option.
Alright! If anyone clicks on the login button in Discourse, they will be redirected to your Ghost website's login or landing page (whichever you set in the .env file).
The work is almost done. The only thing remaining is to take care of member deletion and update actions to sync it with Discourse.
Step 8: Configure Ghost Webhooks
Log in to your Ghost website and go to the integration you created in Step 2. Click on the Add webhook option:
You have to create two webhooks here. One for member update and another for member delete.
The Target URL that you should use is in the form of https://site.com/ghost/api/external_discourse_on_ghost/DOG_GHOST_MEMBER_UPDATED_WEBHOOK_ID
In the above, replace site.com with your site's URL and DOG_GHOST_MEMBER_UPDATED_WEBHOOK_ID with the value you have for the variable in the .env file you created in Step 4.
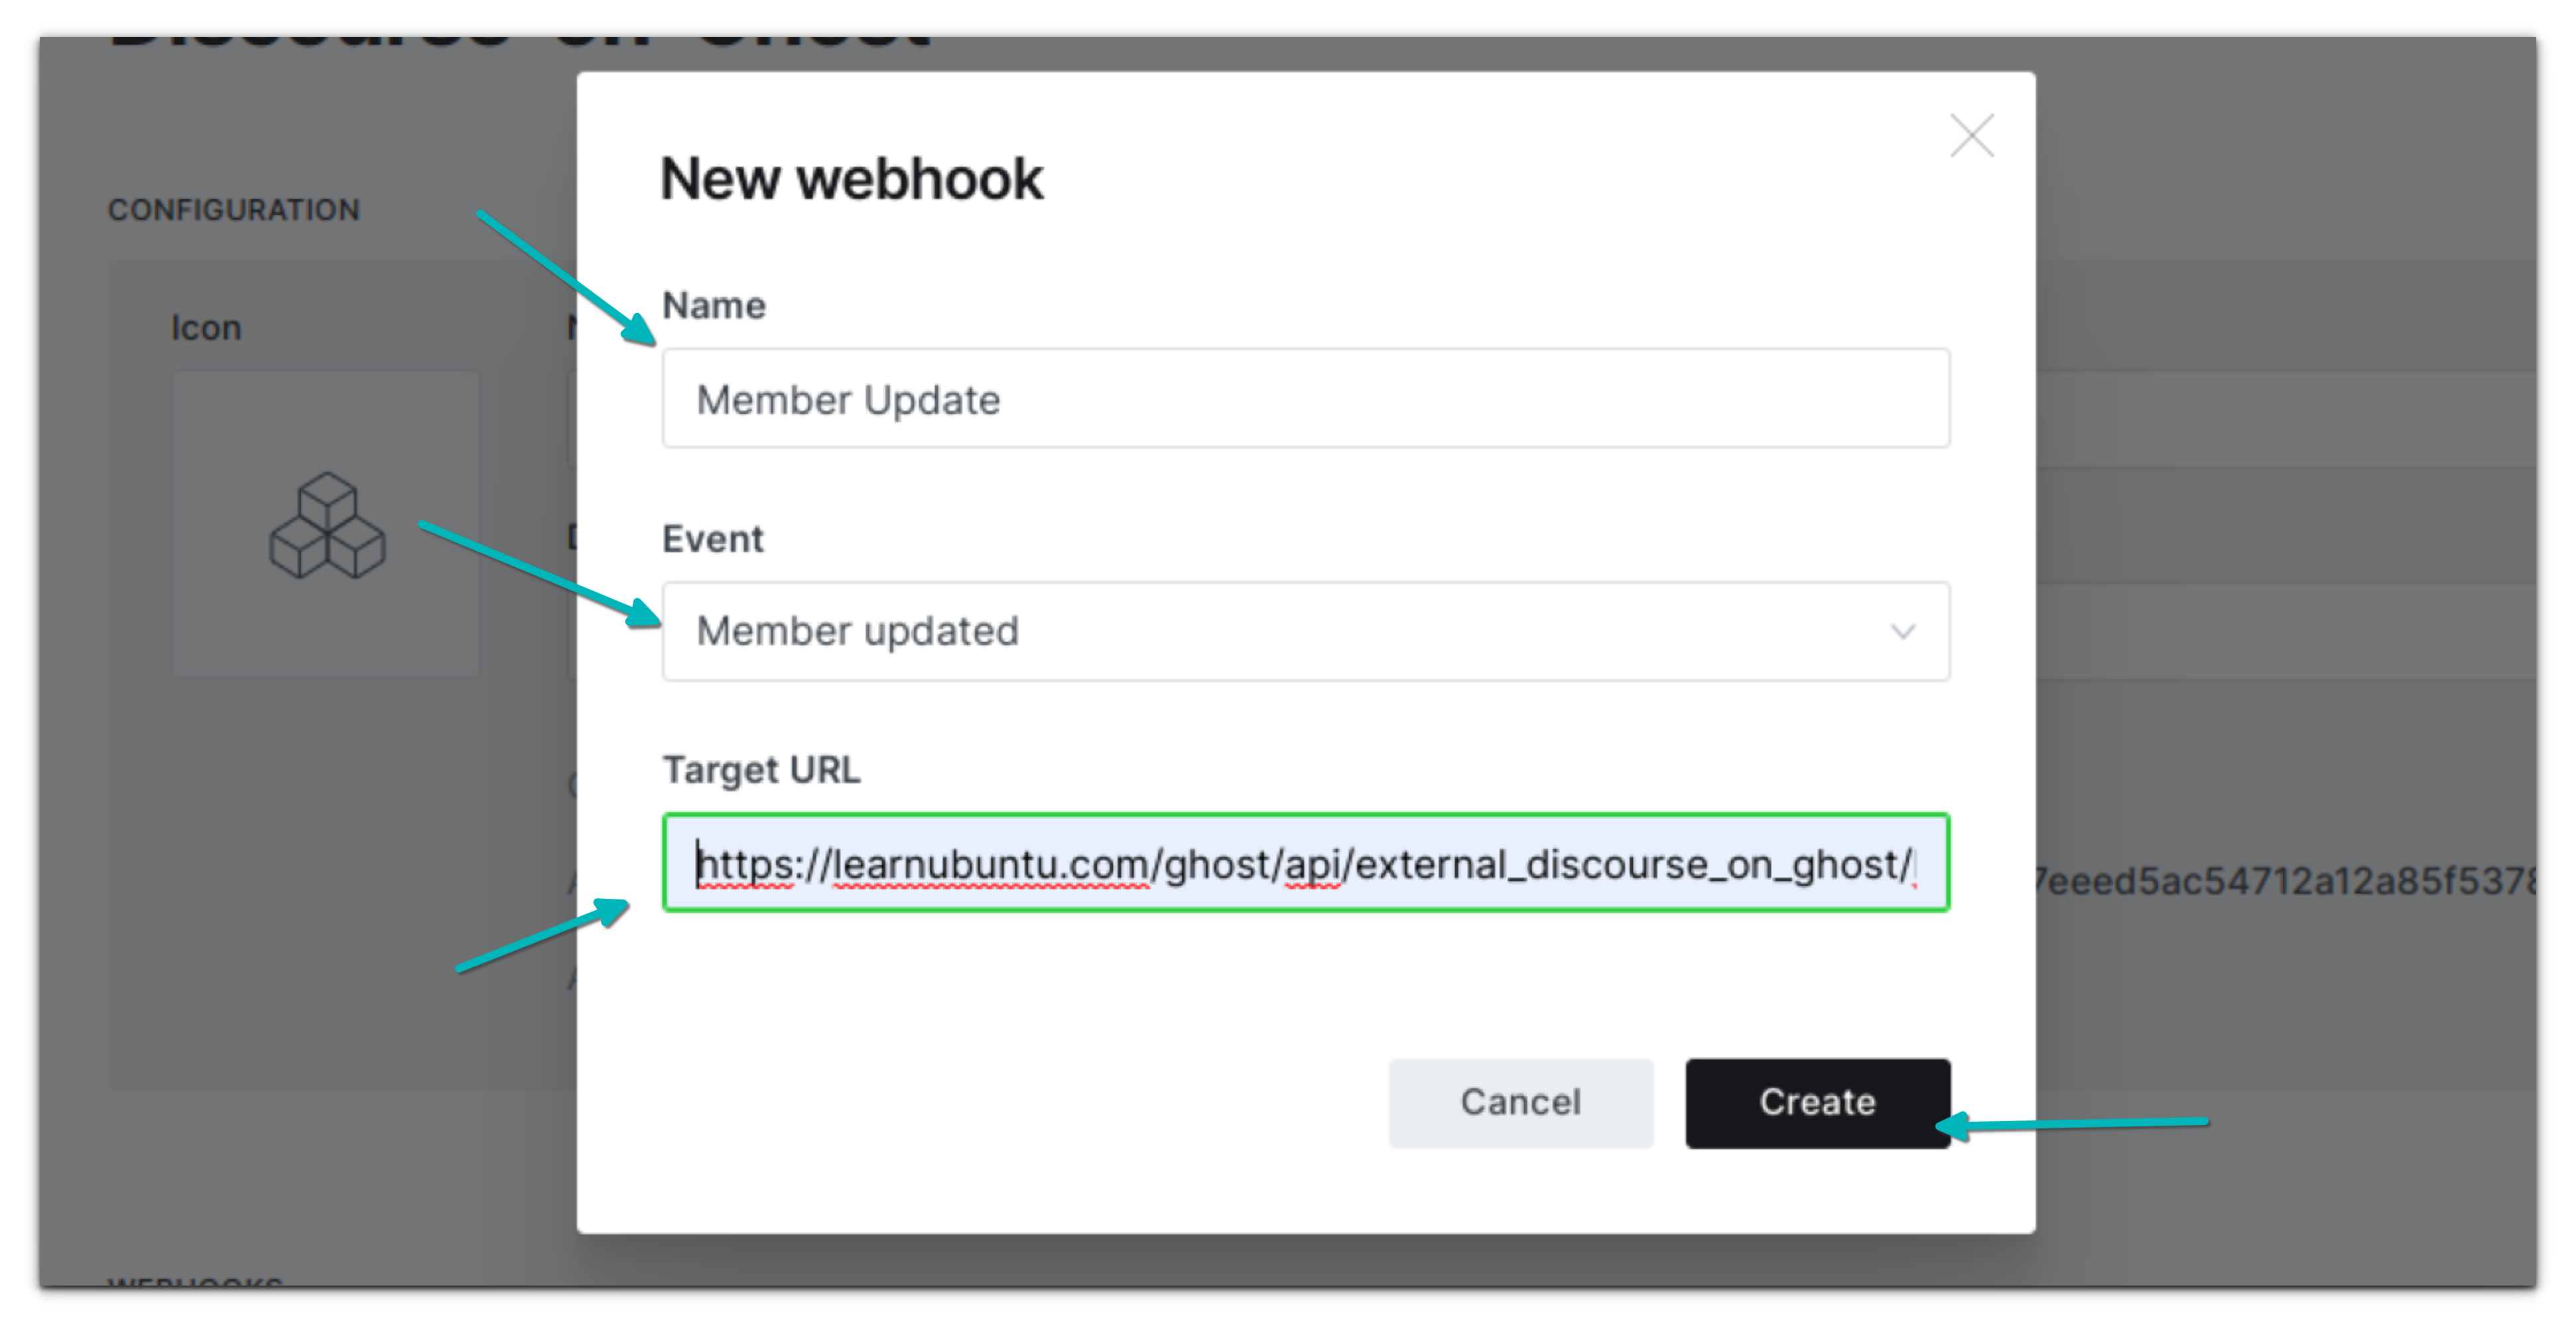
Similarly, when creating the webhook for member delete, you use the DOG_GHOST_MEMBER_DELETED_WEBHOOK_ID in the Target URL structure.
You are all set to go. Everything is in place. You can start testing it. Congratulations on using Ghost SSO on Discourse.
Things to know before you go...
Here are a few things you should know before you go.
When someone tries to login to Discourse, they will be redirected to Ghost login.
It will create a new Discourse account for existing Ghost members who are not Discourse members.
For existing Discourse members who are not Ghost members, they should create a Ghost account with the same email address they used for Discourse. This way, they will be able to access their existing Discourse account.
Do keep in mind that this applies for Discourse admin accounts as well. You should create or update Ghost account with the same email address as the Discourse account.
In the .env file, the DOG_GHOST_MEMBER_DELETE_DISCOURSE_ACTION is set to Suspend. It means that if a user is deleted from Ghost, their account will be suspended in Discourse. You may change it to one of these values.
I know it's a long read. But when I tried following the official documentation, I found some key parts missing or not in the order it should have been. Hence, I created this tutorial.
It is possible that you may encounter issues that I didn't. If that's the case, please let me know in the comments and I'll try to help you out.