As a sysadmin, you'll often deal with IP address configuration. Changing the IP address is one of the common IP configuration tasks.
While the IP addresses on most systems are configured automatically, you may need to change them manually in some cases.
In this article, you'll see various ways to change the IP address in Linux. I'll also focus on Ubuntu network configuration separately.
Before you proceed any further, you should run this command to check your current IP address:
ip aThis will also show the interface name which you'll need while changing the IP address.
Using the ip Command to Set an IP Address
The ip command is available on most Linux distributions.
For setting an IP address, use it like this:
ip addr add [ip_address] dev [interface]For example, add an IP address to the eth1 interface as:
sudo ip addr add 192.168.56.21/24 dev eth1You now have two IP addresses: one from the old configuration and one from the new command:
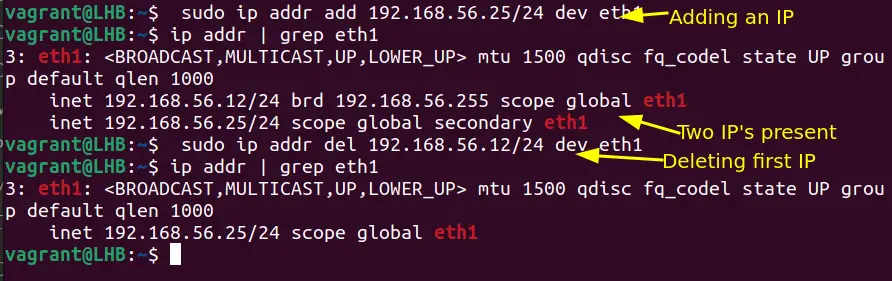
As you can see in the above screenshot, after deleting the old one, you are left with only one.
Making an IP Address Permanent
Surprisingly, the IP addresses set by the above method are not going to persist in system reboots.
If you are using an old version of Ubuntu(<17.10), you can make these changes permanent by editing the file '/etc/network/interfaces':
sudo nano /etc/network/interfacesIf your file read like the below, your IP address will be set by a DHCP client:
auto eth0

iface eth0 inet dhcp
To change the IP address as per our choice, we can modify this file to manually set the IP address. To set the IP address statically, for e.g. as 192.168.56.20, change the above entry to look as:
auto enp0s3

iface enp0s3 inet static

address 192.168.56.20

netmask 255.255.255.0

gateway 192.168.40.31
The entries above are self-explanatory for moderate Linux users. To apply the changes, you need to run the command:
$ sudo systemctl restart networking.serviceTip: On RedHat-based systems, the file '/etc/sysconfig/networking-scripts/ifcfg-*' serves the purpose of configuring network interfaces.
Using Netplan for Network configuration (for Ubuntu)
Ubuntu provides a Netplan utility for network configuration.
Let us take an example of configuring an IP address on Ubuntu 20.04. I am using 'NetworkManager' as the renderer for the network configuration.
The current IP address can be checked from the Netplan configuration file. This file is in YAML format and can be created if not present:
sudo nano /etc/netplan/config.yamlIf the IP address is dynamic, you will see the 'dhcp4' parameter set to true.
In case, you have a pre-configured static IP, the configuration will look much like this:
---

network:

  version: 2

  renderer: networkd

  ethernets:

    eth1:

      addresses:

        - 192.168.56.66/24

      nameservers:

         addresses:

           - 8.8.8.8

      routes:

        - to: default

          via: 10.0.2.2
To change the IP address, replace the old IP address with a new one. Additionally, you can keep this IP and add one more to the above interface (en01).
Once you have configured the network, pre-test it before applying:
sudo netplan tryAfter confirming the changes, the new configuration can be applied as:
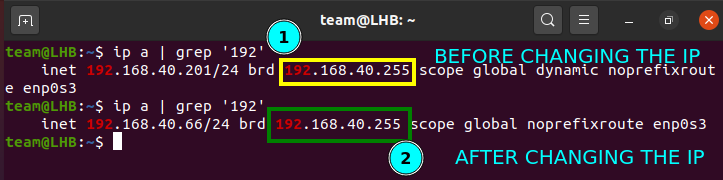
sudo netplan applyCheck if the new settings have been applied:
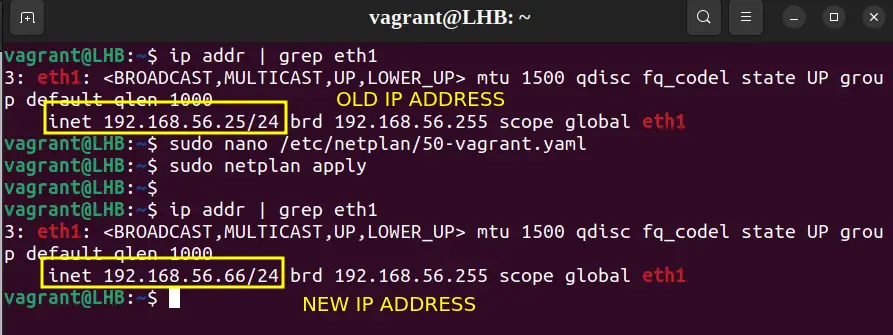
One of the advantages of using Netplan is that the network configuration will persist between reboots. Your IP address change is permanent.
Using Graphical Interface to Change the System IP Address (for Desktop Users)
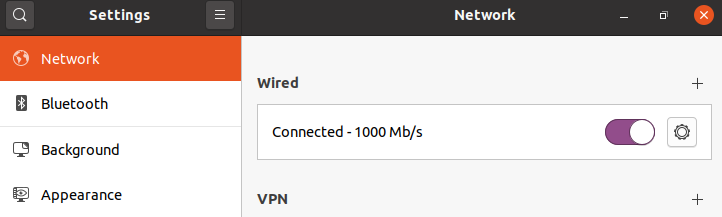
Managing IP addresses with a graphical interface is the easiest one and preferable for new Linux users. On a Ubuntu system, the Network settings contain all the required configurations.
Open ‘Settings’ from the GNOME dashboard and look for the ‘Network’ option:
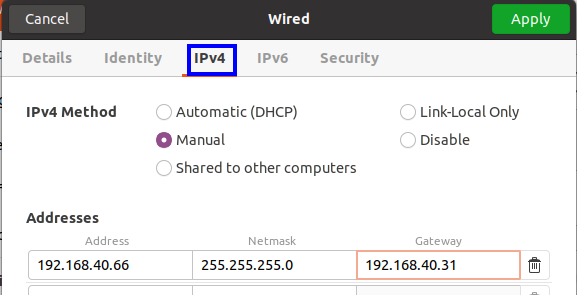
Choose the setting icon from the active network on your system:
On the new window, select the IPv4 tab and then under the IPv4 method, choose the Manual option. Enter the details for the new IP address:
Now restart your connection and check the IP address:
As you can see from the above screenshot, the IP address has now changed.
Wrapping Up
The ip command is suitable for all Linux systems. Netplan is a new way of managing a network and is a very straightforward approach for Ubuntu systems.
I also added steps for the desktop users to help them change the IP address graphically.
Let me know if you have any questions or suggestions.