When you hear about technologies like Docker, Podman, or Kubernetes, the term “container” is never far behind. Containers have revolutionized how we develop, ship, and run software by providing lightweight, portable, and self-sufficient execution environments but what makes a container isolated from the host system and other containers is not a single, monolithic piece of software, but a collection of kernel features, with Linux namespaces being the most fundamental.
Here, we will focus on understanding what namespaces are, why they are necessary, how they work and how to work with them directly without any container runtime.
We will also see how you can mount your own isolated filesystem, create an isolated user environment, add cgroup isolation, and create a minimal container from scratch.
A bit of history first
Linux namespaces emerged in the early 2000s to address the growing need for resource isolation in multi-user systems. As early as 2002, with kernel version 2.4.19, the first namespace, dedicated to mount points, allowed the creation of isolated mount points for each process. This concept was progressively extended with PID namespaces for process isolation in 2008, followed by Network namespaces for network isolation and IPC namespaces for inter-process communication.
The arrival of Docker in 2013 marked a major turning point as it used namespaces to create lightweight and rapidly deployable containers, without using virtual machines. By combining isolation (namespaces) and granular resource management (cgroups ), Docker democratized the use of containers, transforming application development and deployment practices.
Today, namespaces are essential in technologies like Kubernetes, which orchestrate thousands of containers in production. They represent a native, lightweight, and high-performance solution for resource isolation in Linux, driving modern virtualization.
How Linux Namespaces work
Those who program primarily in C++ or Python are familiar with directive called namespaces, which allow the user to utilize a different scope for their variables and objects, thus avoiding problems with identical naming conventions for other elements.
The system namespace encompasses the same C++ namespace concept, mainly the aspect of changing the current scope. In Unix systems, it’s common for many resources to be managed globally; for example, the PID (Process ID) is a unique identifier managed globally by the kernel. No two processes have the same PID and the same applies to devices mounted on your machine.
To simplify, let’s make this concrete with the UTS (UNIX Time-sharing System) namespace, which isolates the hostname and NIS (Network Information Service) domain name.
We will use the unshare command, which runs a program with some namespaces "unshared" from its parent. In this context, "unshared" means "newly created and isolated."
Open your first terminal and check the current hostname. This will be our host namespace.
user@host:~$ hostname
Now, run a new shell process in a new, isolated UTS namespace. The --uts flag tells unshare to create a new UTS namespace for the child process. We also use sudo as creating most namespaces requires root privileges.
user@host:~$ sudo unshare --uts /bin/bash
root@host:~#
Now, from within this new shell, change the hostname. This change will be isolated to this UTS namespace.
root@host:~# hostname isolated-box
root@host:~# exec bash
root@isolated-box:~#
We run exec bash to re-launch the shell so it picks up the new hostname for the prompt. Now our prompt shows isolated-box as our new hostname.
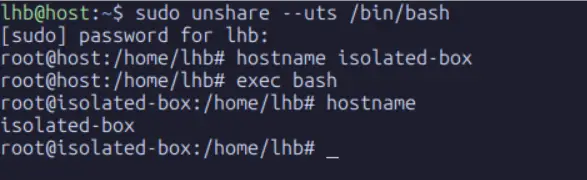
In this same shell, verify the hostname is changed.
root@isolated-box:~# hostnameNow, open a second terminal or a new tab on the same host and check the hostname:
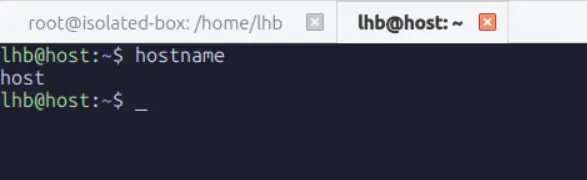
As you can see, the process in the first terminal (and its children) lives in a UTS namespace where the hostname is isolated-box. Every other process on the system, including the shell in your second terminal, remains in the original UTS namespace where the hostname is still host.
unshare without root permission fails because unprivileged user namespaces are disabled by default, which prevents the kernel from allowing writes to uid_map and leads to the familiar Operation not permitted error. RHEL, openSUSE, and Arch based distros enables user namespaces out of the box, so the same command works there without any extra steps and lets you access your home directory normally. On Ubuntu, enabling user namespaces with sudo sysctl kernel.unprivileged_userns_clone=1 resolves the issue and allows a clean unshare session where UID 0 inside the namespace correctly maps to your real UID outside.Now that we have created a namespace, to inspect them system-wide? we can use lsns command. It lists information about all accessible namespaces or the namespace of a given process.
From your second terminal (in the host namespace), run lsns:
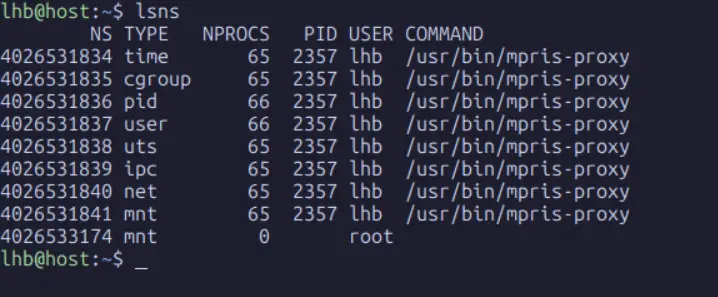
You can see the original uts namespace (ID 4026531838) used by almost all processes, including PID 1. You can also see your newly created uts namespace (ID 4026532000 in this example) with only one process (/bin/bash).
Two critical behaviors to understand about namespaces are inheritance and lifecycle:
- Inheritance: When a process creates a new child process (using
fork()), the child inherits a copy of all its parent's namespaces. This is why thebashprocess inside our new UTS namespace is a member of it. - Lifecycle: A namespace is automatically torn down by the kernel when the last process in the namespace terminates or leaves it. This is why our isolated UTS namespace will vanish the moment we type
exitin the first terminal. TheNPROCScolumn inlsnsshows you the count of processes keeping that namespace alive.
Although I demonstrated this using UTS, there are several resources that can be isolated using namespaces. The main ones are:
- Mount (mnt) namespace
- Process identify (pid) namespace
- Network (net)namespace
- Inter-process comunication (IPC) namespace
- User namespace
- Unix timesharing
In addition to these other resources have been proposed but not yet implemented, such as:
- Time namespace
- System log (syslog) namespace
Namespace architecture
The way the operating system creates and manages namespaces depends primarily on the namespace architecture implemented in the operating system kernel. There are two basic architectures in which namespaces can be implemented: hierarchical and non-hierarchical architectures.
Hierarchical architecture relates resources in different contexts. Generally, the resources of new contexts are related to the context of the already created system. Although namespaces are isolated from each other, they can be mapped so that the main context can somehow know that other contexts are running. The diagrams below demonstrates how different namespaces can be hierarchically related.
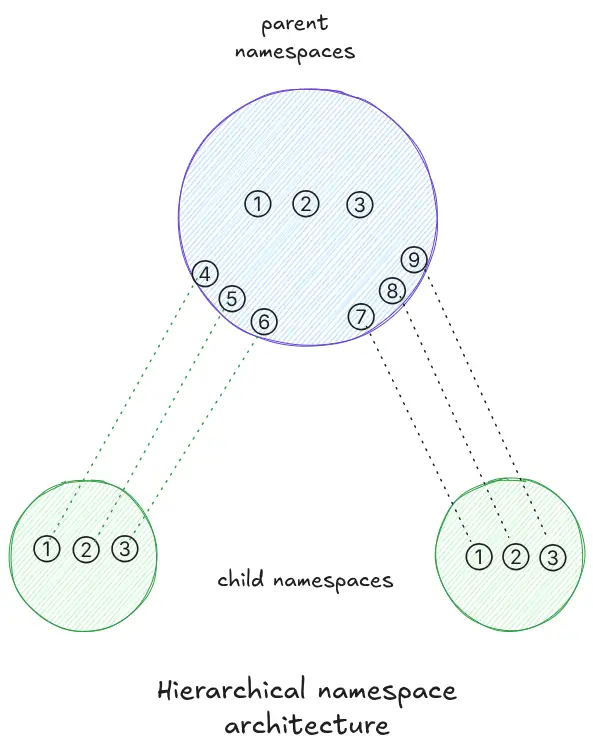
For example purposes, let’s assume that the numbered circles represent processes. In the hierarchical architecture, child namespaces originate from the parent namespace, thus establishing a hierarchy where processes executed by the children are mapped to processes in the parent. It’s important to note that the identifiers in the child namespaces are different from those in the parent namespace.
Non-hierarchical architecture does not relate resources in different contexts. The simpler the resource, the more likely it is to use this architecture (UTS, for example). In this architecture, resources in child namespaces are not mapped to the namespace that created them (system context, for example).
Both architectures are currently in use depending on the resource being isolated through the namespace, one architecture or the other is used. This can be seen in LXC and Docker containers. When we run a process inside an LXC container (an LXC context), it can be seen outside the container (in the system context) because it has been mapped.
The process PID in the context of lxc will be different from the PID in the context of the system. Therefore, the PID is a resource type that uses a hierarchical architecture in its namespaces and in the resources it isolates.
The data structure responsible for enabling namespace grouping is nsproxy, defined in the include/linux/nsproxy.h file. Below, we can see the declaration:
struct nsproxy {
    atomic_t count;
    struct uts_namespace *uts_ns;
    struct icp_namespace *icp_ns;
    struct mnt_namespace *mnt_ns;
    struct pid_namespace *pid_ns;
    struct net *net_ns;
}
There are 5 pointers to each namespace except for the user namespace. This is due to the specialized implementation of the user namespace. All other namespace structures (*_ namespace) have a pointer to the user namespace called user_ns.
The main reason for separating the user namespace from the nsproxy framework is due to differences in security permissions implemented through capabilities . The nsproxy framework requires a capability called CAP_SYS_ADMIN (generally, it’s a permission similar to sudo), while the user namespace is part of a group of credentialing frameworks called cred, which represents a different security context than a process.
1. PID Namespace
The Process ID (PID) namespace is one of the most impactful for containerization. It isolates the process ID number space. This means processes in different PID namespaces can have the same PID.
In a traditional Linux system, PID 1 is the first process started by the kernel (init or systemd) and adopts all orphaned child processes. This creates a problem for containers: if a container is meant to look like a fresh Linux system, it needs its own PID 1. But the host system already has one.
PID namespaces solve this by providing isolated PID numbering. The first process spawned in a new PID namespace becomes its PID 1. This process assumes the role of init for that namespace: it becomes responsible for reaping orphaned children within its namespace.
Let’s create a PID namespace. It is will use the unshare command again:
user@host:~$ sudo unshare --pid --fork --mount-proc /bin/bash
root@host:~#
Let’s dissect the flags:
pid: Creates a new PID namespace.
fork: Required for pid, it ells unshare to fork the specified program (/bin/bash) as a new child process. This child becomes the “init” process (PID 1) in the new namespace.
mount-proc: The /proc filesystem, used by commands like ps, top, and pstree, reflects the process tree from the perspective of the current PID namespace. This flag mounts a new, isolated instance of the proc filesystem that is aware of our new PID namespace, preventing it from displaying all the host’s processes.
Now, from within this new shell, run ps aux:
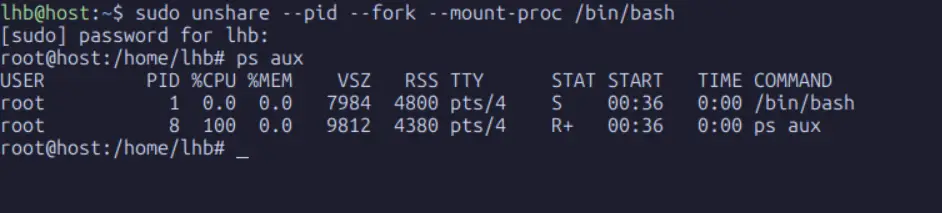
From inside this namespace, you see only two processes: the bash shell itself (as PID 1) and the ps command. The hundreds of other processes running on the host are completely invisible. You have achieved process-level isolation.
It’s important to understand the concept of internal and external PIDs.
- Internal PID: The PID as seen from within the namespace. Inside our namespace,
bashis PID 1. - External PID: The “real” PID as seen from the host (the root PID namespace).
From your second terminal (on the host), find the process and look at its PID:
user@host:~$ ps aux | grep 'unshare.*pid'
From the host’s perspective, our isolated bash process has a real PID of 12346but from inside its own PID namespace, it sees itself as PID 1. The kernel maintains this mapping, which is essential for tools like kill to work correctly across namespace boundaries.
2. Network Namespaces
If PID namespaces provide process isolation, Network namespaces provide network isolation. A network namespace provides a completely isolated network stack: its own private set of network interfaces, IP addresses, IP routing tables, socket listings, connection tracking tables, and firewall rules.
This is the feature that allows each container to have its own lo(loopback) interface and its own enp0s3interface with a private IP address, completely separate from the host and other containers.
First, let’s see what the network looks like from the host namespace:
user@host:~$ ip -br link list
This output shows the physical and logical interfaces available to the host. Now, let’s create a new network namespace:
user@host:~$ sudo unshare --net /bin/bash
root@host:~#
The --net flag creates a new network namespace. Now, list the interfaces from inside this namespace:
root@host:~# ip -br link list

The enp0s3interface is gone. The new network namespace starts with only a downed lo interface. Let’s bring it up:
root@host:~# ip link set lo up
root@host:~# ip -br link list
Now, from this isolated namespace, try to ping the Google DNS server:
ping 8.8.8.8
This fails, as expected because there are no routes and no interfaces connected to the outside world. The process inside this namespace has no network connectivity whatsoever.
3. Mount Namespace
The mount namespace in linux is one of the most important and oldest namespaces because it shapes the view of the filesystem. When you run a process inside a container, the paths you see under / are not the same ones that the host sees, even though both sets of paths ultimately rely on the same kernel. This illusion allows each container to have its own filesystem layout that appears self contained.
A mount namespace provides a private set of mount points. Processes inside the namespace see only the mounts that belong to that namespace. The kernel copies the current mount table when creating a new mount namespace, but any subsequent changes are private to the namespace unless explicitly shared.
To observe this, begin with a fresh shell and check the host mounts:
user@host:~$ findmnt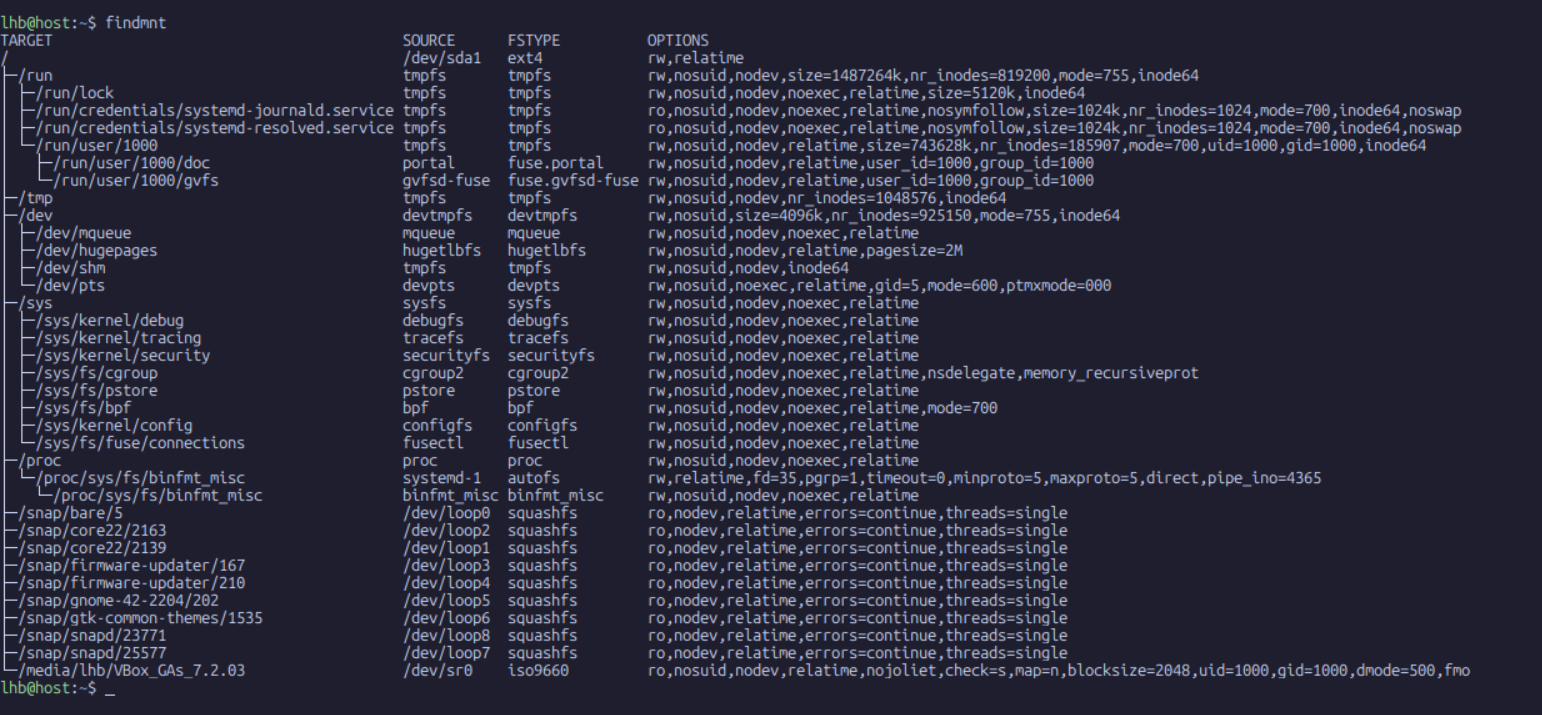
As you can see, the host mount table is long and extensive. We can see entries for our root filesystem, boot partition, various bind mounts, and the entries inserted by systemd for temporary filesystems. This list defines the namespace that the current process occupies.
Now, lets create a new mount namespace:
user@host:~$ sudo unshare --mount /bin/bash
root@host:~#
Inside this shell, the mount table looks identical to the host copy because it was cloned at creation. However, the main difference is that any new mounts or unmounts in this namespace remain invisible to the host.
To verify this lets run a simple test. First, create a directory that will serve as a mount point:
root@host:~# mkdir /mnt/testThen bind mount a portion of the filesystem onto it:
root@host:~# mount --bind /etc /mnt/testIf you run findmnt inside this namespace, you will see the new bind mount.
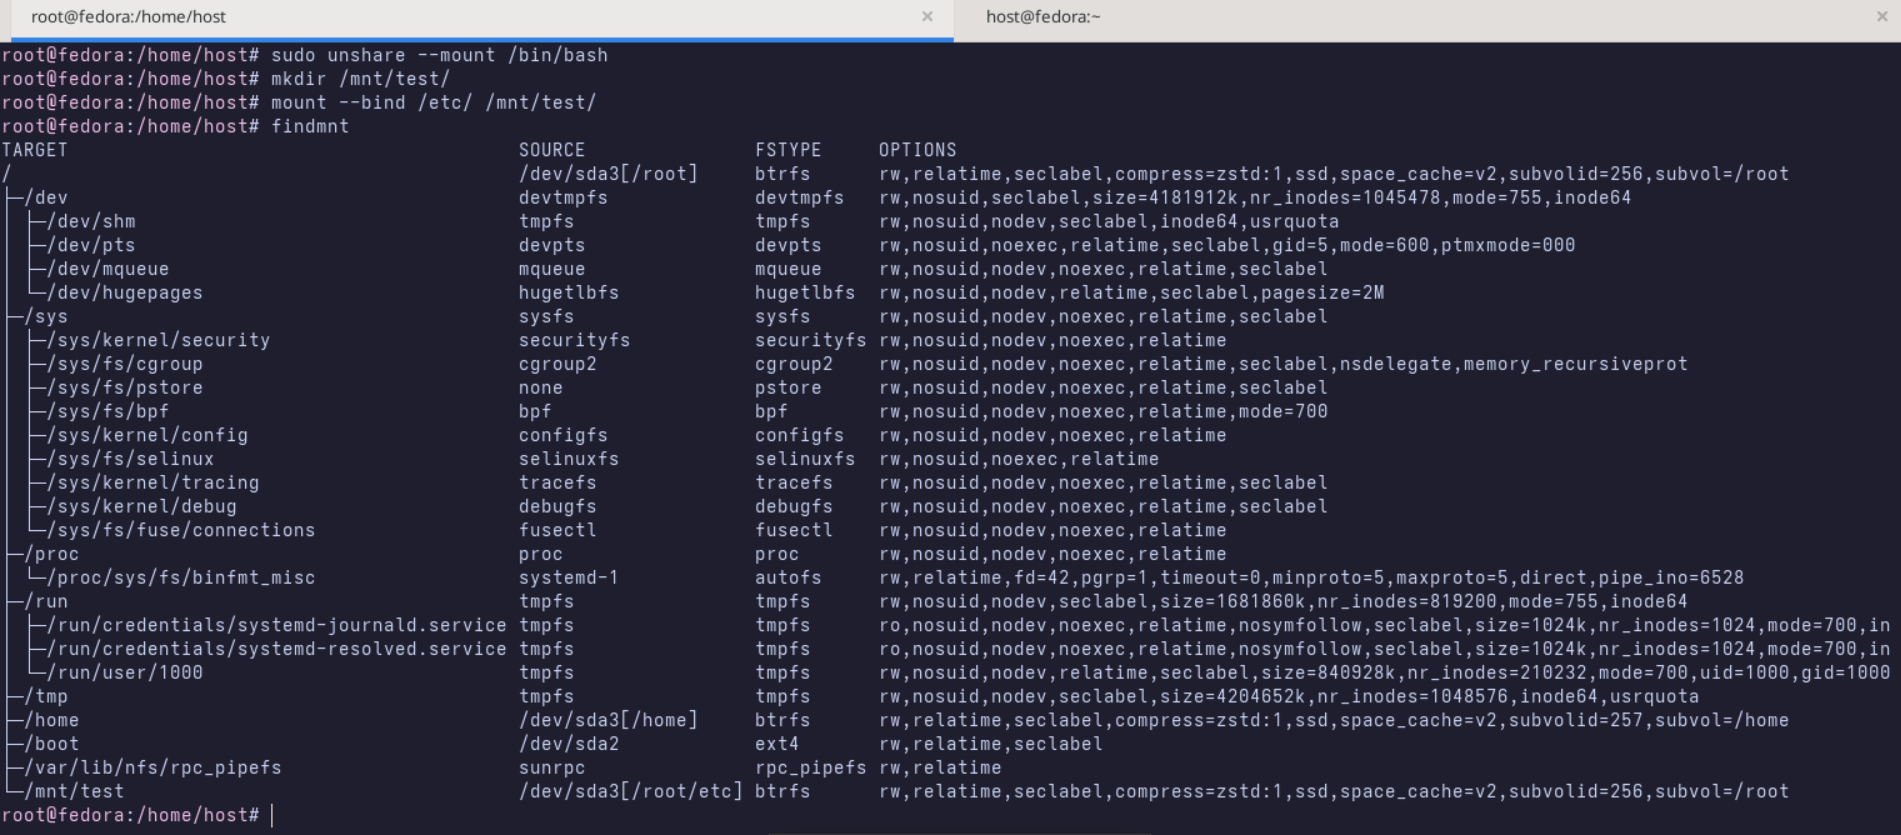
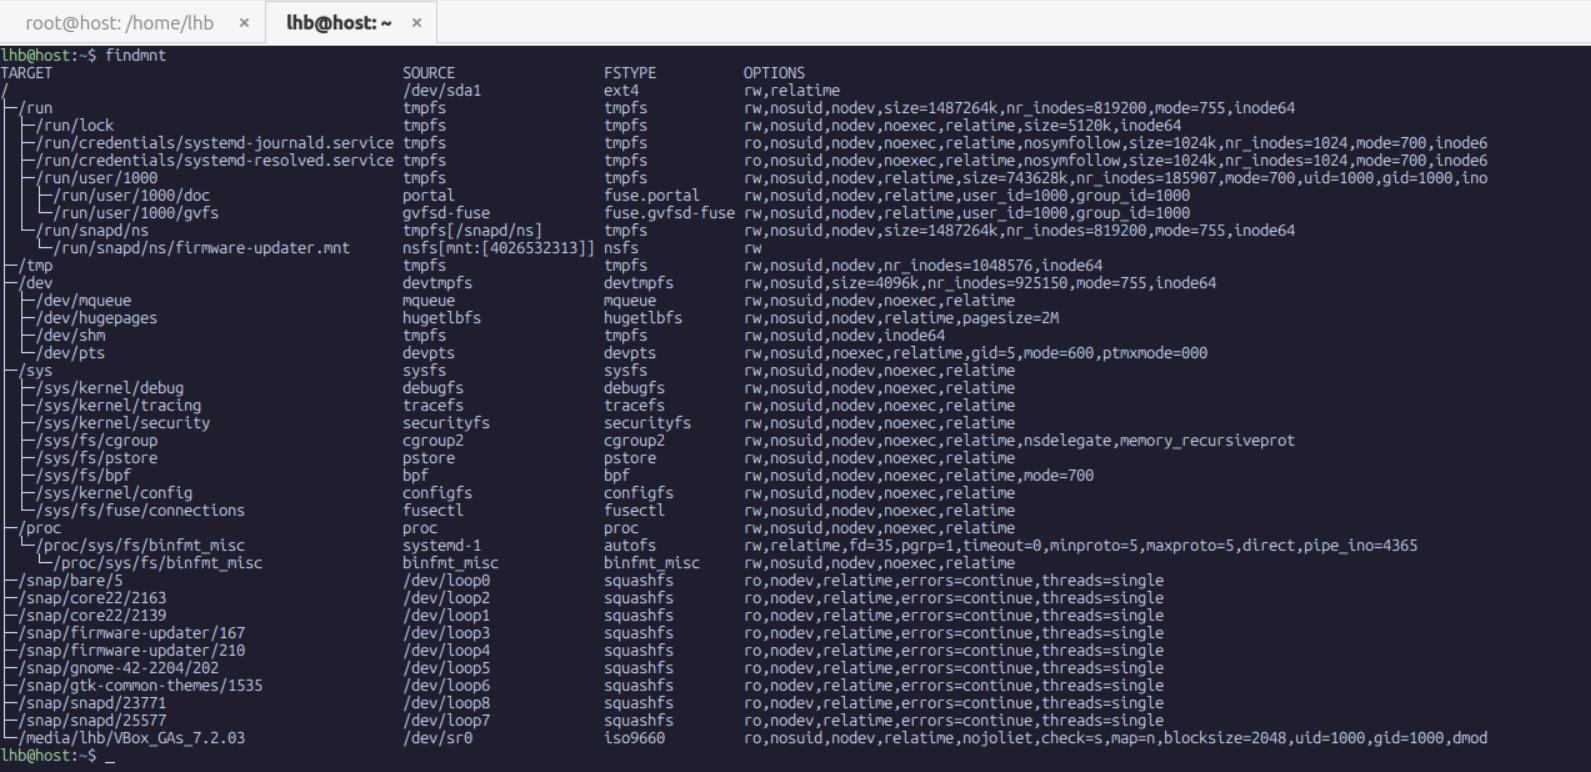
Open a second terminal on the host and run findmnt there. The mount you created will not appear in the host output. The host has no knowledge of this mount, yet the process inside the namespace sees it as normal.
This distinction is at the center of container filesystems. Docker, Podman, LXC, and others create mount namespaces so that they can build custom paths from chains of real directories, overlay filesystems, network mounts, and temporary filesystems, all without affecting the host. For example, Docker uses overlayfs to combine an image layer with read write layers. Without mount namespaces, these overlays would pollute the host environment.
There is another important behavior of mount namespaces that is often overlooked. Mount propagation modes determine whether mount events in one namespace propagate into another. You can inspect propagation modes by running findmnt -o TARGET,PROPAGATION. Bind mounts inside a namespace can be private, shared, or slave, and the mode determines how changes affect other namespaces. Private is the safest choice for containers because it prevents leakage into the parent.
To finish, unmount your test bind mount inside the namespace and exit the shell:
root@host:~# umount /mnt/test
root@host:~# exit
The namespace is now gone and the mount event is entirely forgotten. Again, this reinforces the rule that a namespace exists only while there are processes attached to it.
4. User Namespace
User namespace determines who you are inside the filesystem by isolating user and group IDs. This allows processes inside linux to run as root inside the namespace while having no root level privileges on the host. This is one of the most significant advances in Linux security because it breaks the assumption that UID 0 must always correspond to the host administrator.
A user namespace establishes a mapping between internal and external UIDs. The internal UID is the one the process sees inside the namespace. The external UID is the one the kernel associates with the process on the host. This mapping lets the internal UID appear powerful inside the namespace while remaining harmless outside it.
To explore this, lets create a user namespace. The easiest way to create a new user namespace is with the -r (or --map-root-user) flag. This automatically sets up a UID/GID mapping that makes your current user appear as root inside the namespace.

Notice that the shell prompt changes to root@host. From inside this user namespace, you are root. However, from the host's perspective, this process is owned by UID 1000.
Most container runtimes rely heavily on this mapping. When a container declares that it is running as root, it refers to the internal root identity. The host kernel still sees the process as an unprivileged user unless the container is running in privileged mode. This reduces risk and limits the damage a container can do.
User namespaces interact with other namespaces to provide strong isolation. For example, if a user namespace owns a mount namespace, the processes inside can mount filesystems without host privileges. They can also set capabilities inside their namespace without affecting the host environment. This flexibility is what allows unprivileged users to run root inside sandboxes such as rootless Podman or rootless Docker.
5. Cgroup Namespace
While the PID namespace isolates processes, and the network namespace isolates networking, the cgroup namespace isolates views of control groups. A cgroup namespace provides a private view of the cgroup hierarchy for a process. This is important because containers expect to manage their own cgroups without interfering with the host or other containers.
Control groups (cgroups) are the Linux mechanism for limiting and accounting resource usage. They control CPU time, memory allocation, I/O bandwidth, and many other resources. A cgroup namespace hides host cgroup paths and exposes only the paths relevant to the container.
To understand the distinction, examine your cgroup path on the host:
user@host:~$ cat /proc/self/cgroup
You will see one or more entries for each controller, each pointing to a path within the host cgroup hierarchy. Now create a cgroup namespace:
user@host:~$ sudo unshare --cgroup /bin/bash
root@host:~#
Inside this namespace, inspect the cgroup paths again:
root@host:~# cat /proc/self/cgroup
You will now see simplified paths that represent the isolated view. This means processes inside the namespace cannot observe or influence cgroups outside their namespace.
The cgroup namespace does not independently create or destroy cgroups. It simply controls visibility. To actually enforce resource limits, you must create cgroups in the host first or within the namespace if user namespaces allow it. Combined with mount namespaces, user namespaces, and PID namespaces, this gives containers a complete resource framework.
6. IPC Namespace
The IPC (Inter-Process Communication) namespace isolates System V IPC objects and POSIX message queues. These are mechanisms for processes to communicate with each other via shared memory segments, semaphore arrays, and message queues.
Without isolation, all processes on the system can see and potentially interfere with each other’s IPC objects. An IPC namespace ensures that only processes within the same namespace can access these objects.
Create a shared memory segment in the host namespace.
user@host:~$ ipcmk -M 1024
user@host:~$ ipcs -m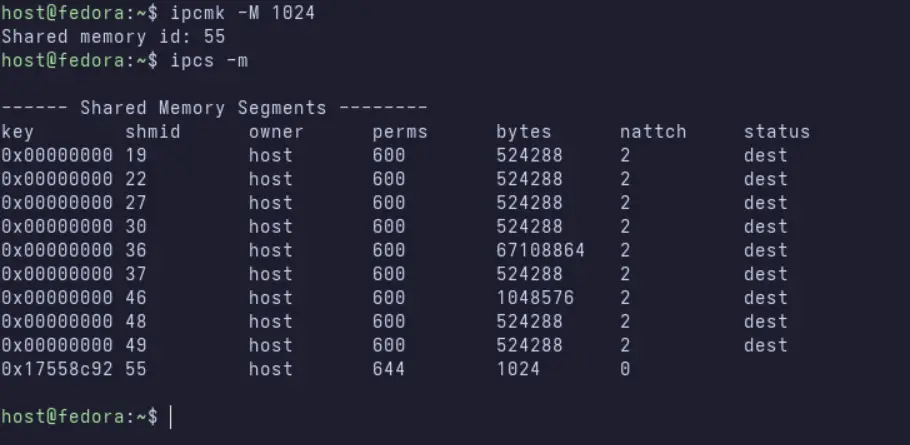
Now, create a new IPC namespace and check for segments.
user@host:~$ sudo unshare --ipc /bin/bash
root@host:~# ipcs -m
The shared memory segment is invisible from within the new IPC namespace. Any segments created inside this namespace will be private to it.
7. Time Namespace
The Time namespace is a more recent addition (Linux 5.6). It allows for per-namespace offsets to the system clock (CLOCK_MONOTONIC) and the boot time (CLOCK_BOOTTIME). This is primarily useful for live-migrating containers or VMs, or for adjusting the system time for a set of processes without affecting the host.
For example, you could set a container’s clock back by 24 hours. This is a specialized namespace and is not yet widely used in everyday container operations, but it completes the set of isolatable global resources.
👨💻 Building a container from scratch using Linux Namespaces
Now that all the pieces have been introduced, we can combine them to create a minimal container without any container runtime. The goal is to assemble the namespaces manually and run a simple process in an isolated environment that behaves like a container. This provides a deeper understanding of how container engines work beneath their user-friendly interfaces.
1. Create a root filesystem
A container needs its own filesystem. For this demonstration, we will use BusyBox as the minimal root filesystem.
user@host: ROOTFS="$HOME/rootfs"
user@host: mkdir -p "$ROOTFS"/{bin,proc,sys,dev}
user@host: cp /usr/bin/busybox "$ROOTFS/bin/"
user@host: for cmd in sh mount umount ls mkdir ps ping hostname; do
    ln -sf busybox "$ROOTFS/bin/$cmd"
done
This sets up a minimal filesystem with essential binaries. In practice, you could also use a Debian, Ubuntu, or Alpine rootfs. The idea is to have a directory containing /bin, /proc, /sys, /dev, and optionally /etc.
2. Start a new set of namespaces
We will combine mount, PID, UTS, IPC, network, and user namespaces. This creates an environment that resembles a container.
user@host: sudo unshare --mount --pid --uts --ipc --net --fork /bin/bash Inside this new shell, you are operating in fresh namespaces. You are root inside this user namespace, you have a private PID tree, and your mount operations will not affect the host.
3. Prepare the mount namespace
First, mount a new instance of proc inside your rootfs:
root@host: mount --bind "$ROOTFS/dev" "$ROOTFS/dev"
root@host: mount -t proc proc "$ROOTFS/proc"
root@host: mount -t sysfs sys "$ROOTFS/sys"
Set a hostname for the UTS namespace:
root@host: hostname isolated-box
Bring up loopback networking. Even in a minimal demonstration, a working loopback interface is important:
ip link set lo upThis gives you basic networking inside the namespace. External networking would require virtual ethernet pairs or macvlan interfaces, which container runtimes configure automatically.
Enter the new root filesystem using chroot:
root@host: chroot "$ROOTFS" /bin/sh You now have an isolated filesystem environment with /proc, /sys, and /dev properly mounted. All changes to mounts inside this environment will not affect the host.
4. Start PID 1 inside the namespace
Create a new shell that acts as PID 1:
exec /bin/bashNow run:
ps auxYou will see only a very small process tree. This is exactly what a real container PID namespace looks like.
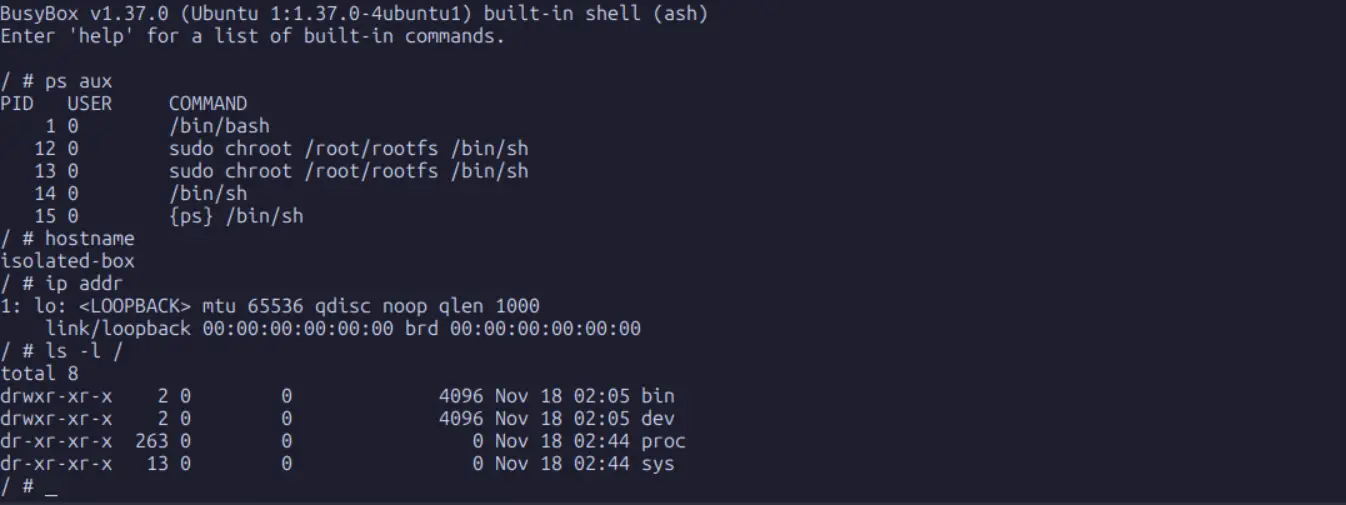
At this point, wehave constructed a minimal container with its own root filesystem, its own network namespace, loopback interface, and hostname.
This is exactly what container engines create, but they automate mount propagation, networking, UID mappings, image layering, cgroup enforcement, and lifecycle management.
Wrapping Up
Linux namespaces form the invisible scaffolding that makes container isolation possible. They isolate processes, users, filesystems, networks, and resources while remaining flexible and efficient. By decoupling key system resources like processes, networks, and mount points, they allow each environment to appear self-contained while still sharing the same kernel. Through simple tools such as unshare and lsns, we can directly observe how these mechanisms work without relying on Docker or Kubernetes.
Not only did you learn the concept of namespaces, but you also created a fully isolated environment that behaves like a container. Doing the work by hand reveals how simple the underlying mechanisms are and how much value container engines extract from them.
If you understand namespaces, you understand containers. If you understand containers, you understand much of modern infrastructure. Everything built on top of containers, from Kubernetes to serverless platforms, relies on these mechanisms.