As you might have heard the phrase a backup is no good if it is not restorable.
There are a variety of ways to do a backup of your essential files on a cloud server. But what is also important is that you always have an updated copy of those files on your local systems.
Backing them up on the cloud is fine. But a true backup is only a fresh and regularly updated copy that is available at your end at all times. Why? Because it's YOUR data!
Two challenges I'm going to address in this regard are:
- The necessity to stop Docker containers on a production server to avoid any possible data corruption (especially databases) when doing the backup. The files on live production containers are continuously being written.
- Stopping Docker containers also results in downtime, and you cannot afford to do that, especially if you are on production.
These issues can be addressed by using clusters instead of single servers. But here, I'm focusing on single servers and not clusters to keep the cloud service expenditures to as low as possible.
I kept wondering on how to take care of the above two challenges. Then it struck me that we can make use of a combination of both a cloud and a localized solution.
By cloud-based solutions, I mean the backup services provided by cloud service providers such as Linode, Digital Ocean and others. In this walkthrough, I'm going to use Linode.
By localized solutions, I mean the use of command line or GUI-based tools to download the backup from cloud servers into your local system/desktop. Here, I've used sftp (command-based).
First, I'll discuss how to do the backup followed by how to restore it as well.
The Cloud + Local Based Backup Procedure
Let's see the backup procedure first.
Enable backups on the Linode production server (in-case you have not already)
If you are using a production server on Linode, it is highly recommended that you enable backup for it whenever it is first deployed. A "nanode" as it's called, comes with 1 GB RAM and offers the following backup plan:
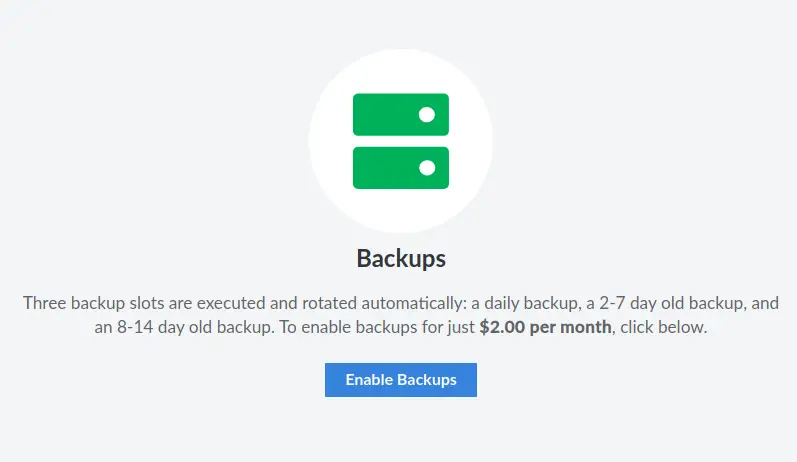
All other backup solutions offer a similar feature but at higher rates. Make sure you have it enabled.
Take a manual snapshot as backup on the cloud
Enter a date for future reference. Here, I call it "manual-snapshot-11-05-21".

As soon as you click on it, you'll be asked for confirmation:

When you confirm, you'll find a notification at the bottom on the right:

You can monitor the progress on the same page, beside where it says that your server is running(top left):

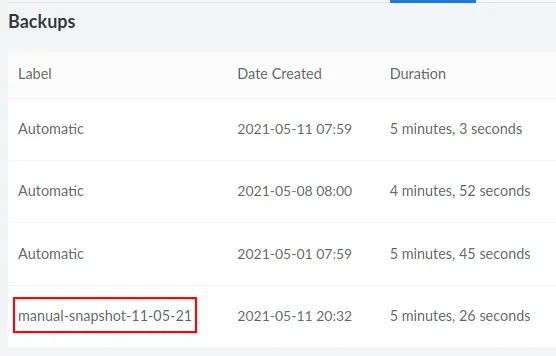
Once it's done, you'll notice the backup as a fourth one in the list.
Clone the production server
Though you can directly clone a server (based on earlier scheduled backups) from the Linode's panel, I'd recommend you use manual backups as discussed in the above step.
So, in order to proceed with creating a clone based on the most recent manual backup you made, make sure you follow the below instructions:
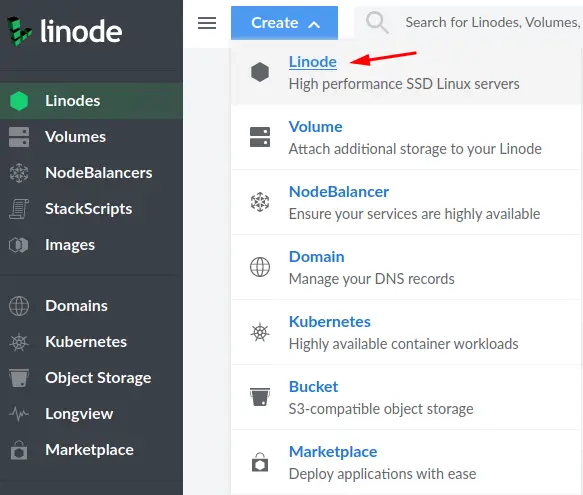
Go to the Linode panel and click "Create":
Select "Linode":
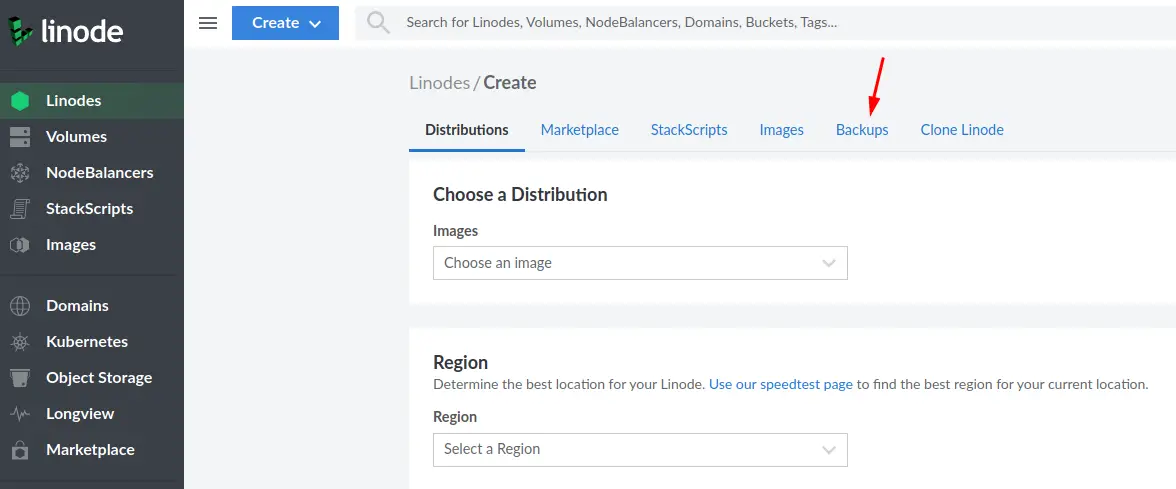
Select the "Backups" tab:
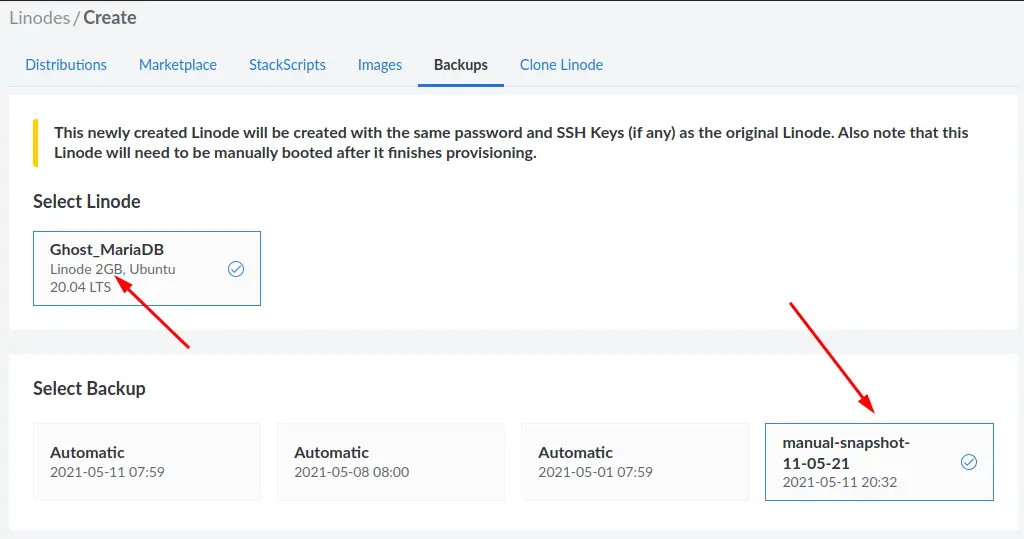
Note that the snapshot you are taking is based on a 2 GB Linode. Select the manual snapshot that you just created:
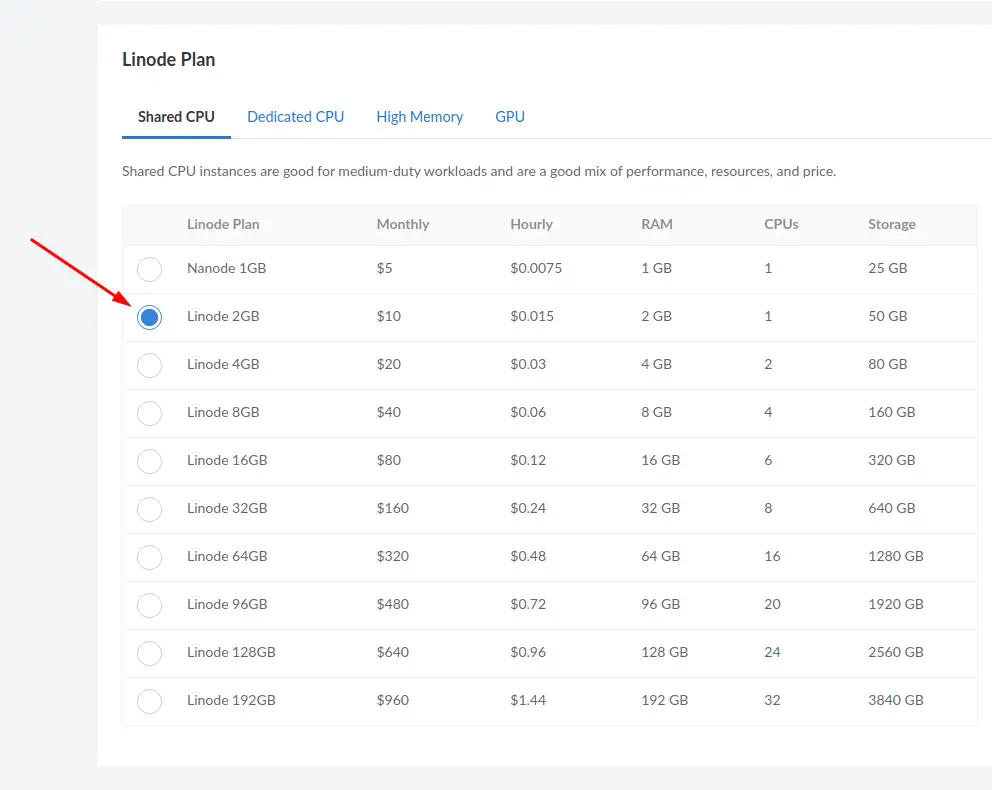
Now, make sure you select the same specification (2 GB Linode Plan) for your clone:
After you've created the new server based on the backup of the production server, you'll have a readily available clone of the production server available for you.

Login to the clone via ssh and stop all containers
You shouldn't have any issues logging in to the new clone via ssh because it uses the same public keys as the production server. You just need to use the new IP of the clone. I do assume you use ssh alone and have password-based authentication disabled, don't you? Read this ssh security guide if you haven't yet.
Once logged in, stop all containers whose data you want to backup. Typically, you would move into the respective app directories and use the docker-compose down command. On a typical production environment, you are always expected to be using Docker Compose instead of the conventional docker stop command that should be preferred during testing only.
For example, if I had Ghost running with its corresponding database container, I would first check its respective information:
avimanyu@localhost:~$ docker ps
CONTAINER ID   IMAGE                                    COMMAND                  CREATED        STATUS       PORTS                                      NAMES
6a3aafe12434   ghost:4.4.0                              "docker-entrypoint.s…"   7 days ago     Up 7 days    2368/tcp                                   ghost_ghost_2
95c560c0dbc7   jrcs/letsencrypt-nginx-proxy-companion   "/bin/bash /app/entr…"   6 weeks ago    Up 10 days                                              letsencrypt-proxy-companion
6679bd4596ba   jwilder/nginx-proxy                      "/app/docker-entrypo…"   6 weeks ago    Up 10 days   0.0.0.0:80->80/tcp, 0.0.0.0:443->443/tcp   jwilder-nginx-proxy
1770dbb5ba32   mariadb:10.5.3                           "docker-entrypoint.s…"   3 months ago   Up 10 days                                              ghost_db_1
As you can see here, the container names are ghost_ghost_2 and ghost_db_1 respectively running under a reverse proxy. Let's stop them.
avimanyu@localhost:~$ cd ghost
avimanyu@localhost:~/ghost$ docker-compose down
Stopping ghost_ghost_2 ... done
Stopping ghost_db_1    ... done
Network net is external, skipping
avimanyu@localhost:~/ghost$
In case you have more applications running behind a nginx reverse proxy configuration, use the same procedure with the respective directory names set for the applications. Stop them all one by one.
Backup volumes and settings as gzip archives
Now let's see the manual back up process.
Backup named volumes
When you are dealing with named Docker volumes, make a note of whether the volumes had been created manually or if it was based on a generic Docker Compose configuration the app was first deployed.
A generic configuration in the volumes section looks like:
volumes:
  ghost:
  ghostdb:
The above scenario is managed by Docker Compose, and the actual volume names you would be needing for backup are going to be ghost_ghost and ghost_ghostdb.
In case the volumes were manually created with docker volume create volume-name, the configuration would look like the following and strictly be ghost and ghostdb alone:
volumes:
  ghost:
    external: true
  ghostdb:
    external: true
Nonetheless, you have to backup them in either case, and you also need to check the paths on the containers when the volumes are mounted. For example, on a typical Ghost configuration with MariaDB, the paths can be known by looking at the volumes subsections inside the service definitions. Here's an excerpt to show you what I mean:
    ghostdb:
        volumes:
            - ghostdb:/var/lib/mysql
The above config is part of the database service and its corresponding container that would be created once it gets deployed.
Similarly, for the ghost service itself, the path is /var/lib/ghost/content:
    ghost:
        volumes:
            - ghost:/var/lib/ghost/content
You need to know these paths in order to backup your volumes.
Use the docker volume ls command to double-check the volume names present on the cloned server.
avimanyu@localhost:~/ghost$ docker volume ls
DRIVER    VOLUME NAME
local     ghost
local     ghostdb
local     nginx-with-ssl_acme
local     nginx-with-ssl_certs
local     nginx-with-ssl_dhparam
local     nginx-with-ssl_html
local     nginx-with-ssl_vhost
So, you can confirm that the volumes indeed are ghost and ghostdb.
Time to back em up! On the production clone, let us now create a backup directory inside your user directory:
mkdir ~/backup
Now, I'm going to use the following command to backup the contents of the volumes inside a tar archive:
docker run --rm -v ghostdb:/var/lib/mysql -v ~/backup:/backup ubuntu bash -c "cd /var/lib/mysql && tar cvzf /backup/ghostdb.tar.gz ."
In the above command, with -v or --volume, I mount the existing docker volume to a new Ubuntu container and also bind mount the backup directory I just created. Later, I move into the database directory inside the container and use tar to archive its contents. --rm is used to automatically clean up the container and remove its file system when the container exits(because you want it only as long as the backup or restore job gets done).
Notice the dot at the end of the above command before the quote(") ends. It ensures the archive includes what's inside /var/lib/ghost/content alone and not including the entire path itself as sub-directories. The latter will cause issues when restoring the archive to a new volume on a new server. So, please keep that in mind.
Now, I have an archive of the MariaDB database volume that our Ghost blog is using. Similarly, I've to backup the ghost volume as well:
docker run --rm -v ghost:/var/lib/ghost/content -v ~/backup:/backup ubuntu bash -c "cd /var/lib/ghost/content && tar cvzf /backup/ghost.tar.gz ."
Remember that the above backup commands are based on external volumes that were initially created manually. For generic volumes created and managed by Docker Compose, the actual volume names would instead be ghost_ghost and ghost_ghostdb respectively. For example, for ghost_ghostdb, the ghost prefix refers to the name of your application directory where you have your Docker Compose configuration files and ghostdb refers to the volume name you have set in your Docker Compose configuration.
Backup settings with or without bind mounts
Also note that you that you must archive the ghost docker compose directory irrespective of whether you use bind mounts or named volumes because your configuration files are stored here.
In case you are using bind mounts and not named Docker volumes, the entire directory would be archived including the bind mounts. Here, I'm calling it ghost-docker-compose.tar.gz to avoid confusion:
avimanyu@localhost:~/ghost$ sudo tar cvzf ~/backup/ghost-docker-compose.tar.gz .
Bind mounted volumes do not need a separate volumes section in a Docker Compose file. They would just like the following when defined inside the service:
    ghost:
        volumes:
            - ./ghost:/var/lib/ghost/content
Similarly, the bind mounted database volume would look like:
    ghostdb:
        volumes:
            - ./ghostdb:/var/lib/mysql
"./" indicates the bind mounted directory inside the same ghost directory that we just "cd"d into. Therefore, you make a complete backup of all files in this case(including volumes and configuration files).
Backup bind mounts like named volumes
As an alternative, you can also individually backup the bind mounts. This gives you an option to choose whether you want your new server to have a bind mounted or a named volume configuration on Docker. The reason being, the archives are backed up in the same manner like named volumes discussed above. To do that, you need to "cd" into the application and database directories(bind mounts) one by one.
cd ~/ghost/ghost
sudo tar cvzf ~/backup/ghost.tar.gz .
cd ~/ghost/ghostdb
sudo tar cvzf ~/backup/ghostdb.tar.gz .
Both bind mounts and named volumes have their own pros and cons. The question about which of them is most ideal varies from application to application. For example, Nextcloud developers suggest named volumes, whereas Rocket.Chat developers suggest bind mounts.
Moving on, it is time you fetch those archives at your end.
Download the archives to your local system using sftp
Using sftp, you can straightaway download your archives into your local system. Here I'm using port 4480 and IP 12.3.1.4 as an example. It refers to same port used by ssh.
user@user-desktop:~$ sftp -oPort=4480 [email protected]
Connected to 12.3.1.4.
sftp> get /home/avimanyu/backup/ghost.tar.gz /home/user/Downloads
Fetching /home/avimanyu/backup/ghost.tar.gz to /home/user/Downloads/ghost.tar.gz
/home/avimanyu/backup/ghost.tar.gz                                                                                                                                                                                                                                                         100%  233MB   6.9MB/s   00:34
sftp> get /home/avimanyu/backup/ghostdb.tar.gz /home/user/Downloads
Fetching /home/avimanyu/backup/ghostdb.tar.gz to /home/user/Downloads/ghostdb.tar.gz
/home/avimanyu/backup/ghostdb.tar.gz                                                                                                                                                                                                                                                       100%   26MB   6.5MB/s   00:03
sftp> get /home/avimanyu/backup/ghost-docker-compose.tar.gz /home/user/Downloads
Fetching /home/avimanyu/backup/ghost-docker-compose.tar.gz to /home/user/Downloads/ghost-docker-compose.tar.gz
/home/avimanyu/backup/ghost-docker-compose.tar.gz                                                                                                                                                                                                                                          100%  880     6.0KB/s   00:00
sftp> exit
user@user-desktop:~$
As you can see here, the get command on sftp is helluva lot faster than rsync or scp. Once the download is complete, you'll be shown the sftp prompt where you can enter exit and move out of the sftp console. The downloaded files would be available at /home/user/Downloads.
At this point, you can say that you have taken a complete backup of your docker application.
But as I must say again, it's no good unless you can restore it.
Restoration Procedure
Now that you know how to do a backup, it is time to see how to restore from a backup.
Create a new server on the cloud
Create a fresh new server from your Cloud service dashboard. I discussed this on our backup section. On Linode, it looks like:
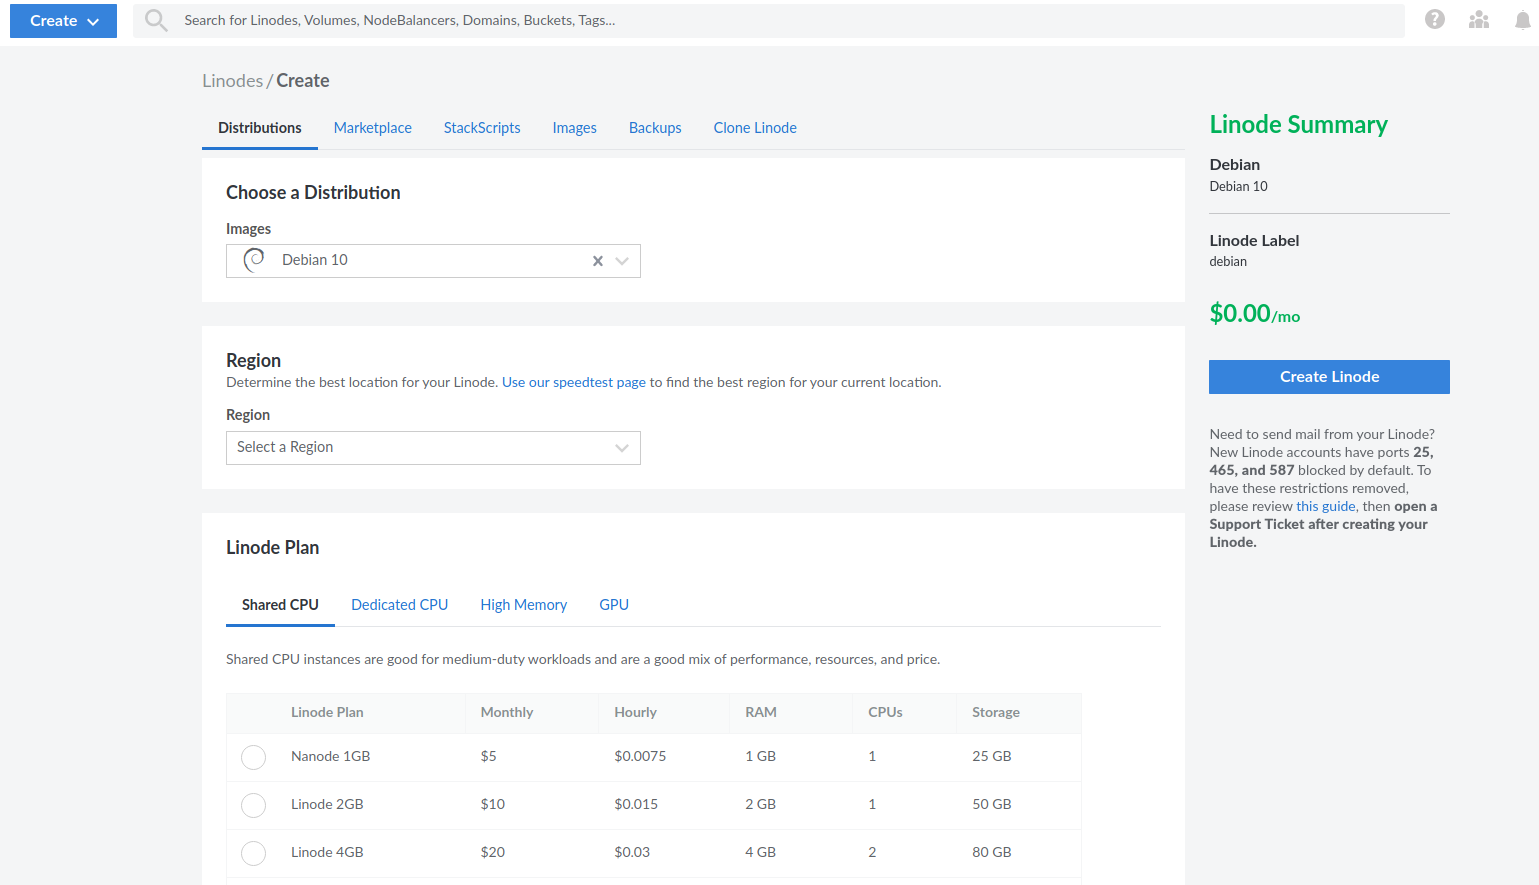
It is recommended to keep the server specifications the same as of the original server the archives were backed up from(mentioned earlier).
Upload backup archives to new server
Assuming you can now login to the new server based on your saved ssh settings on your cloud service provider, upload the files to the server with sftp's put command:
user@user-desktop:~$ sftp -oPort=4480 [email protected]
Connected to 12.3.1.5.
sftp> put /home/user/Downloads/ghostdb.tar.gz /home/avimanyu
Uploading /home/user/Downloads/ghostdb.tar.gz to /home/avimanyu/ghostdb.tar.gz
/home/iborg/Downloads/ghostdb.tar.gz                                                                                                                                                                                                                                                       100%   26MB   6.2MB/s   00:04
sftp> put /home/user/Downloads/ghost.tar.gz /home/avimanyu
Uploading /home/user/Downloads/ghost.tar.gz to /home/avimanyu/ghost.tar.gz
/home/iborg/Downloads/ghost.tar.gz                                                                                                                                                                                                                                                         100%  233MB   7.2MB/s   00:32
sftp> put /home/user/Downloads/ghost-docker-compose.tar.gz /home/avimanyu
Uploading /home/user/Downloads/ghost-docker-compose.tar.gz to /home/avimanyu/ghost-docker-compose.tar.gz
/home/iborg/Downloads/ghost-docker-compose.tar.gz                                                                                                                                                                                                                                          100%  880    22.6KB/s   00:00
sftp> exit
user@user-desktop:~$
If you prefer to use a GUI for uploading, you can still use FileZilla.
Restore settings and volumes
First, restore the docker compose directory of your Ghost configuration.
mkdir ghost
cd ghost
sudo tar xvf ~/backup/ghost-docker-compose.tar.gz
As an alternative, you can also try to restore the user ownership(permissions are already preserved) that might be helpful when restoring bind mounted directories(already present in the archives), with --same-owner:
sudo tar --same-owner -xvf ~/backup/ghost-docker-compose.tar.gz
In case you want to rely on Docker Compose for managing the new volumes, create them first. As per our discussion in the backup volumes section above, you would obviously have to follow the necessary naming conventions:
docker volume create ghost_ghost
docker volume create ghost_ghostdb
If you want to set them as external within your Docker Compose configuration, the names would have to be different(revise the above two commands):
docker volume create ghost
docker volume create ghostdb
To restore the MariaDB volume for Ghost:
docker run --rm -v ghostdb:/restore -v ~/backup:/backup ubuntu bash -c "cd /restore && tar xvf /backup/ghostdb.tar.gz"
To restore the Ghost volume itself:
docker run --rm -v ghost:/restore -v ~/backup:/backup ubuntu bash -c "cd /restore && tar xvf /backup/ghost.tar.gz"
Make sure DNS settings are restored based on new IP
Since you are using a new server, the IP has definitely changed and hence must be revised for your domain. You can check these nginx reverse proxy docker prerequisites as a reference where it has been discussed.
Launch new containers with necessary settings and restored volumes
Now relaunch the configuration on the new server:
docker-compose up -d
If you following all instructions above assiduously, you will now have a fully restored Docker web application based on your backup.
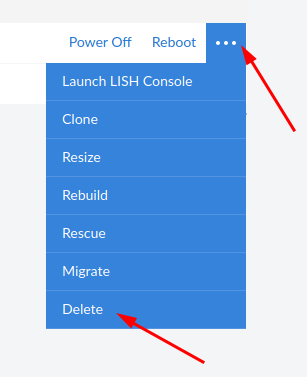
Destroy the Clone
Once your assured your goal is achieved, having the clone is no longer required unless you want to keep it for testing. So if you don't want it anymore, please delete the Linode(DOUBLE CHECK!):
Final Thoughts
There are already many solutions that make use of such methods in parts and portions. But that demands downtime because the containers must be stopped. That challenge is taken care of by using cloud backups from production clones and not the production servers themselves.
Instead of using a 24/7 additional server as a cluster for downtime-less backups, we are but momentarily using one for ensuring the same. This enables better FinOps.
If you prefer to use a GUI for downloading or uploading your backups, you can use sftp via FileZilla.
Since you are backing up the files on a cloned server and not on the production server itself, you are saving valuable uptime, in addition to avoiding unexpected hiccups that you might encounter during the process. To be honest, you can be free of any worry and fiddle with it with no tensions at all because you don't touch the production server ;)
Can't deny that the entire process is quite comprehensive, but it sure takes care of our objective. Looking beyond, this procedure could also be completely automated in the future, with a careful synchronization between the cloud and your local system.
If you have further suggestions on Docker backup and restore without downtime, please share your thoughts in the section below. Any other feedback or comments are most welcome.
