Autostarting Podman Containers
Podman is awesome but it doesn't autostart containers after system reboots. Here's how to fix that.

Podman is by far one of my favourite tools for container management. It has a daemon-less architecture that allows an unprivileged user to run containers without root access, further enhancing system security.
That doesn't mean Podman is perfect, without issues. One such pain in the neck is its restart policy. The containers will not restart automatically after your server reboots.
The problem: Container restart policy
If you look at the man page of podman-run, you will notice that the --restart option will not start the container(s) again when the system reboots.
It says, "Please note that --restart will not restart containers after a system reboot."
This is different than what you might be used to – with Docker. The reason behind behaviour is Podman's daemon-less architecture.
The containers managed by Docker respect this for every reboot because the Docker daemon starts at boot and starts the specified containers.
But, being daemon-less means Podman does not start on boot, so the containers do not start on boot either.
The solution: systemd
Love it or hate it, the distribution of your choice probably uses systemd as the init system. Best put it to good use! :)
Step 1: Get the container up and running
There can be multiple ways you might want to start a container. Maybe you want a simple container and are using the podman run command. You might use a docker file if you have a complex configuration.
For demonstration purposes, I will create a container based on the mariadb container image and name my container chitragupta-db.
$ podman ps
CONTAINER ID  IMAGE                             COMMAND               CREATED         STATUS             PORTS       NAMES
422eed872347  docker.io/library/mariadb:latest  --transaction-iso...  58 seconds ago  Up 58 seconds ago              chitragupta-db
Now is the time you should stop the container in question. But do not worry, stopping the container right now is not necessary. It can be done later too!
Step 2: Create a systemd service
As I mentioned earlier, Podman is a daemon-less container management software. Hence, the startup of podman managed containers needs to be externally managed.
I will demonstrate doing exactly that by creating a systemd service.
systemd is an init system that manages services/daemons on Linux-based operating systems. Therefore, it is the perfect candidate for solving our problem.
Step 2A: Create a systemd unit file
The systemd unit file for your container does not need to be manually created. There is a handy command for that. That command is podman generate systemd and the syntax is as follows:
podman generate systemd --new --name CONTAINER_NAMETo generate a systemd unit file for your container, use the podman generate systemd command along with the name of your container.
In my case, I named my container chitragupta-db, so I will use that.
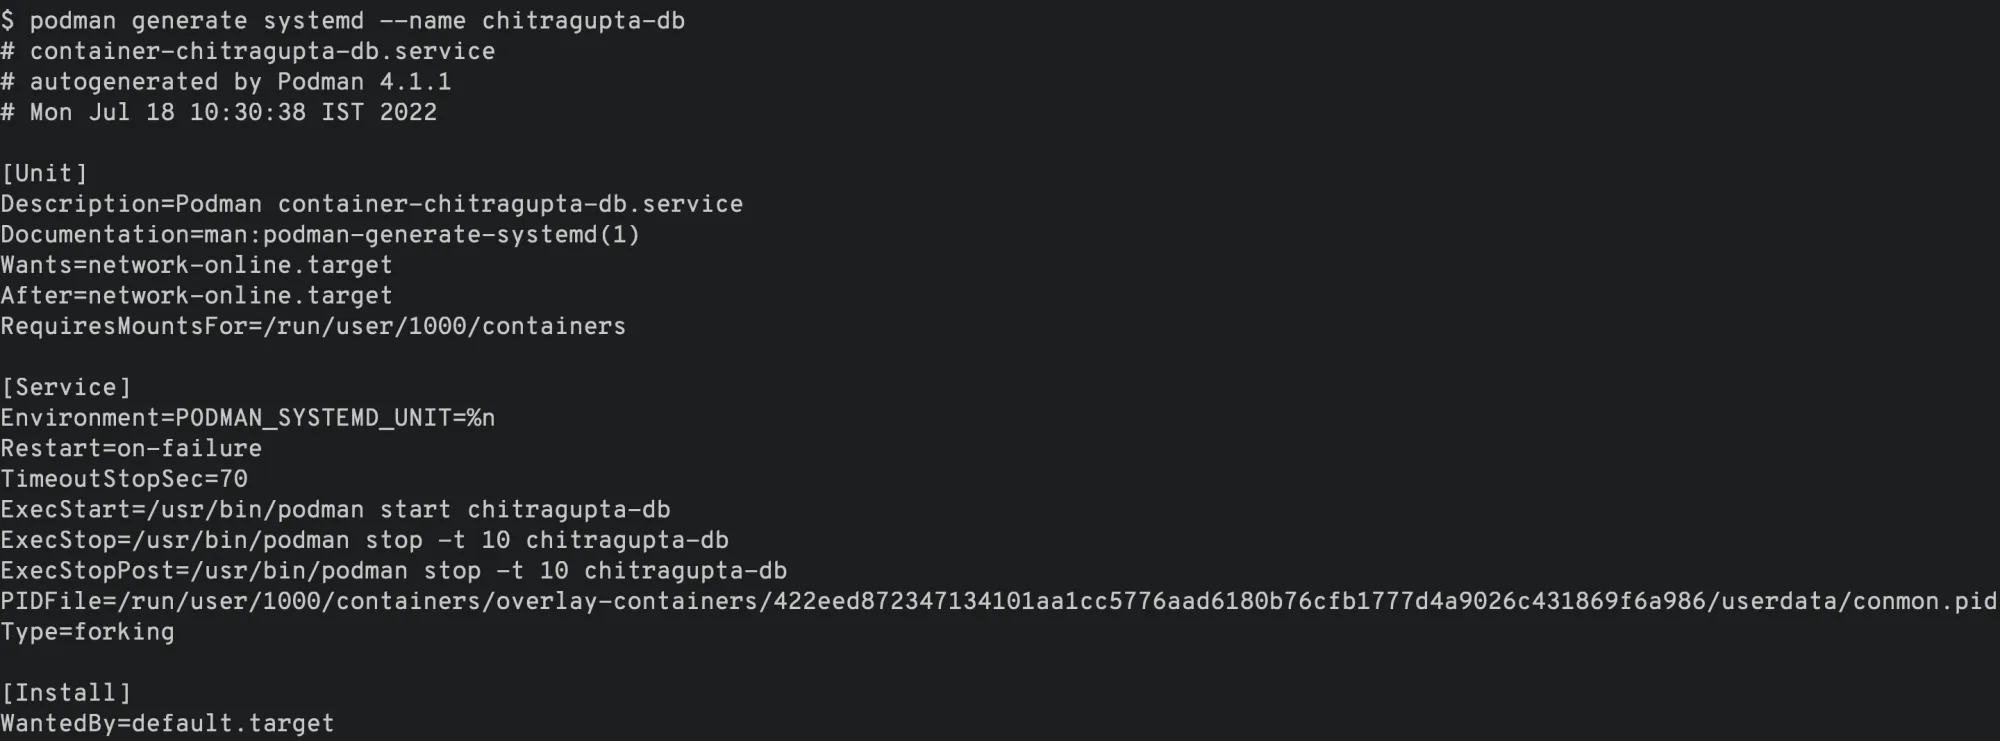
As you can see, this particular podman command did all the work for us. But this isn't particularly useful... yet.
The output of podman generate systemd is what you should have in your unit file for your service. But why copy paste? The podman command also comes with a handy option, which is the --files (or -f for short) option.
Using the --files option will populate a file with the necessary contents instead of printing it to your console/terminal. Using this option will create a file named container-CONTAINER_NAME.service in your current working directory.
$ podman generate systemd --new --name chitragupta-db -f
/home/pratham/container-chitragupta-db.service

$ ls *.service
container-chitragupta-db.service
In my case, the name of my container is chitragupta-db, it created a file named container-chitragupta-db.service in my current working directory.
Since the podman generate systemd command is creating a systemd unit file, you can also use the --after=, --requires=, --wants= options to specify respective dependencies for your container(s).
Step 2B: Move the systemd service file to a specific location
As you might have noticed, the specified podman command will create a new systemd unit file in your current working directory. The current working directory, wherever that might be is most definitely not the correct directory to put a systemd service file in.
The acceptable location for a superuser's systemd service file is /etc/systemd/system/. For a normal, non-root user, you should place it inside the ~/.config/systemd/user/ directory.
Then, move the generated systemd file in the proper directory.
Since my container is deployed as a root-less container, I will move it under the ~/.config/systemd/user/ directory.
$ mv -v container-chitragupta-db.service ~/.config/systemd/user/
renamed 'container-chitragupta-db.service' -> '/home/pratham/.config/systemd/user/container-chitragupta-db.service'
The systemd unit file was generated without any user input and it is placed inside the correct directory.
Now all that remains is to enable it.
Step 3: Enable the container's systemd service
Now that podman has automatically generated a systemd unit file in the correct location, it is time to enable this service. But before the service is enabled, systemd needs to be made aware of the new service that we just made available.
To reload systemd for the root user, run the following command:
sudo systemctl daemon-reloadTo relaod systemd a non-root user, use the --user option and remove the sudo command from beginning. Below is the command you should run.
systemctl --user daemon-reloadDoing so will relaod systemd (without requiring a system reboot) and make it aware that a new service named container-chitragupta-db.service exists.
Now that systemd is aware of our newly created service, you can enable it.
To enable a service for the root user, use the following command syntax:
sudo systemctl enable SERVICE_NAME.serviceTo enable a systemd service for a non-root user, use the --user option without the sudo command. Below is the command syntax:
systemctl --user enable SERVICE_NAME.serviceAs stated above, my container is a root-less container and I will enable the systemd service accordingly. Your output should be similar to what is shown below:
$ systemctl --user enable container-chitragupta-db.service
Created symlink /home/pratham/.config/systemd/user/default.target.wants/container-chitragupta-db.service → /home/pratham/.config/systemd/user/container-chitragupta-db.service.
Once enabled, you can check the status of your systemd service using the status sub-command.
Below are the command syntices for the root user and non-root user:
# for root user
sudo systemctl status SERVICE_NAME.service

# for non-root user
systemctl --user status SERVICE_NAME.service
Below is the status of the container-chitragupta-db service on my computer.
$ systemctl --user status container-chitragupta-db.service
○ container-chitragupta-db.service - Podman container-chitragupta-db.service
     Loaded: loaded (/home/pratham/.config/systemd/user/container-chitragupta-db.service; enabled; vendor preset: disabled)
     Active: inactive (dead)
       Docs: man:podman-generate-systemd(1)
Do not be worried that the service status is inactive (dead). We have just enabled the service and the service is supposed to start on boot, not now. So, this is the indende behaviour.
If you did not stop the container in Step 1, now is the time to podman stop and podman container rm the container and reboot to start the container service.
Step 4: Enable Podman's restart service
On some distributions, you might need to enable the podman-restart service too. This is true for non-Fedora Linux distributions, especially for NixOS.
You can do so using the following command:
systemctl --user enable podman-restart.serviceThe podman-restart systemd service will make sure that any containers that have their restart-policy set to always will be started at boot.
Step 5 (optional): Enable user lingering (for non-root users)
As you know by now, this service is being run by a normal user (pratham is the user in my case) and not the root user. That means that said user needs to be logged in at the boot and should stay active even if they log out from a GUI or TTY session.
This can be achieved by the use of loginctl command. From the terminal session of your user, run the following command:
sudo loginctl enable-lingerThis command will ensure that a user session for your user is spawned at boot and kept active even after logouts from GUI or tty session(s).
Finally, the re-starting of containers managed by Podman at boot has been enabled. A reboot will automatically restart the containers of which you have created a systemd unit file of, and enabled them.
This was quite a long process, but thankfully manual intervention was not necessary.
Modify your systemd service
We all know that defaults are always good for a beginner. It helps to prevent the overwhelming feeling for a newbie. But what about someone who is not a beginner?
Trust me, Podman's defaults for the generated systemd file are perfect for most people. But we are not most people. We need more tweaks. In that case, I have written a short guide regarding creating your own systemd service.
You can use this as a guide and manage modify your existing systemd file for the container. Or even create a totally new, custom service, from scratch! :)
Conclusion
This tutorial guides you to the process of creating systemd unit files for managing the autostart of containers managed by Podman, at boot. The use of systemd helps the administrator keep an eye on containers using the systemd interface many are familiar with.
Do comment and let us know your thoughts on this. If you have any alternative way to do it, comment below.