

Ghost is a very popular open-source content management system. Started as an alternative to WordPress and it went on to become an alternative to Substack by focusing on membership and newsletter.
The creators of Ghost offer managed Pro hosting but it may not fit everyone's budget.
Alternatively, you can self-host it on your own cloud servers. On Linux handbook, we already have a guide on deploying Ghost with Docker in a reverse proxy setup.
Instead of Ngnix reverse proxy, you can also use another software called Traefik with Docker. It is a popular open-source cloud-native application proxy, API Gateway, Edge-router, and more.
I use Traefik to secure my websites using an SSL certificate obtained from Let's Encrypt. Once deployed, Traefik can automatically manage your certificates and their renewals.
In this tutorial, I'll share the necessary steps for deploying a Ghost blog with Docker and Traefik.
Here's what you need for this tutorial:
- A domain and access to its DNS settings
- A cloud server like the ones from DigitalOcean or Linode
- Decent knowledge of Linux command line
- Decent knowledge of Docker
With that aside, let's see how to go about it.
Step 1. Get a domain (if you don't have one)
I always recommend deploying tools on real domains even if it is for test purposes.
Domains are not expensive these days. You can find some good, inexpensive domains at NameCheap.
For test purposes, you can get any domain that is available at the cheapest price. Usually, domains with obscure TLDs like .club are very cheap. Instead of renewing the next year, you can buy another one at a cheap price.
If it is for a real, public-facing website, go for a domain that is suitable for your branding. I always prefer .com domains over any other TLD.

For the production website, I recommend using Cloudflare for a faster website. You can use it for free. Here's how to set up your DNS with Cloudflare.
2. Setting up your Cloud Instance
I use DigitalOcean to host my website - Narasimman Tech. It is easy and cheap to set up. If you are a new user, DigitalOcean gives you a $100 credit, valid for 60 days of server usage.


If you are in doubt, refer to our list of free cloud servers. You can get some free credits for trying out a new service.
I let you create a new server on your preferred cloud service.
3. Setting up Docker and Docker Swarm
I believe that you can figure out how to use SSH to connect to the remote servers.
ssh root@<IP address of the Droplet>
Once you are logged in to your server, you need to get Docker configured. Since the installation of Docker is different for different distributions, I am not going to cover it. If you need help, here's a tutorial for Ubuntu.

We will be running our services in a Docker Swarm Environment. To start a Docker Swarm Environment run,
docker swarm init
This creates a new Swarm Environment and this becomes your manager node. You can add a new Droplet as a worker node, to scale up your services, but that’s beyond the scope of this tutorial.
4. Creating Required Configuration Files and Directories
Create a folder called my website or anything you want and change the directory to the newly-created directory.
mkdir website

cd website
You have to create a couple of files and directories to store Traefik configuration files and your SSL keys:
Create a new directory called ‘data’ and change the directory into it.
mkdir data

cd data
Inside this directory, create two new files called traefik.yml and acme.json change the permission of acme.json to 600.
touch traefik.yml acme.json

chmod 600 acme.json
Open the file using any editor.
nano traefik.yml
Paste the following code in the traefik.yml file.
api:
  dashboard: true
  debug: true
serversTransport:
  insecureSkipVerify: true
entryPoints:
  web:
    address: :80
    http:
      redirections:
        entryPoint:
          to: websecure

  websecure:
    address: :443
    http:
      middlewares:
        - secureHeaders@file
        - nofloc@file
      tls:
        certResolver: letsencrypt
        domains:
          - main: yourdomain.com
            sans:
              - "*.yourdomain.com"

pilot:
  dashboard: false

providers:
  docker:
    swarmMode: true
    endpoint: "unix:///var/run/docker.sock"
    exposedByDefault: false
  file:
    filename: /configurations/dynamic.yml

certificatesResolvers:
  letsencrypt:
    acme:
            #caServer: https://acme-staging-v02.api.letsencrypt.org/directory
      email: [email protected]
      storage: acme.json
      keyType: EC384
      dnsChallenge:
        provider: cloudflare
        resolvers:
          - "1.1.1.1:53"
          - "1.0.0.1:53"
You have to change a few variables:
Change yourdomain.com to the domain you own.
          - main: yourdomain.com
            sans:
              - "*.yourdomain.com"
Create a new directory called configurations and change the directory into it. Inside this directory, create a new file called ‘dynamic.yml’ and copy-paste the following lines.
mkdir configurations

cd configurations

touch dynamic.yml

nano dynamic.yml
# Dynamic configuration
http:
  middlewares:
    nofloc:
      headers:
        customResponseHeaders:
          Permissions-Policy: "interest-cohort=()"
    secureHeaders:
      headers:
        sslRedirect: true
        forceSTSHeader: true
        stsIncludeSubdomains: true
        stsPreload: true
        stsSeconds: 31536000

    # UserName : admin
	# Password : qwer
    user-auth:
      basicAuth:
        users:
          - "admin:$apr1$tm53ra6x$FntXd6jcvxYM/YH0P2hcc1"

tls:
  options:
    default:
      cipherSuites:
        - TLS_ECDHE_ECDSA_WITH_AES_256_GCM_SHA384
        - TLS_ECDHE_RSA_WITH_AES_256_GCM_SHA384
        - TLS_ECDHE_ECDSA_WITH_AES_128_GCM_SHA256
        - TLS_ECDHE_RSA_WITH_AES_128_GCM_SHA256
        - TLS_ECDHE_ECDSA_WITH_CHACHA20_POLY1305
        - TLS_ECDHE_RSA_WITH_CHACHA20_POLY1305
      minVersion: VersionTLS12

5. Setting up Traefik and Ghost
Now go back to our main directory, i.e., the ‘website’ directory in my case, which you created at first.
cd ~/website
Now create a file called docker-compose.yml for editing.
nano docker-compose.yml
Paste the following:
# Traefik, Ghost, and MySQL
version: '3.3'

services:
  traefik:
    image: traefik:latest
    networks:
      - traefik
    ports:
      - 80:80
      - 443:443
    volumes:
      - /etc/localtime:/etc/localtime:ro
      - /var/run/docker.sock:/var/run/docker.sock:ro
      - ./data/traefik.yml:/traefik.yml:ro
      - ./data/configurations:/configurations
    environment:
	  - CF_API_EMAIL=
	  - CF_DNS_API_TOKEN=
    deploy:
      mode: replicated
      replicas: 1
      placement:
        constraints: [node.role == manager]
      labels:
      - "traefik.enable=true"
      - "traefik.docker.network=traefik"
      - "traefik.http.routers.traefik-secure.entrypoints=websecure"
      - "traefik.http.routers.traefik-secure.rule=Host(`traefik.yourdomain.com`)"
      - "traefik.http.routers.traefik-secure.service=api@internal"
      - "traefik.http.services.traefik-secure.loadbalancer.server.port=8080"

  ghost:
    image: ghost:4-alpine
    depends_on:
      - mysql
      - traefik
    networks:
      - traefik
      - backend
    volumes:
      - ghost_data:/var/lib/ghost
    environment:
      # see https://ghost.org/docs/config/#configuration-options
      database__client: mysql
      database__connection__host: mysql
      database__connection__user: root
      database__connection__password: secretpassword
      database__connection__database: ghost
      # this url value is just an example, and is likely wrong for your environment!
      url: https://yourdomain.com
      # contrary to the default mentioned in the linked documentation, this image defaults to NODE_ENV=production (so development mode needs to be explicitly specified if desired)
      #NODE_ENV: development
    deploy:
      mode: replicated
      replicas: 1
      placement:
        constraints: [node.role == manager]
      labels:
        - "traefik.enable=true"
        - "traefik.docker.network=traefik"
        - "traefik.http.routers.ghost-secure.entrypoints=websecure"
        - "traefik.http.routers.ghost-secure.rule=Host(`yourdomain.com`)"
        - "traefik.http.routers.ghost-secure.service=ghost"
        - "traefik.http.services.ghost.loadbalancer.server.port=2368"

  mysql:
    image: mysql:8.0
    command: --default-authentication-plugin=mysql_native_password
    environment:
      MYSQL_ROOT_PASSWORD: secretpassword
    networks:
      - backend
    volumes:
      - sql_data:/var/lib/mysql
    deploy:
      placement:
        constraints: [node.role == manager]

networks:
  traefik:
    external: true
  backend:
    external: true

volumes:
  ghost_data:
    external: true
  sql_data:
    external: true
Remember to set the environment variables. If you don’t know how to get your Cloudflare account’s API Email and DNS API Token, read this article from Cloudflare.
    environment:
	  - CF_API_EMAIL=
	  - CF_DNS_API_TOKEN=
Don’t close the file yet. You have to change a few parameters here.
Replace ‘traefik.yourdomain.com; with a subdomain.
- "traefik.http.routers.traefik-secure.rule=Host(`traefik.yourdomain.com`)"
Replace ‘secretpassword’ with a new password.
database__connection__password: secretpassword
Replace ‘https://yourdomain.com' with your URL.
url: https://yourdomain.com
Replace ‘yourdomain.com’ with a subdomain, or use the full domain.
- "traefik.http.routers.ghost-secure.rule=Host(`yourdomain.com`)"
Finally, replace ‘secretpassword’ with the password you set above on point two.
MYSQL_ROOT_PASSWORD: secretpassword
6. Creating and Starting The Services
Now everything is in place! Check your files if everything is in place and the variables are modified to your requirements.
Your file structure should be like this:
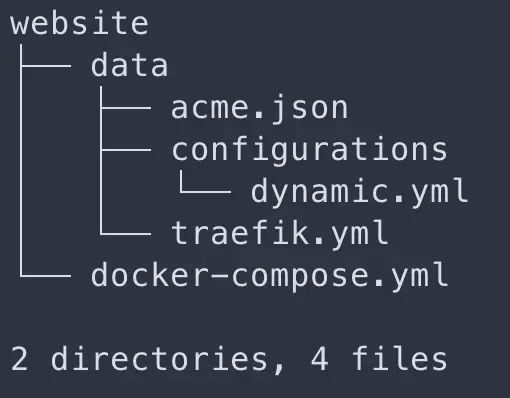
Now from this directory, run the command. You can change ‘site’ to anything you want.
docker stack deploy -c docker-compose.yml site
This takes a couple of a while to download the docker images and to get the SSL keys.
To list out the running services, run:
docker service ls
This lists the running services. If the REPLICAS are 0/1 wait for a few minutes, it might be preparing.
To check the status of individual services, run:
docker service ps <service name>
Replace <service name> with site, site_ghost or site_traefik or site_mysql.
To view the logs of individual services, run:
docker service logs -f <service name>
Hurray!! Now your site must be up and running. Visit the URLs you provided above for Traefik and Ghost. Follow me on Twitter - @narasimman_tech
