
Discourse is the one of the hot open source software these days. It’s a free and open source forum software co-developed by the co-founder of Stack Overflow, Jeff Atwood.
You probably have already seen Discourse forums in action. Many Linux distributions (like Manjaro and Ubuntu MATE) and software companies (like Cloudflare) are using it to provide support to their users. Even we have a Linux support forum for It’s FOSS set up on Discourse.
I am not going to go in detail of how great Discourse is. I am going to show you how to easily install a Discourse forum on a Linux server using Digital Ocean’s famous one-click install.
Why not go with the managed hosting provided by the Discourse developers? You can surely do that but a starting price of $100 per month is not affordable by everyone. Digital Ocean on the other hand costs only $10 per month.
Digital Ocean is one of the best cloud server provider. It has a marketplace that allows you to install a Linux server pre-configured to run as a specific service.
Want a website running on WordPress? In just a few clicks, you’ll have it ready. Digital Ocean also has one-click install of Discourse forum and in my opinion, it’s one of the easiest way to get a Discourse forum running in around 30 minutes (taking DNS changes into account).
Setting up a Discourse forum with Digital Ocean cloud server
If you don’t have an account already, please sign up for a Digital Ocean account. You’ll get at east $10 free credits if you sign up with our link.
In this tutorial, I am going to setup a Discourse forum on a subdomain of my website linuxhandbook.com. The forum will be set on forum.linuxhandbook.com
You can follow the same tutorial to setup Discourse on a full domain like linuxhandbookforum.com. Just the DNS part will be slightly different, rest remains the same.
I made a video of the entire procedure so that will be easy for you to see things in action.
Step 1: Create a Droplet with Discourse Forum
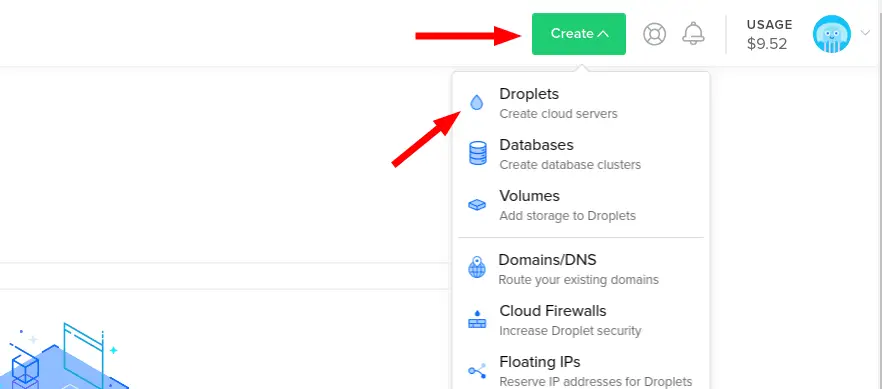
Click on create droplet. Droplet is basically a Linux server running in a VM.
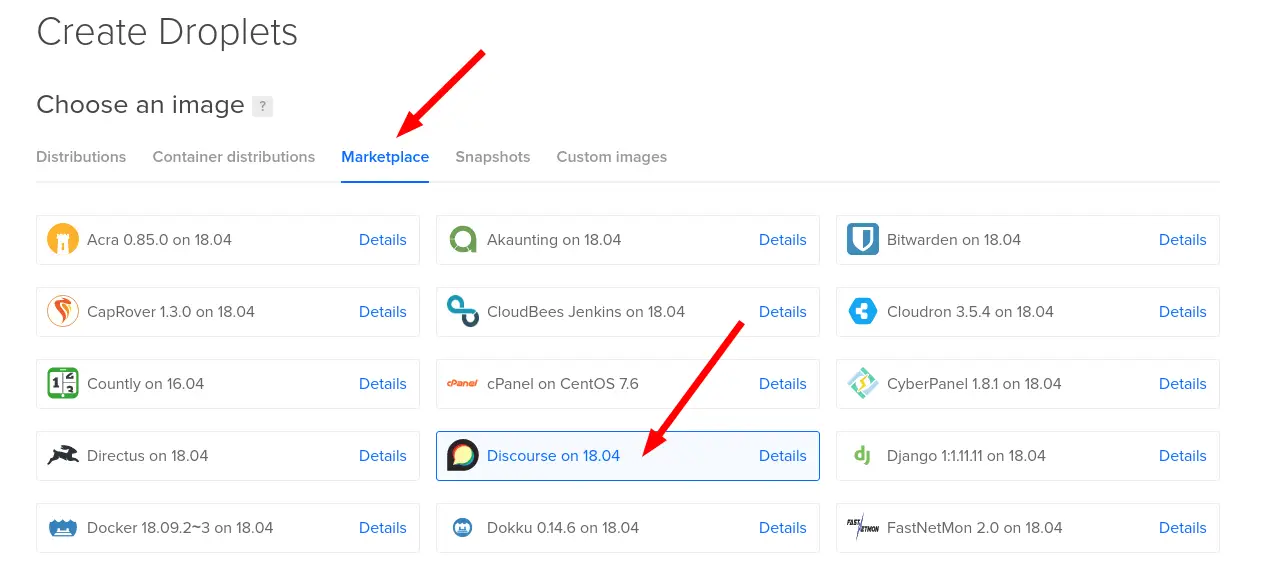
Go to Marketplace and select Discourse. You’ll notice that the one-click install of Discourse Forum is only available with Ubuntu 18.04 LTS.
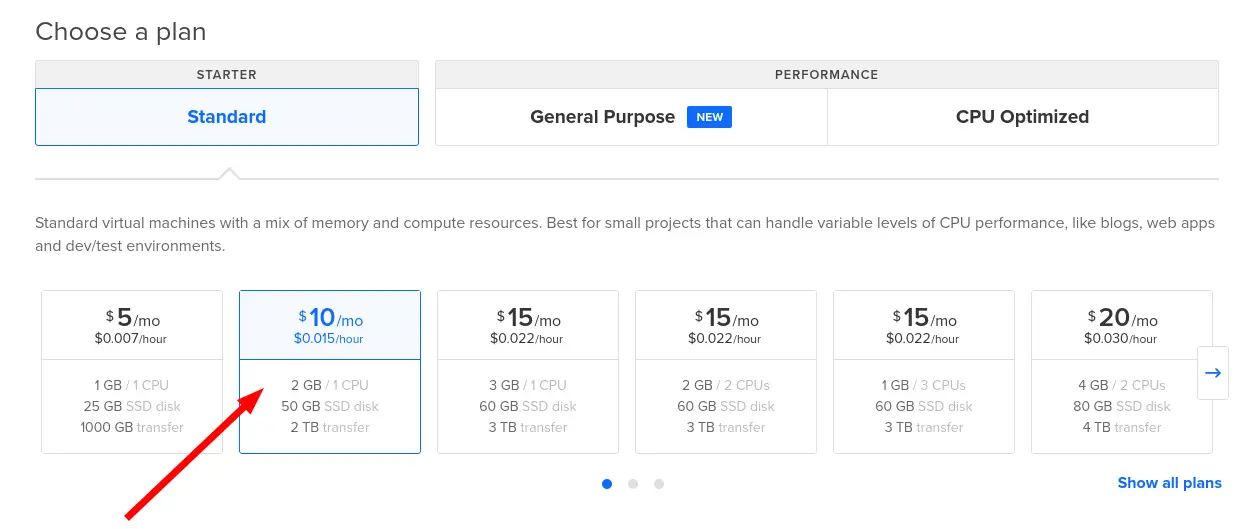
Choose a plan here. The pricing depends on the server configuration. The minimum plan should be $10 per month for Discourse install. I have found that the $5 plan doesn’t work with Discourse.
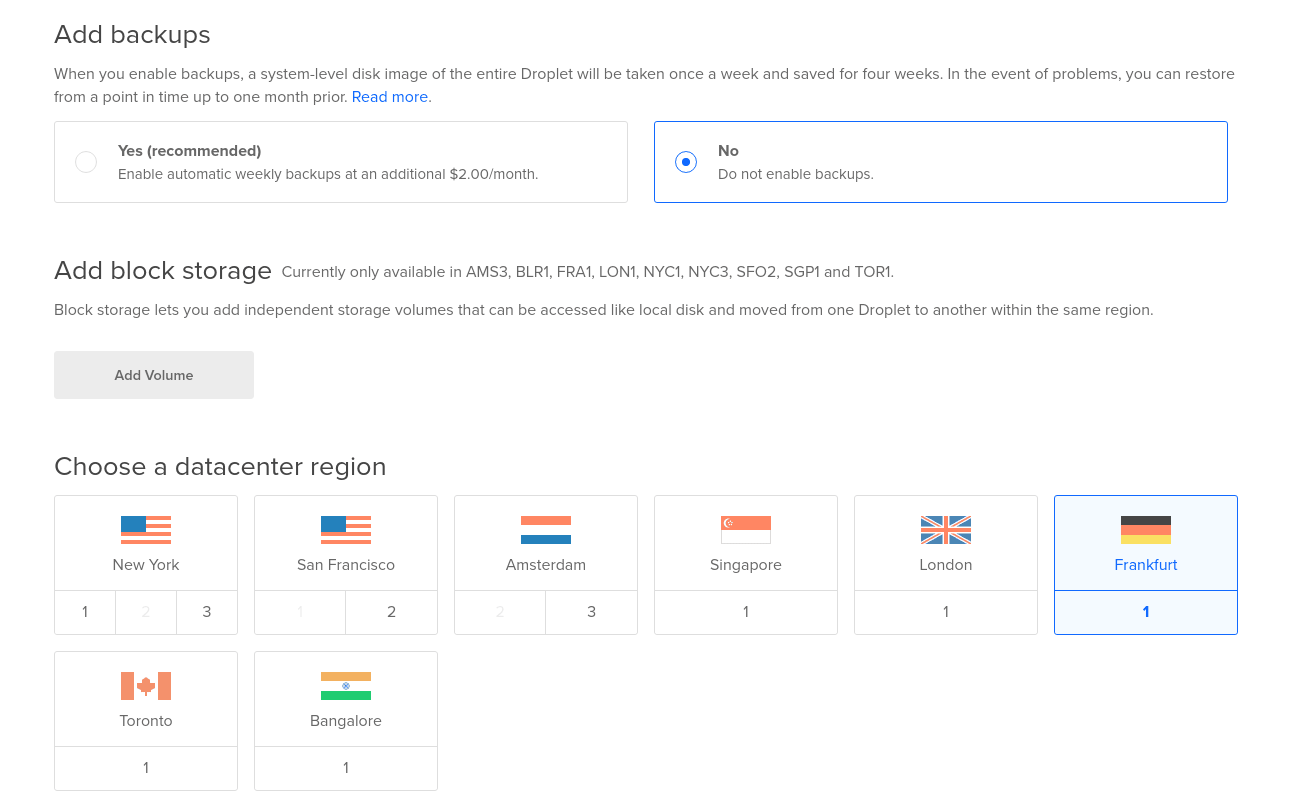
You have the option to buy additional storage and backup plans. All of these optional services will cost you a few dollars more per month. I would not advise for the extra storage but backups are crucial. So either add the backup to your plan or make your own backup using rsync command in Linux.
Next, select a datacenter region of your choice. A good practice is to keep your server close to the majority of your site visitors. You may also consider the ‘privacy law’ in each of those countries.
You can add your SSH key if you want. This will allow you to log into the server from your system without password. I hope you know how to enable SSH on Linux.
Change the hostname to easily recognize the server or leave it as it is. In the end. hit ‘Create’.
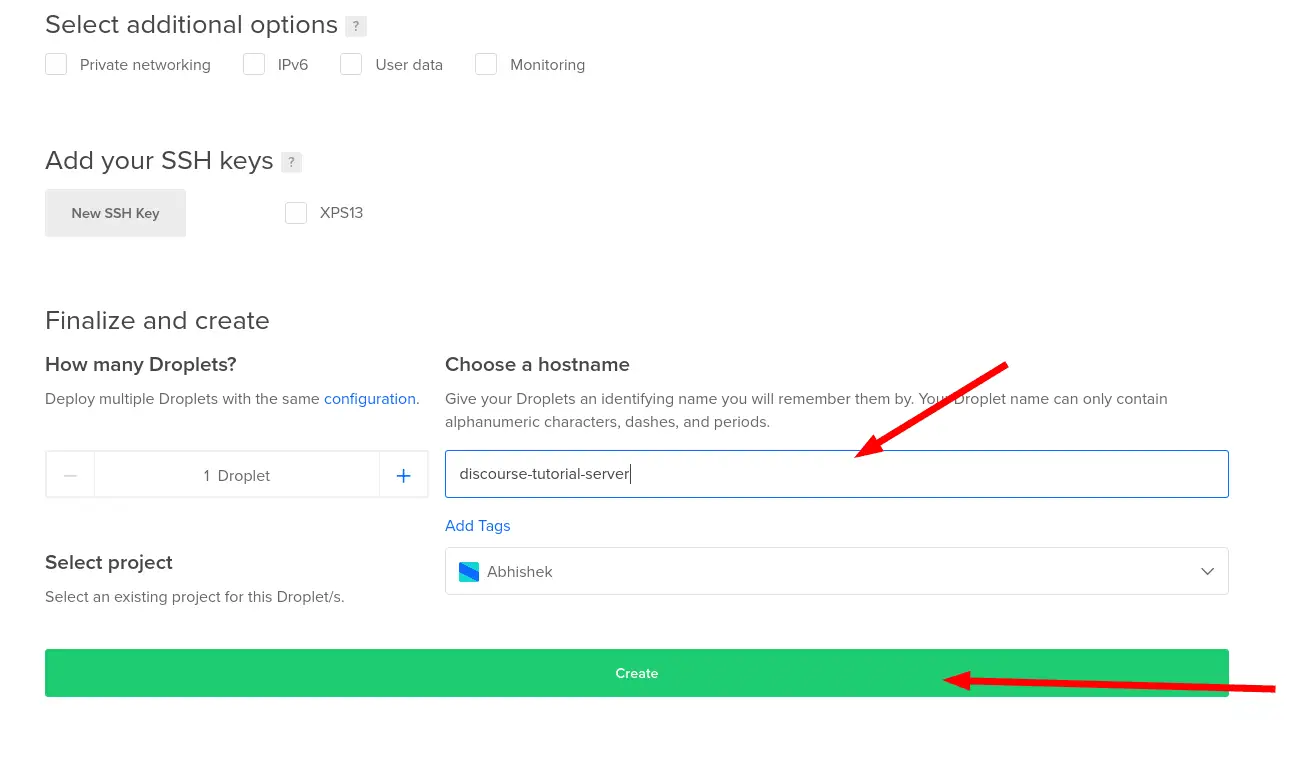
It will take around 2 minutes and your droplet i.e. your Linux server will be deployed. Your Discourse Forum is not ready yet because you need to do some more work on it.
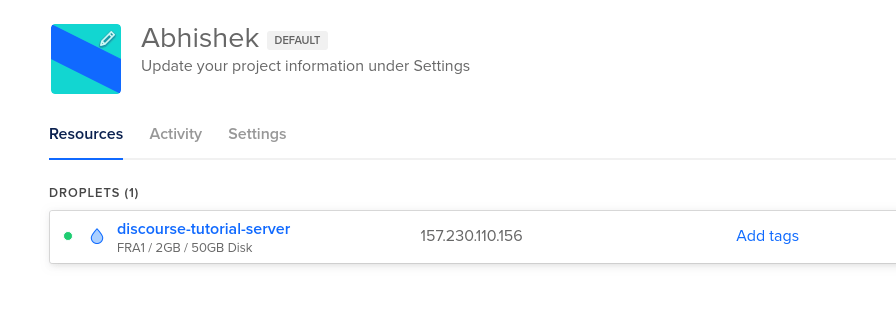
You should receive an email on the address registered with your Digital Ocean account. This email consists the server details such as its hostname, IP address, username and password. You’ll need this information to log on to your system but you’ll see that part later in this tutorial.
Step 2: Set up an SMTP Server for your Discourse forum
You’ll need to setup an SMTP server so that you can send emails from your server. This is an essential part of setting up Discourse forum. You won’t be able to create any member on the forum if that user never receives an email for activating his/her account.
You can use an SMTP service that provides some free emails per month. I use Mailgun and they provide around 10,000 emails free each month. I am going to use the same in my tutorial here.
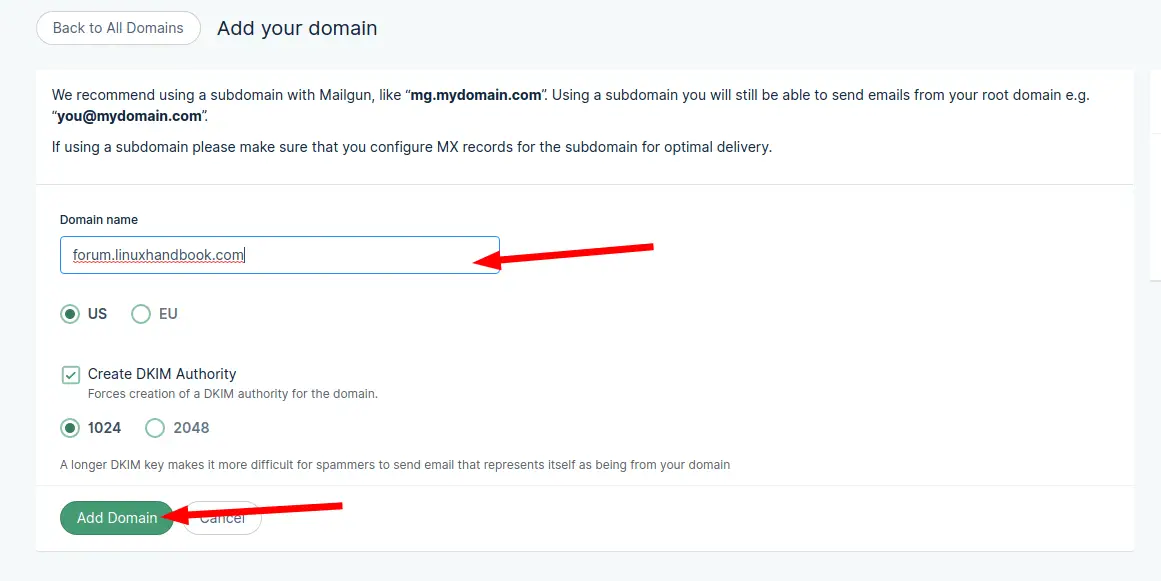
I am going to put this discourse forum on a subdomain of my website, forum.linuxhandbook.com
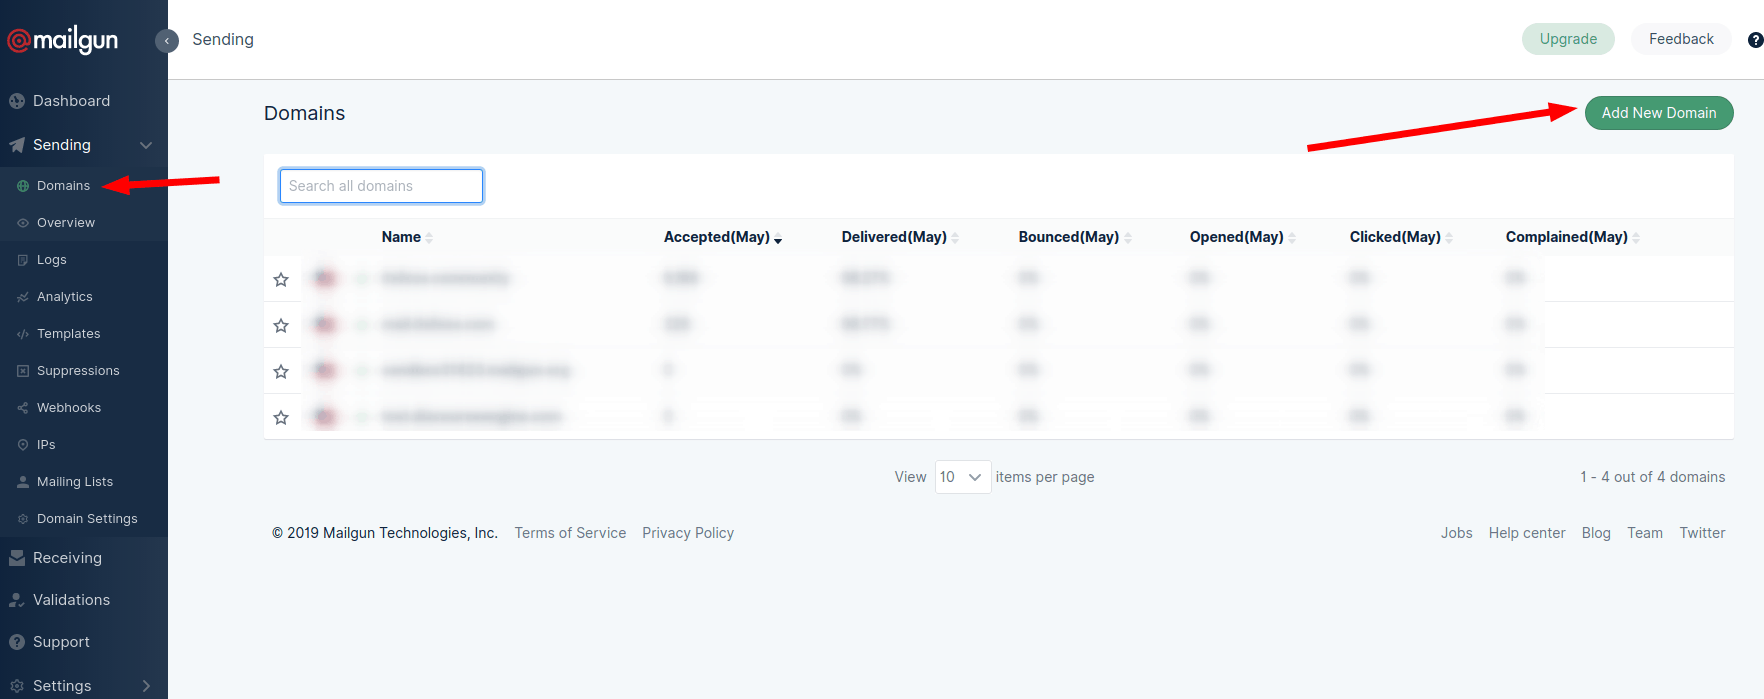
Sign up for Mailgun first and then log in to it. From the left sidebar, select Domains and the click Add New Domain.
Add the details of the domain or sub-domain you are going to use for your Discourse forum.
Once your domain is added, it will give you a few records to be added to your DNS record.
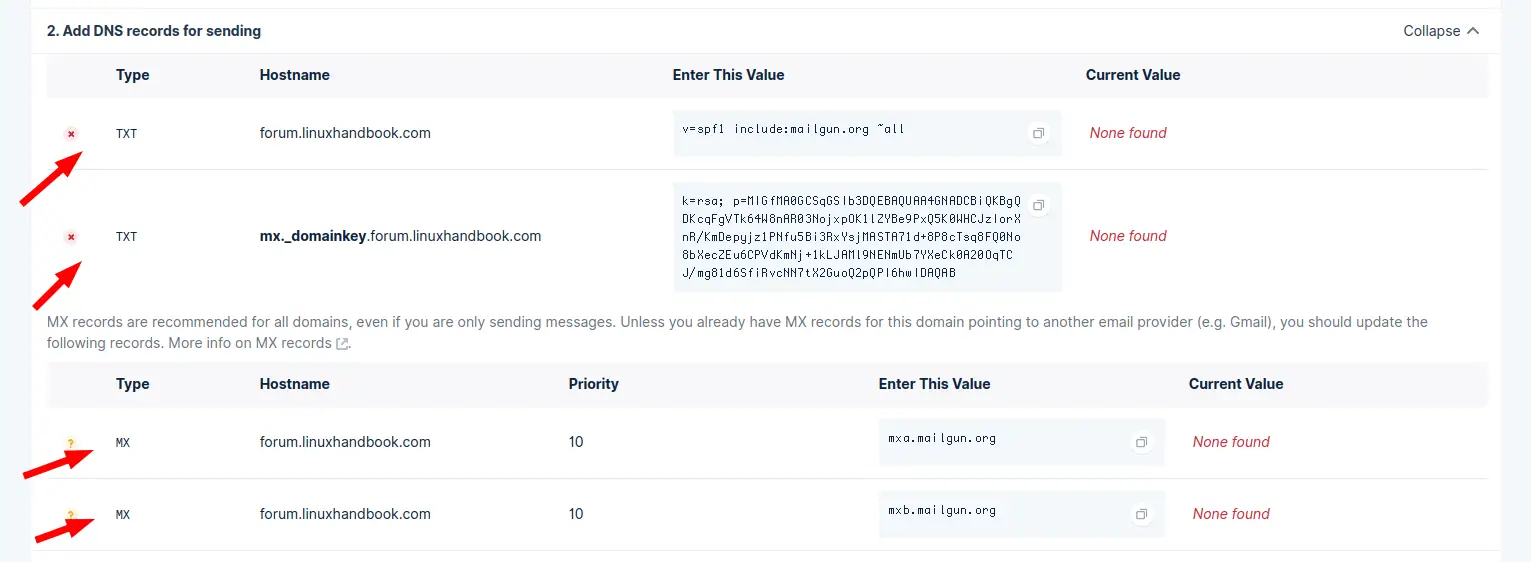
Go to your DNS registrar where ever it is and then you add these record one by one. I am using NameCheap here but the steps should be nearly the same.
Log in to your DNS server provider’s account and edit the DNS records.
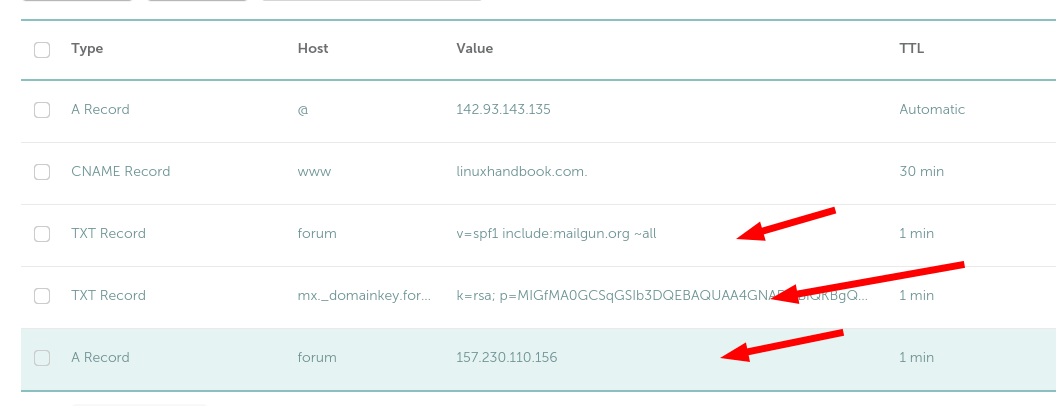
One thing to note here is that if you are using @ with your IP address in the DNS record, you should remove main domain name while adding the DNS records provided by MailGun. Which means instead of add TXT record for forum.linuxhandbook.com, add it for forum (see the image below).
You’ll also have to specify your own domain/subdmain (forum.linuxhandbook.com in this case) to the new IP address of your Digital Ocean server.
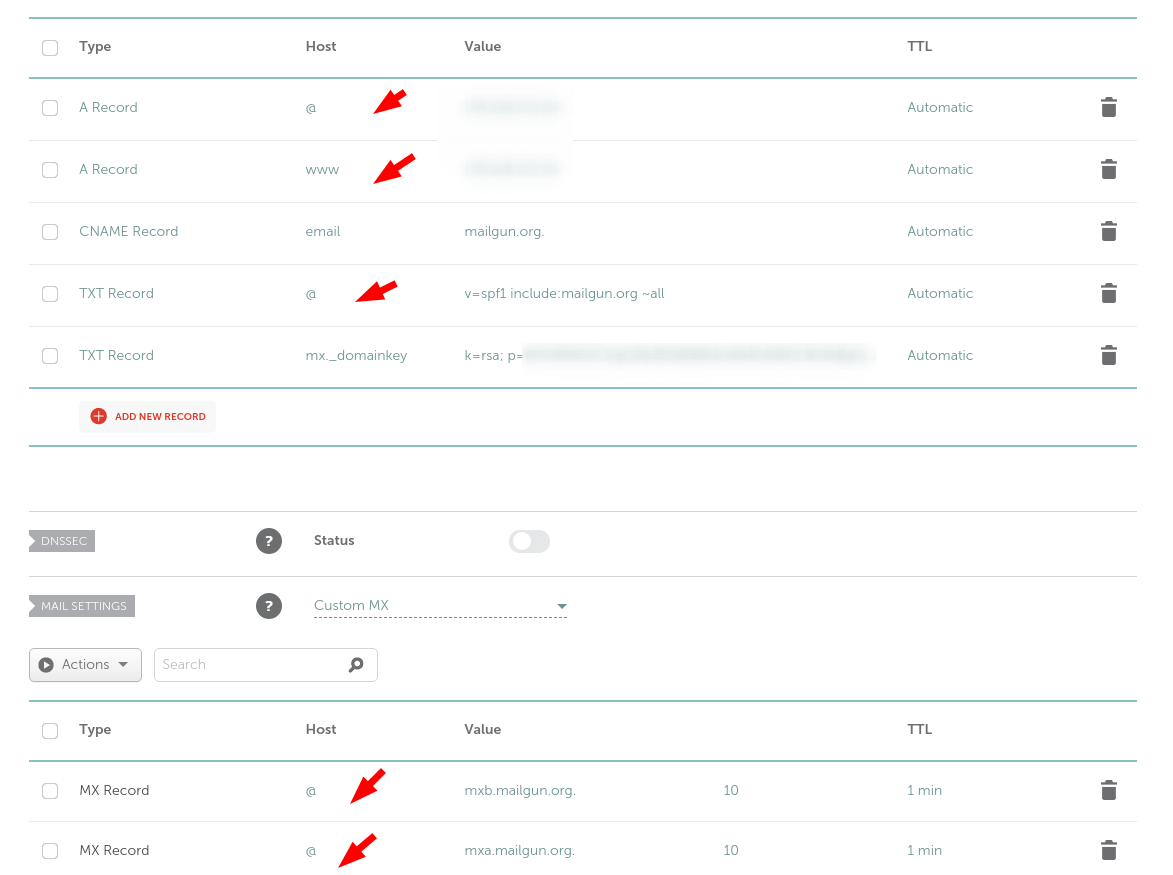
Similarly, add the MX record for the email:

DNS setting for a new domain (instead of subdomain)
If you are NOT using a sub-domain, your DNS setting should like this.
Now that you have changed everything, go back to Mailgun and see if it has identified the DNS changes you made. Click on the Verify DNS Settings in Mailgun.

Normally, it should take around 5 minutes but you know the DNS can be a prick and may take hours sometimes.
If your domain is verified with Mailgun, you should receive an email from them. It should also reflect in your Mailgun account. If you don’t see the domain in Mailgun ever after verification, try logging out and log in back in Mailgun account.
Now that you have successfully added the SMTP server in your DNS, you need to get the SMTP credentials and use it in the Discourse installation.
Go to your domain in Mailgun and click on Domain Settings in the left sidebar. Note down the SMTP server name, port and the username.
The default username is [email protected] and the password is the same as your Mailgun account. This account and password is saved in clear text in the YML file of your Discourse install. If you are not comfortable saving your Mailgun account password, I advise that you add a new SMTP user for using it in the Discourse setup.
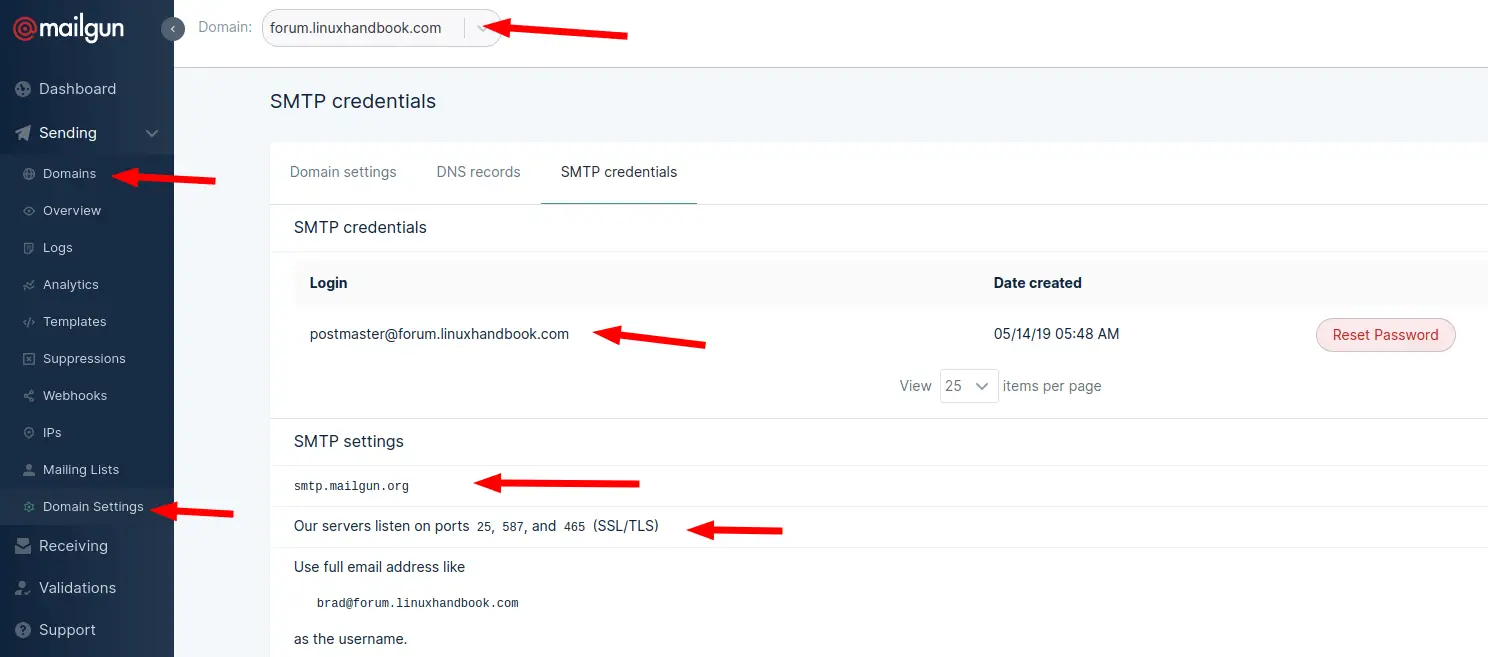
Note down the SMTP settings from here. We need to use it now.
Step 3: Configure the Discourse forum (with free SSL)
SSH into your Linux server that you created via Digital Ocean droplet in step 1.
ssh root@IP_Address_of_Your_ServerOn the first login, you’ll be forced to change the root password. First enter the default password and then enter the new password twice.
Once you do that, it will ask you to configure the Discourse installation. You need to have the following information ready at this time:
- Email address for Discourse admin
- Domain/sudomain that you want to use
- SMTP settings that you had noted down in last step
- An email address for the free SSL setup via Let’s Encrypt (can be same as admin email for discourse)
Press enter to start the configuration:
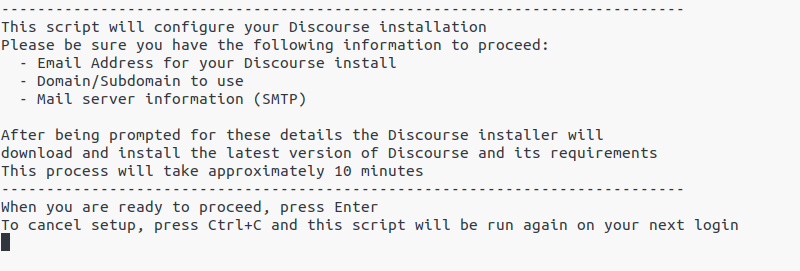
Now it will ask you to provide the details one by one for configuring the Discourse server. You have the information handy so you can easily enter all the details.
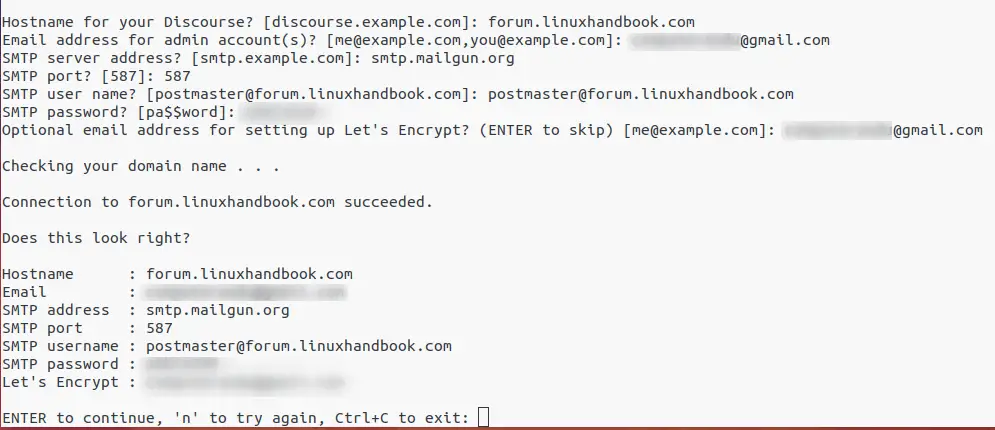
Here’s the text form that I used in my setup (if you cannot read the text in the image above). I strongly advise you to add an email address for Let’s Encrypt. This will setup SSL for free for you and your forum will have HTTPS enabled by default.
Hostname for your Discourse? [discourse.example.com]: forum.linuxhandbook.com
Email address for admin account(s)? [[email protected],[email protected]]: [email protected]
SMTP server address? [smtp.example.com]: smtp.mailgun.org
SMTP port? [587]: 587
SMTP user name? [[email protected]]: [email protected]
SMTP password? [pa$$word]: your_password
Optional email address for setting up Let's Encrypt? (ENTER to skip) [[email protected]]: [email protected]
With this much information entered, it will start building the Discourse setup. You’ll see a lot of output on the screen and some of it may seem like error or warning. Don’t worry! Wait for the entire process to be over to judge if things went fine or not. The build process may take up to 5 minutes.
If everything goes fine, you should see a message like:
Discourse is now installed. Log into your admin account in a browser to continue configuring Discourse.Step 4: Test your Discourse installation
Now that you have everything set, it’s time to test your Discourse forum.
Enter the URL of your Discourse forum in a web browser (forum.linuxhandbook.com in my example).
You’ll notice that it is automatically redirected to https://forum.linuxhandbook.com/ and you should see a congratulatory message on the screen.

The testing is not complete yet. You have to test if the mailing system is working fine or not. Click on register in the above screen and then enter a password for your admin account of your Discourse forum:
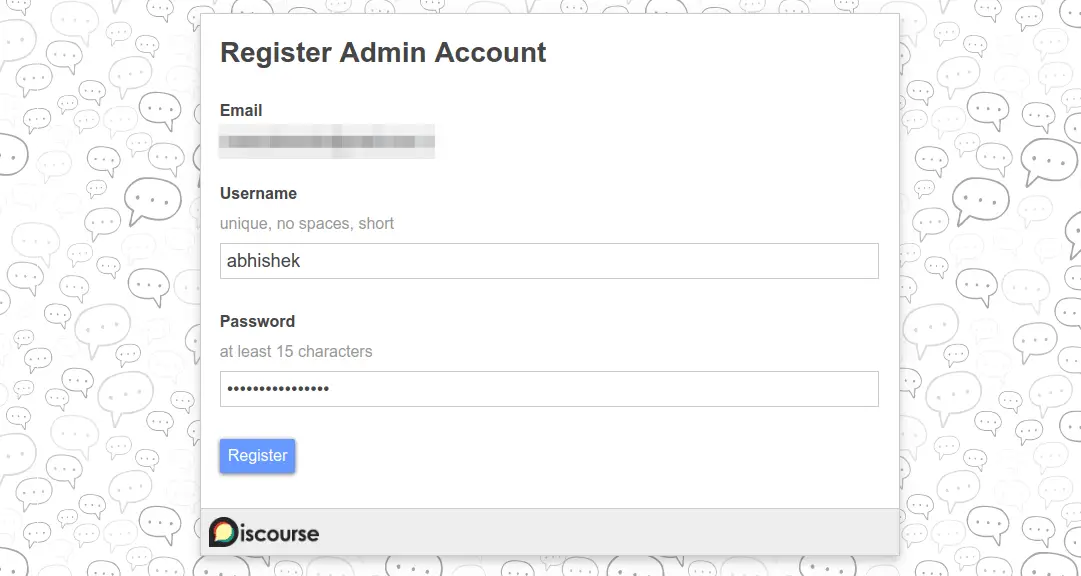
When you hit register, it will send a email on the specified email address to activate the account. If you receive this email, then congratulations! You have successfully installed and configured Discourse forum on cloud server.
Once you have successfully installed a Discourse Forum, I advise you to read the READ ME FIRST: Admin Quick Start Guide. It’s already a post on your newly installed forum and this will teach you some basic stuff about managing the Discourse forum. The official Discourse forum is an excellent place to find answers to your questions.
I hope this tutorial was easy to follow and you were successful in installing a fully-functioning Discourse forum with HTTPS. If you face any issues with Discourse installation, feel free to leave a comment below and I’ll try to help you out.

