> ## Content Index
> Fetch the complete content index at: https://linuxhandbook.com/llms.txt
> Use this file to discover other available public pages before exploring further.
# Create a Web Server with NGINX and Secure it Using Certbot
- URL: https://linuxhandbook.com/ngnix-certbot/
- Published: 2023-03-14T12:16:46.000Z
- Updated: 2023-03-14T12:16:46.000Z
- Description: Certbot makes the SSL certificate deployment and renewal such an effortless process. Learn how to use certbot with Ngnix.
- Author: Sagar Sharma
- Tags: Tutorial
HTTPS is not a luxury anymore. You must have it on your website.
Let's Encrypt project has made it easier to deploy SSL certificates for free but it needs to be renewed after every few months.
[Certbot](https://certbot.eff.org/?ref=linuxhandbook.com) saves you the trouble as it automates deploying new certificates and renewing the existing ones.
You can comfortably use certbot with Nginx. Wondering how?
In this tutorial, I will walk you through the following:
- Installing NGINX
- Adding server block
- Installing and using certbot
Sure, you can skip any section if it is already configured.
⚠️
To follow this tutorial, you'd have to have a registered domain name.
In this tutorial, I will be using AWS VM. But you can use any of your favorite ones.
Just make sure to have a public IP; otherwise, you won't be able to use it as a web server (a mistake I made previously).
So let's start with the installation of NGINX.
## 1\. Installing NGINX on Ubuntu
As the NGINX is available on the default repository of Ubuntu, it can easily be installed with the following command:
```
sudo apt install nginx
```
To verify the installation, check the installed version:
```
nginx -v
```

Start the NGINX service and make it start at every boot using the following:
```
sudo systemctl start nginx && sudo systemctl enable nginx
```
If you are using the UFW firewall (which you must), allow the NGINX to pass through it:
```
sudo ufw allow 'nginx full'
```
## 2\. Setup NGINX Server Block
To set up, up the NGINX server block, use the following command and replace the `sudoersagar.de` with your own domain:
```
sudo mkdir -p /var/www/sudoersagar.de/html
```
Next, [update the owner of the directory to the current user using the chown command](https://linuxhandbook.com/chown-command/):
```
sudo chown -R $USER:$USER /var/www/sudoersagar.de/html
```
And [change the permissions of the directory using the chmod command](https://linuxhandbook.com/chmod-command/):
```
sudo chmod -R 755 /var/www/sudoersagar.de
```
Now, let's create a sample HTML index page:
```
nano /var/www/sudoersagar.de/html/index.html
```
My index page contains the following and you can use the same too:
```
Greetings from Sagar Sharma
Success! The sudoersagar server block is working!
```
[Save changes and exit from the nano](https://linuxhandbook.com/nano-save-exit/) text editor.
Next, you will have to make a directory named `sites-enabled`:
```
sudo mkdir /etc/nginx/sites-enabled
```
Now, let's create a simple NGINX server block:
```
sudo nano /etc/nginx/sites-available/sudoersagar.de
```
```
server {
listen 80;
root /var/www/sudoersagar.de/html;
index index.html;
server_name sudoersagar.de www.sudoersagar.de;
location / {
try_files $uri $uri/ =404;
}
}
```
And in case, you have no idea what is being used on the server block, here's a brief explanation:
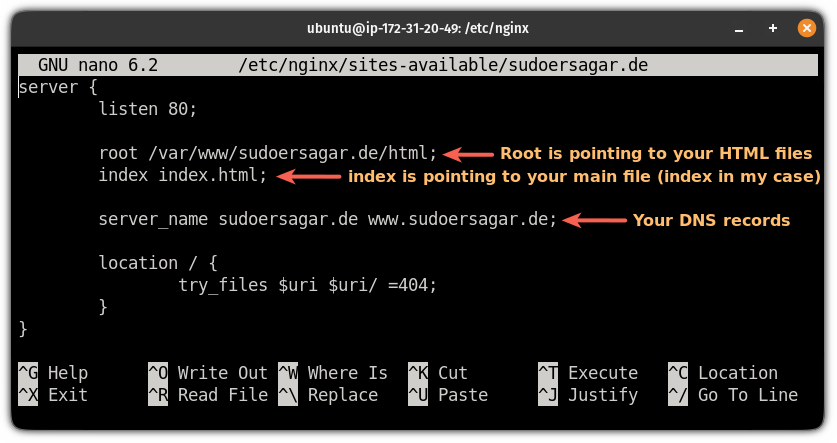
Save changes and exit from the text editor.
To enable your site, you will have to [create a soft link](https://linuxhandbook.com/symbolic-link-linux/) from `sites-available` to `sites-enabled`:
```
sudo ln -s /etc/nginx/sites-available/sudoersagar.de /etc/nginx/sites-enabled/
```
Finally, test the configuration file using the following command:
```
sudo nginx -t
```
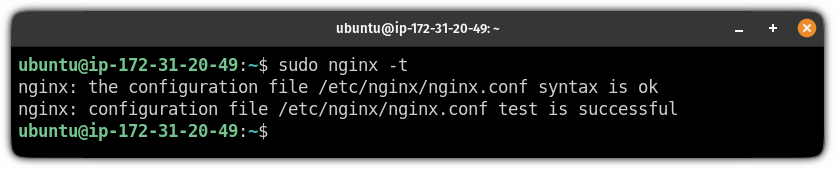
If everything is done correctly, you will have the same output as shown above.
Now, reload the NGINX configuration:
```
sudo nginx -s reload
```
## 3\. Create DNS A Record
By the DNS A record, you can map the domain with the NGINX public IP address.
The process is quite straightforward for most providers. Here, I'm using google domains.
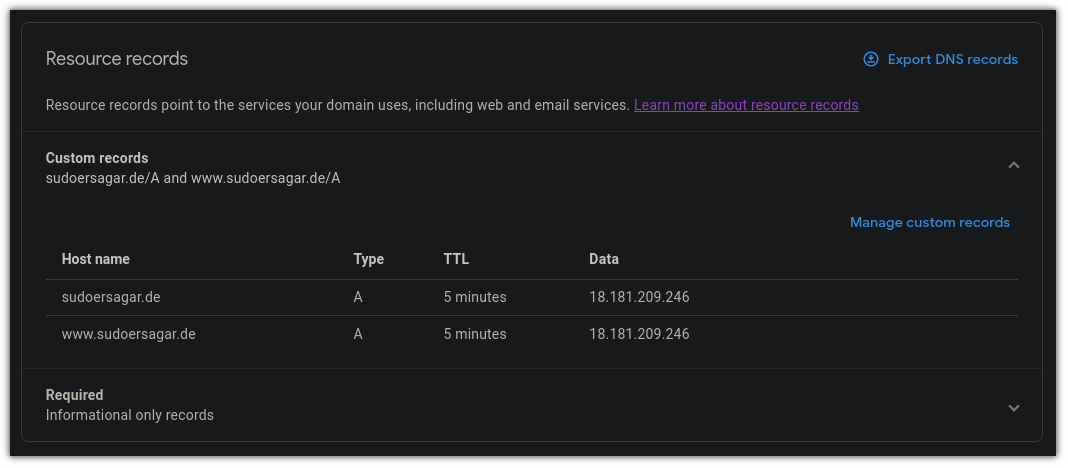
Choose,
- `A` as a type
- `300` for TTL (Time To Live)
- Add public IP address in `data` field
- Do the same for `www` hostname
Save the record.
It takes time to reflect on the changes (2 mins in my case).
To check, you can [use the dig command](https://linuxhandbook.com/dig-command/) with the domain name:
```
dig sudoersagar.de
```
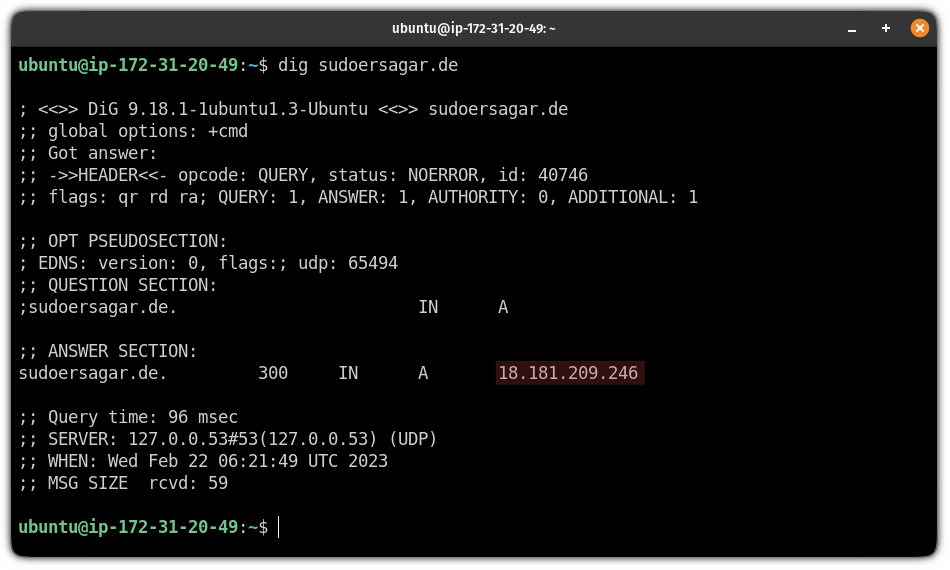
And if it is up and running, it will show the IP address you used with the domain.
## 4\. Setting up certbot
To set up certbot, I will be using snaps (a package manager developed by Canonical).
And the first step is to remove any existing certbot package on the Ubuntu system:
```
sudo apt remove certbot
```
But if you are using anything apart from Ubuntu, you will have to configure snaps manually.
And for that purpose, we have a dedicated tutorial:
[How to Install and Use Snap in Various Linux DistributionsSnaps are Canonical’s way of providing a cross-distribution package management system. In this article, we will see how to install and use snaps in various Linux distributions.It's FOSSAbhishek Prakash](https://itsfoss.com/install-snap-linux/?ref=linuxhandbook.com)
Once you are done with the setup, use the following command to install certbot:
```
sudo snap install --classic certbot
```
And finally, create a symlink to the certbot directory:
```
sudo ln -s /snap/bin/certbot /usr/bin/certbot
```
To verify the installation, check the installed version of certbot:
```
certbot --version
```

## 5\. Install certificates
⚠️
You can request 50 certificates per week (maximum).
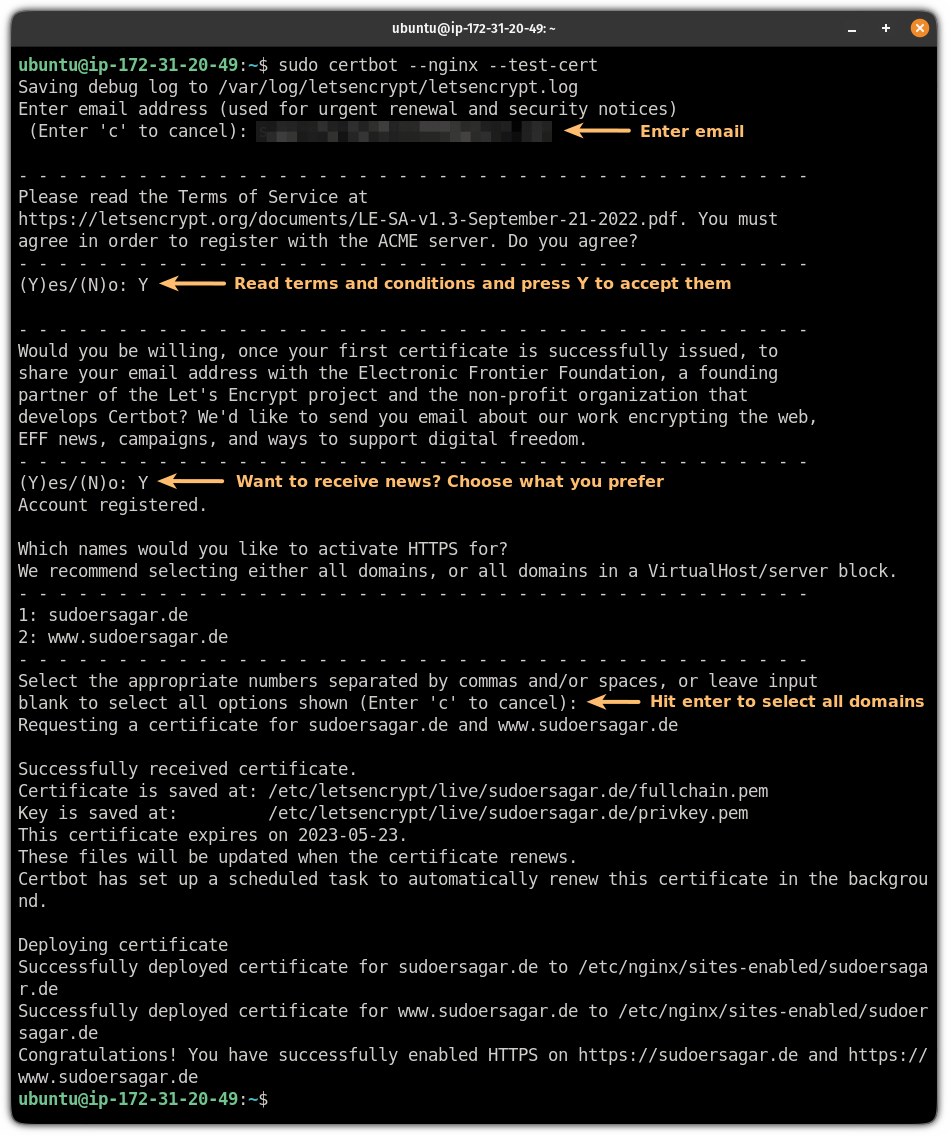
As you can request a limited number of certificates per week, using the test certificate is the best practice to find possible errors.
To install testing certificates, use the following command:
```
sudo certbot --nginx --test-cert
```
And it will ask the following:
- Enter your email address to receive urgent renewals and change in policies.
- Use the link to download the PDF of the terms and conditions and press `Y` and hit enter if you agree.
- It is optional to subscribe to the mailing list by which you will receive newsletters.
- It will list available domain names for the request. You can select one or two manually. And if you want certificates for every domain listed, leave it blank and hit enter (that's what I did).
If you find no errors, you can proceed with installing the actual certificate:
```
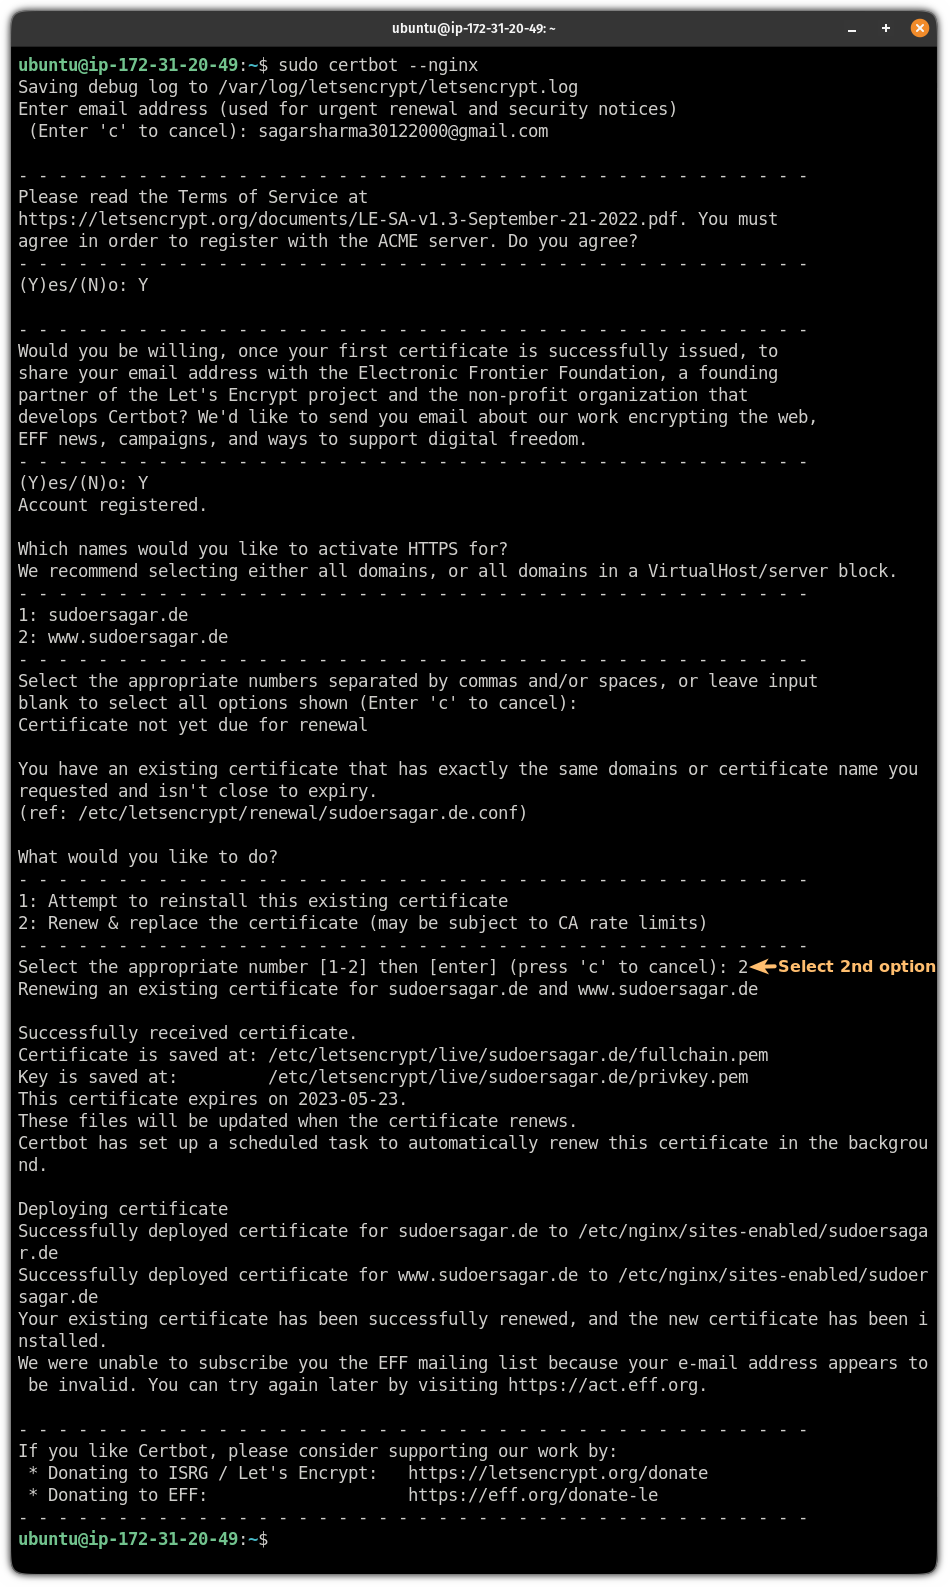
sudo certbot --nginx
```
It will ask the same set of questions but will add one different question.
As you already have installed the test certificates, you have two choices:
- Reinstall the existing certificates (test certificates in my case)
- Renew and replace certificates
Choose the 2nd option and hit enter:
That's it! You have secured your website with HTTPS.
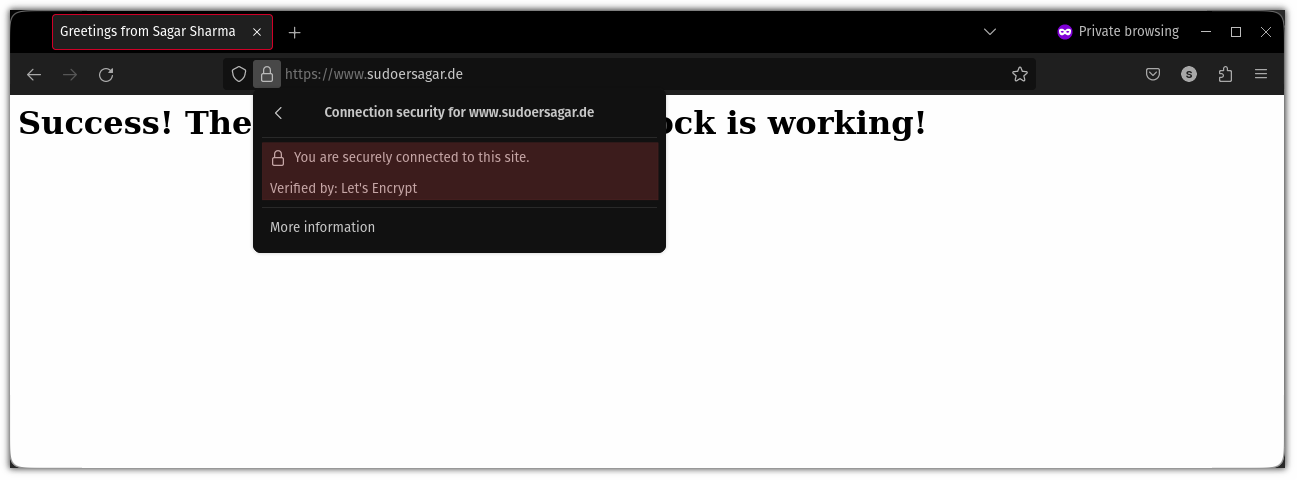
And now, if you check, the connection to the site will be secured:
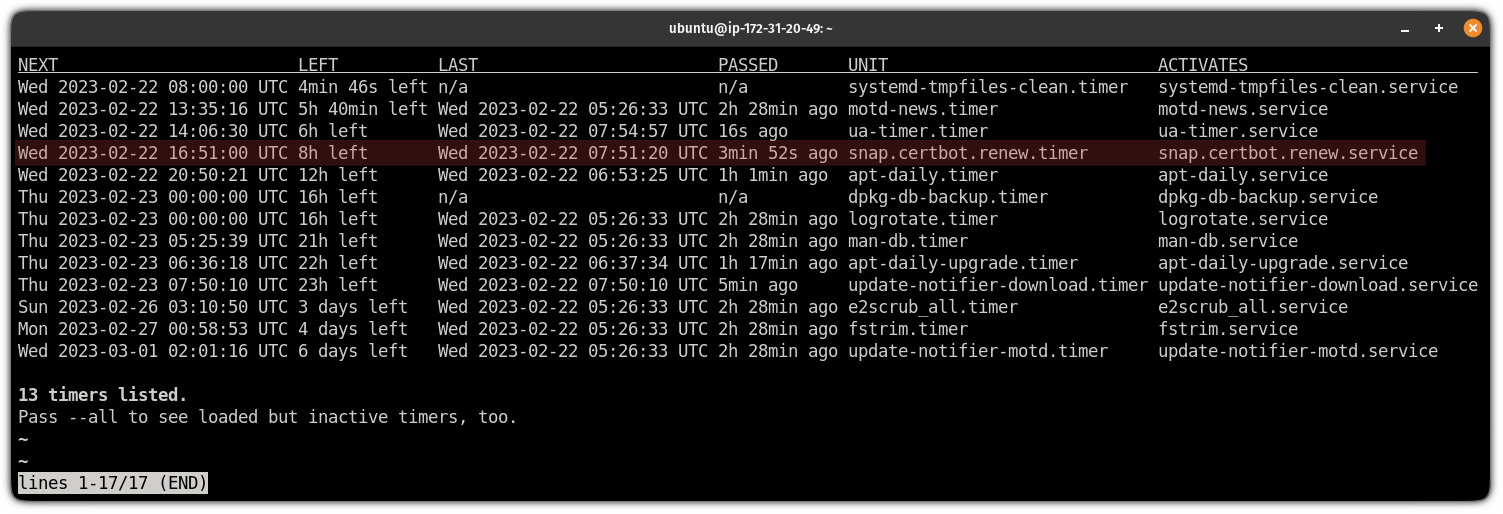
Certbot is scheduled to run every 12 hours and will renew certificates if the existing one is expired. You can check the times using:
```
systemctl list-timers
```
And if you want to update them manually, you can use the following command:
```
sudo certbot renew
```
## Want to live patch your Ubuntu server?
Being one of the most powerful OS, you can live patch your Ubuntu server without rebooting.
Yep, it's that powerful. Want to learn how? Here you have it:
[How to Enable Livepatching on Ubuntu ServerTired of rebooting your Ubuntu server after every security upgrade? You may enable live kernel patching and forget about reboots altogether.Linux HandbookAbhishek Prakash](https://linuxhandbook.com/livepatch-ubuntu-server/)
I hope you will find this guide helpful.
Let me know if you encounter any errors while executing the given steps.
Also, if you have any suggestions on what I should cover next, let me know in the comments.